Custom Shader Data for Vehicles
中文 | English
Run this command at the repository root to replay the examples through the local Unity MCP. The command also captures screenshots in both languages.
python Docs/Manual/manual/tools/tutorials.py run custom-shader-data --capture
Click to expand MCP actionsClick to collapse MCP actions
Prepare the teaching sample. The recipe provides ${variables}.
{
  "variables": {
    "package": "${fixture}/Docs_${runId}_Package.asset",
    "pipeline": "${fixture}/Docs_${runId}_Pipeline.asset",
    "shaderData": "${fixture}/Tutorial_CustomShader.asset",
    "packageGuid": "4ccfd3f8-eabc-44d6-b599-82486dbd4604"
  },
  "calls": [
    {
      "tool": "invoke",
      "arguments": {
        "path": "static:UnityEditor.AssetDatabase/CreateFolder",
        "args": [
          "${fixtureParent}",
          "${folder}"
        ]
      },
      "expect": {
        "contains": "(String)"
      }
    },
    {
      "tool": "invoke",
      "arguments": {
        "path": "static:UnityEditor.AssetDatabase/CreateAsset",
        "args": [
          "@static:UnityEngine.ScriptableObject/CreateInstance(ShanghaiWindy.Core.ModPackageData)",
          "${package}"
        ]
      },
      "expect": {
        "contains": "OK:"
      },
      "phase": "build"
    },
    {
      "tool": "invoke",
      "arguments": {
        "path": "static:UnityEditor.AssetDatabase/CreateAsset",
        "args": [
          "@static:UnityEngine.ScriptableObject/CreateInstance(ShanghaiWindy.Core.ModPackageBuildPiplineData)",
          "${pipeline}"
        ]
      },
      "expect": {
        "contains": "OK:"
      },
      "phase": "build"
    },
    {
      "tool": "inspect_set",
      "arguments": {
        "path": "asset:${package}/localizedModName/defaultName",
        "value": "Tutorial Package"
      },
      "expect": {
        "contains": "OK:"
      },
      "phase": "build"
    },
    {
      "tool": "inspect_set",
      "arguments": {
        "path": "asset:${package}/localizedDescription/defaultName",
        "value": "Documentation teaching package"
      },
      "expect": {
        "contains": "OK:"
      },
      "phase": "build"
    },
    {
      "tool": "inspect_set",
      "arguments": {
        "path": "asset:${package}/author",
        "value": "Documentation"
      },
      "expect": {
        "contains": "OK:"
      },
      "phase": "build"
    },
    {
      "tool": "inspect_set",
      "arguments": {
        "path": "asset:${package}/supportURL",
        "value": "https://doc.game.windyverse.net/"
      },
      "expect": {
        "contains": "OK:"
      },
      "phase": "build"
    },
    {
      "tool": "inspect_set",
      "arguments": {
        "path": "asset:${package}/guid",
        "value": "${packageGuid}"
      },
      "expect": {
        "contains": "OK:"
      },
      "phase": "build"
    },
    {
      "tool": "inspect_set",
      "arguments": {
        "path": "asset:${pipeline}/linkedModPackage",
        "value": "@asset:${package}"
      },
      "expect": {
        "contains": "OK:"
      },
      "phase": "build"
    }
  ]
}
Use this tutorial when a vehicle needs a shader and material that the built-in shader types do not provide. A CustomShaderData asset stores the custom Material plus channel-name mappings, and CoreRPMatComponent selects it per renderer material slot at runtime.
A custom shader is a Unity shader project of its own. If the Unity Material, Shader Graph or URP/HDRP basics are new to you, read those first; this page only covers how Panzer War plugs your material into a vehicle.
1. Prepare the materials
- Build and test the Shader Graph / shader in the target render pipeline (URP or HDRP), not in the other one.
- Create one Material per pipeline that uses that shader. The URP material and the HDRP material are separate assets with separate pipeline requirements; a material packed for HDRP cannot serve URP.
- Keep the source vehicle textures (albedo, normal, mask) and base colour out of the custom shader defaults. The game writes them back at runtime under the channel names you configure, so the shader must expose those names.
2. Create the Custom Shader Data
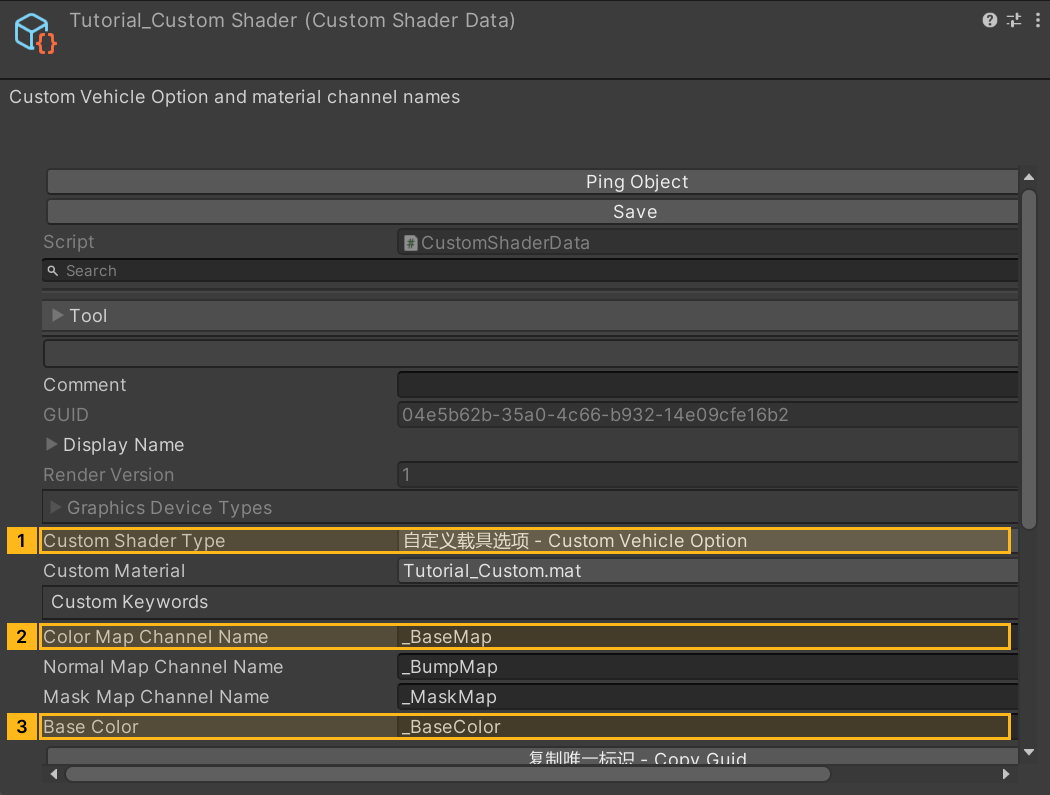
In the Project window choose Create > A Panzer War - 装甲纷争 > C Config - 配置 > Custom Material - 自定义材质 to create a CustomShaderData asset.
The inspector of that asset (CustomShaderDataEditor) fills guid automatically when the asset is opened, and provides:
- 复制唯一标识 - Copy Guid: copies the generated
guidto the clipboard. This is the identifier you paste into the component later. - 创建新的唯一标识 - Create new guid: clears the guid and lets it regenerate. Every reference to the old guid breaks, so only do this before the data is referenced by vehicles or another mod.
Assign your tested Material to Custom Material (overrideMaterialPath) by picking it from the material dropdown. This is the material whose properties are copied onto the vehicle material.
Default vs Custom Vehicle Option
customShaderType has two values:
- 默认 - Default (
Default) showsoverrideMaterialPathandcustomKeywords. The loader can still fill the vehicle's texture and color inputs through the default channel names. - 自定义载具选项 - Custom Vehicle Option (
VehicleOption): additionally shows the channel names the game uses when it restores the vehicle's own maps and colour:
| Field | Meaning | Default |
|---|---|---|
customMainTexName |
Channel the vehicle albedo map is written to | _BaseMap |
customNormalTexName |
Channel the vehicle normal map is written to | _BumpMap |
customMaskTexName |
Channel the vehicle mask map is written to | _MaskMap |
customBaseColor |
Channel the vehicle base colour is written to | _BaseColor |
Change these only when your shader uses different property names. The names must match the shader exactly, including case.
3. Configure CoreRPMatComponent
- Add CoreRPMatComponent to the object that owns the
MeshRendereryou want to re-shade. - Enable Component Based (
isComponentBased). - Add one entry to
indexCoreRPMatParamsper material slot you want to override.indexis the material slot number on that Mesh Renderer, starting at 0. - In each entry set Shader (
coreRPShaderType) toCustom. This revealscustomNatParam. - Fill
customNatParam:urpMaterialGuid: theguidof the CustomShaderData whose Material targets URP.hdrpMaterialGuid: theguidof the CustomShaderData whose Material targets HDRP.- The two GUIDs must be different, and each must point to material data built for the matching pipeline. Do not put a URP GUID into
hdrpMaterialGuid.
The GUID is resolved when the vehicle's resources load. An empty GUID uses the renderer's default shader. When a nonempty GUID fails to resolve or its material bundle is absent, the loader logs the fallback. Supply valid data for each pipeline where the vehicle should use the custom shader.
customNatParam also carries per-slot channel writes:
customTextureChannels:channelNamepluschannelTex, written directly to the material.customColorChannel:channelNameplus either a normal colour or, withisHDRenabled, an HDR colour.
These are useful for per-vehicle variations (markings, lamp colours, insignia) that should not live in the shared custom material.
4. Package it
- Single vehicle: keep the CustomShaderData asset in the same mod package as that vehicle's
VehicleInfoand other vehicle resources, and build them together. - Shared across vehicles or mods: build the CustomShaderData (and its materials) as its own mod package, and have the vehicle mod declare an explicit dependency on that package by its package GUID. Do not rely on load order or on the asset merely existing in another package.
The shipped guid is part of the runtime contract. Rebuilding a shared shader mod with new GUIDs silently breaks every dependant, so treat GUIDs as stable once published.
5. What happens at runtime
For a renderer whose slot resolves to Custom, the shader asset manager:
- Resolves the CustomShaderData by the pipeline-specific GUID (
urpMaterialGuidorhdrpMaterialGuid). - Loads the custom material, assigns its shader to the vehicle material, and copies the custom material's properties (including toggles and dropdown values) onto it.
- Restores the vehicle's own data: albedo, normal and mask maps plus base colour are written to
customMainTexName,customNormalTexName,customMaskTexNameandcustomBaseColor. - Enables the keywords listed in
customKeywordswhoseisTextureChannelConditioncondition is satisfied (that is, the referenced texture channel is assigned), and writes the per-slot texture and colour channels.
Property copying happens before the vehicle data is restored, so anything your custom material sets on the four mapped channels is overwritten by the vehicle's own textures and colour. Use other property names for values that must survive.
Not every property you author is guaranteed to survive: copying is generic (name-based), while the vehicle maps and base colour are restored explicitly. Verify the properties you depend on in the actual game build.
6. Optional channel conventions
The vehicle camouflage and dirt systems use a set of conventional names. They are optional: use them only if your shader implements the matching behaviour. They are shader-side conventions, not properties the loader guarantees to populate.
| Channel name | Type | Convention |
|---|---|---|
_Smoothness |
float | Smoothness |
_CamoPatternMap |
Texture2D | Camouflage pattern map |
_CamoPatternTiling |
Vector4 | Tiling of the pattern map |
_CamoBlackTint |
Color | Colour mixed for the pattern map's black channel |
_CamoRedTint |
Color | Colour mixed for the pattern map's red channel |
_CamoGreenTint |
Color | Colour mixed for the pattern map's green channel |
_CamoBlueTint |
Color | Colour mixed for the pattern map's blue channel |
_Lerp |
float (0-1) | Blend weight of the camouflage colour |
_DirtTex |
Texture2D | Dirt texture |
_DirtRange |
float (0-1) | Dirt blend weight |
_KEYWORD_ENABLE_CAMO |
keyword | Camouflage enabled (used by VehicleCamoManager) |
_KEYWORD_ENABLE_CAMO_COLOR_TEX |
keyword | Texture-based camouflage enabled |
_KEYWORDENABLEDIRT |
keyword | Dirt texture enabled |
Notes:
_KEYWORD_ENABLE_CAMOand_KEYWORD_ENABLE_CAMO_COLOR_TEXare the keywords the currentVehicleCamoManagerdrives. The older_EnableCamo/_EnableCamoColorTexproperty names you may see in old shaders are not the same thing._KEYWORDENABLEDIRTis the dirt keyword name. The blending described below is the legacy sample shader graph behaviour, shown as an example of how the channels can be combined, not a rule the loader enforces. A custom shader that ignores dirt channels simply renders without dirt.
Example dirt behaviour from the legacy sample: when _KEYWORDENABLEDIRT is enabled, the vehicle AO map is blended with _DirtTex at the strength given by _DirtRange. Reimplement it in your graph if you want that look.
7. RGBA pattern and tint technique
The camouflage pattern technique used by the sample shaders: treat _CamoPatternMap as four independent masks, split the RGBA channels, and lerp each channel's tint colour (_CamoBlackTint, _CamoRedTint, _CamoGreenTint, _CamoBlueTint) into the base colour using that channel as the mask, then blend the whole result with the base colour by _Lerp (clamped to 0-1). Gate the branch with _KEYWORD_ENABLE_CAMO / _KEYWORD_ENABLE_CAMO_COLOR_TEX so vehicles without camouflage keep their plain look.
The same idea works for any per-vehicle data: a mask texture plus tint colours gives you markings, stencils or wear patterns without shipping a separate material per vehicle.
8. Shader authoring notes
- The asset inspector recommends
multi_compilefor your keywords. If you useshader_feature, build with the shader variant collection so variants are not stripped and the keyword silently stops working in player builds. - Declare every keyword you toggle from
customKeywordsin the shader, and keep the keyword string identical to the field in the asset. - Avoid
shader_featurevariants that only exist in the editor; check the player build, not just Play Mode.
9. Verify in the target renderer
- Open the vehicle in the URP project and confirm the custom look appears; then repeat in the HDRP project with the HDRP GUID and material. Each pipeline must be checked separately.
- Confirm the vehicle's own albedo, normal, mask and base colour reach the intended channels by temporarily tinting the base colour or swapping a texture.
- Toggle a camouflage or dirt option and confirm the keyword actually changes the result in a build, not only in the editor.
- Load a second vehicle that shares the custom shader mod to confirm the shared package dependency resolves.
- Check the log for loader errors about unresolved GUIDs or missing material bundles; those indicate a wrong GUID, a pipeline mismatch, or a package that was not built with the asset.
The MCP example builds a Windows package from a teaching material and its data asset. Check the final appearance in the target renderer using the steps above.
Click to expand MCP actionsClick to collapse MCP actions
[
  {
    "tool": "invoke",
    "arguments": {
      "path": "static:ShanghaiWindy.Core.AssetBundleManager/LuaEnv/DoString",
      "args": [
        "local sample=assert(loadfile(\"../../Docs/Manual/tutorials/custom-shader-data/example.lua\"))()\nreturn sample(\"${fixture}\")",
        "docs-custom-shader-data",
        "null"
      ]
    },
    "expect": {
      "contains": "Vehicle Option and material channel bindings verified"
    }
  },
  {
    "tool": "invoke",
    "arguments": {
      "path": "asset:${pipeline}/linkedObjects/Add",
      "args": [
        "@asset:${shaderData}"
      ]
    },
    "expect": {
      "contains": "OK:"
    },
    "phase": "build"
  },
  {
    "tool": "invoke",
    "arguments": {
      "path": "static:UnityEditor.EditorUtility/SetDirty",
      "args": [
        "@asset:${pipeline}"
      ]
    },
    "expect": {
      "contains": "OK:"
    },
    "phase": "build"
  },
  {
    "tool": "invoke",
    "arguments": {
      "path": "static:UnityEditor.AssetDatabase/SaveAssetIfDirty",
      "args": [
        "@asset:${pipeline}"
      ]
    },
    "expect": {
      "contains": "OK:"
    },
    "phase": "build"
  },
  {
    "tool": "modpack_plan",
    "arguments": {
      "pipeline": "${pipeline}"
    },
    "expect": {
      "equals": {
        "ok": true,
        "built": false
      },
      "contains": "csd"
    },
    "phase": "build"
  },
  {
    "tool": "modpack_build",
    "arguments": {
      "pipeline": "${pipeline}"
    },
    "expect": {
      "equals": {
        "ok": true,
        "archiveExists": true,
        "published": false,
        "installed": false
      }
    },
    "capture": {
      "archivePath": {
        "path": "archivePath"
      }
    },
    "phase": "build"
  },
  {
    "tool": "invoke",
    "arguments": {
      "path": "static:Frontend.Editor.ModPackageWorkshopMeta/WriteSidecar",
      "args": [
        "${archivePath}"
      ]
    },
    "expect": {
      "contains": ".modpack.json"
    },
    "phase": "build"
  }
]