Configure Vehicle Material Overrides
中文 | English
Run this command at the repository root to replay the examples through the local Unity MCP. The command also captures screenshots in both languages.
python Docs/Manual/manual/tools/tutorials.py run material-component --capture
Click to expand MCP actionsClick to collapse MCP actions
Prepare the teaching sample. The recipe provides ${variables}.
{
  "variables": {
    "material": "${fixture}/Tutorial_Prop.mat",
    "settings": "${fixture}/Tutorial_MaterialSettings.asset",
    "model": "${fixture}/Tutorial_Material.prefab"
  },
  "calls": [
    {
      "tool": "invoke",
      "arguments": {
        "path": "static:UnityEditor.AssetDatabase/CreateFolder",
        "args": [
          "${fixtureParent}",
          "${folder}"
        ]
      },
      "expect": {
        "regex": "\\(String\\) [a-f0-9]{32}"
      }
    }
  ]
}
This example configures transparency in the DE client project. In the public SDK, follow project setup to select the Unity version declared by the SDK. CoreRPMatData stores material parameters. CoreRPMatComponent supplies those parameters when the vehicle's resources load.
1. Prepare the source material
Find the target Mesh Renderer in the model prefab and identify its material slot. The recipe copies an existing propeller material to Tutorial_Prop.mat and assigns it to the first slot of Tutorial_Material.prefab. For your own model, use its mesh and textures.
Click to expand MCP actionsClick to collapse MCP actions
[
  {
    "tool": "invoke",
    "arguments": {
      "path": "static:UnityEditor.AssetDatabase/CopyAsset",
      "args": [
        "Packages/com.shanghaiwindy.coreresources/BuiltInVehicles/Altius-U/Art/Default-FastProp.mat",
        "${material}"
      ]
    },
    "expect": {
      "contains": "(Boolean) True"
    }
  },
  {
    "tool": "prefab_edit",
    "arguments": {
      "json": {
        "path": "${model}",
        "mode": "create",
        "component": "UnityEngine.MeshRenderer",
        "values": {
          "m_Materials": [
            {}
          ]
        },
        "references": [
          {
            "property": "m_Materials.Array.data[0]",
            "asset": "${material}",
            "type": "UnityEngine.Material"
          }
        ]
      }
    },
    "expect": {
      "equals": {
        "ok": true
      }
    }
  }
]
2. Create the material configuration
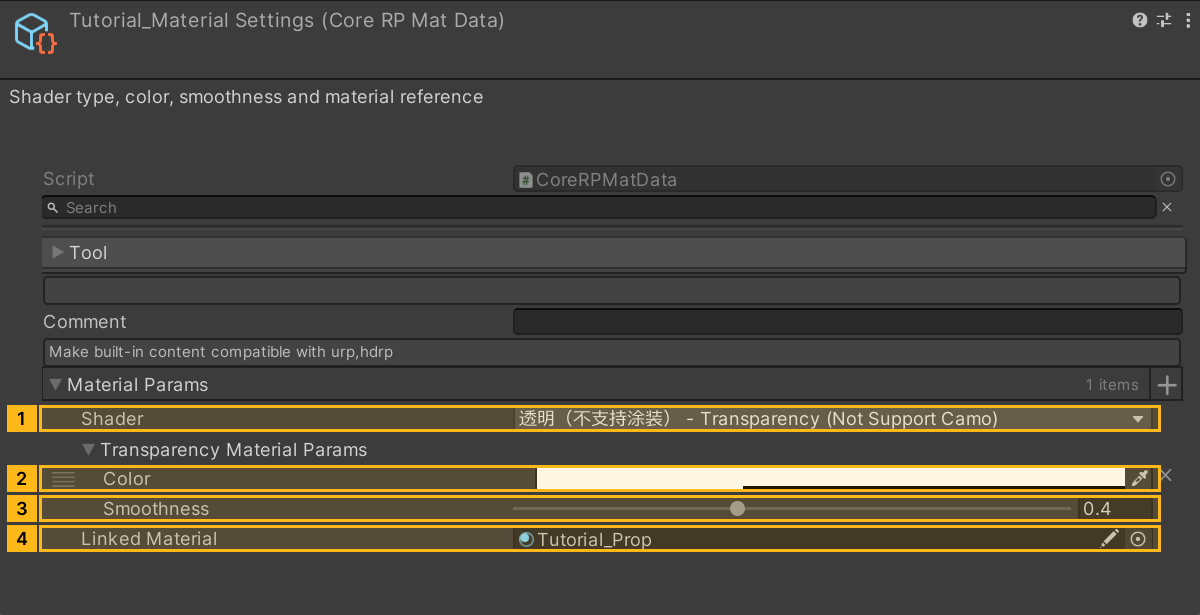
In the Project window, choose Create > A Panzer War - 装甲纷争 > C Config - 配置 > SRP Material Config - SRP 材质配置 to create CoreRPMatData. Expand coreRPMatParams and add an entry.
- Set
coreRPShaderTypetoTransparency. - Expand
transparencyMatParam. Set the color's alpha to 0.35 andsmoothnessto 0.4. - Assign the same Material asset used by the Mesh Renderer slot to
linkedMaterial.
For a camouflage setup, select VehicleCamouflage. The hasMask and maskTex fields in vehicleCamoflageMatParam supply the mask to the selected shader. Consult that shader for its channel meanings.
On the source material, check the base texture _BaseMap, normal texture _BumpMap, and mask _MaskMap. Vehicle camouflage can inherit the source material's _MaskMap. To override that texture for this configuration, enable hasMask and assign maskTex. Use the mask preview to inspect channels individually.
Click to expand MCP actionsClick to collapse MCP actions
[
  {
    "tool": "invoke",
    "arguments": {
      "path": "static:UnityEditor.AssetDatabase/CreateAsset",
      "args": [
        "@static:UnityEngine.ScriptableObject/CreateInstance(ShanghaiWindy.Core.Data.CoreRPMatData)",
        "${settings}"
      ]
    },
    "expect": {
      "contains": "OK:"
    }
  },
  {
    "tool": "inspect_set",
    "arguments": {
      "path": "asset:${settings}/coreRPMatParams",
      "value": "[{\"coreRPShaderType\": 1, \"transparencyMatParam\": {\"color\": {\"r\": 1, \"g\": 1, \"b\": 1, \"a\": 0.35}, \"smoothness\": 0.4}}]"
    },
    "expect": {
      "contains": "OK:"
    }
  },
  {
    "tool": "inspect_set",
    "arguments": {
      "path": "asset:${settings}/coreRPMatParams/0/linkedMaterial",
      "value": "@asset:${material}"
    },
    "expect": {
      "contains": "OK:"
    }
  }
]
3. Attach the component
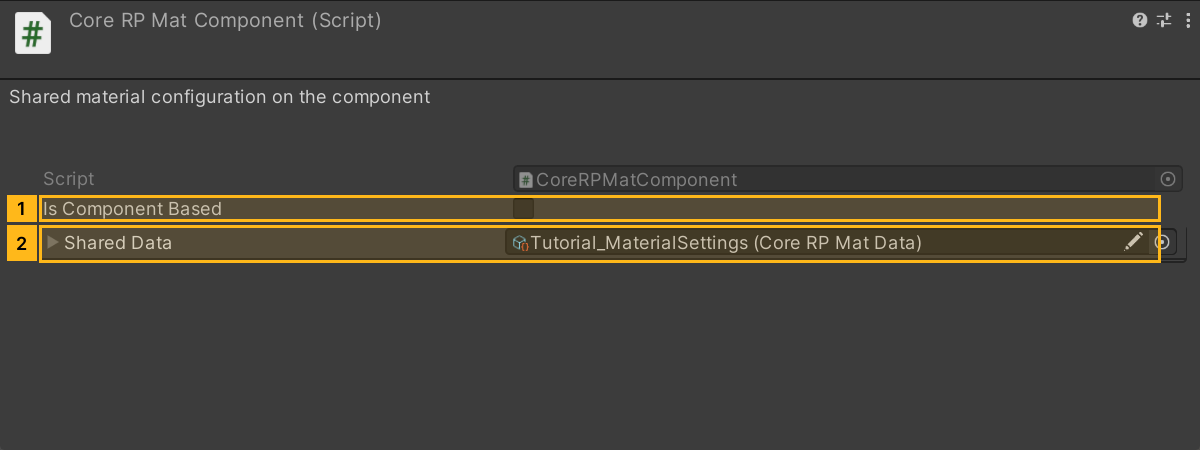
Add CoreRPMatComponent to the target object. Leave isComponentBased off and assign Tutorial_MaterialSettings to matData. Multiple renderers can reuse this configuration.
The component mode instead uses each indexCoreRPMatParams entry's index to select a slot on the same object's Mesh Renderer. Counting starts at zero. Check those indices when reordering material slots.
The index resolves to the Material asset assigned to the slot. Other renderers that share the same material in the same conversion can inherit the override. To change a single slot, duplicate the material and assign the copy to that slot before setting its index.
Click to expand MCP actionsClick to collapse MCP actions
[
  {
    "tool": "prefab_edit",
    "arguments": {
      "json": {
        "path": "${model}",
        "mode": "update",
        "component": "ShanghaiWindy.Core.CoreRPMatComponent",
        "values": {
          "isComponentBased": false
        },
        "references": [
          {
            "property": "matData",
            "asset": "${settings}",
            "type": "ShanghaiWindy.Core.Data.CoreRPMatData"
          }
        ]
      }
    },
    "expect": {
      "equals": {
        "ok": true
      }
    }
  }
]
4. Save and check the references
Save the prefab and read back the Mesh Renderer material, linkedMaterial and component matData references. During resource loading, the code matches the source Material object and applies the parameters to an instance. Check the visual result after loading the vehicle. This example verifies the editor assets and their parameters.
Click to expand MCP actionsClick to collapse MCP actions
[
  {
    "tool": "inspect",
    "arguments": {
      "path": "asset:${model}/MeshRenderer/sharedMaterials/0/name"
    },
    "expect": {
      "contains": "Tutorial_Prop"
    }
  },
  {
    "tool": "inspect",
    "arguments": {
      "path": "asset:${settings}/coreRPMatParams/0/linkedMaterial/name"
    },
    "expect": {
      "contains": "Tutorial_Prop"
    }
  },
  {
    "tool": "inspect",
    "arguments": {
      "path": "asset:${model}/CoreRPMatComponent/matData/name"
    },
    "expect": {
      "contains": "Tutorial_MaterialSettings"
    }
  },
  {
    "tool": "inspect",
    "arguments": {
      "path": "asset:${settings}/coreRPMatParams/0/transparencyMatParam/color/a"
    },
    "expect": {
      "contains": "0.35"
    }
  },
  {
    "tool": "inspect",
    "arguments": {
      "path": "asset:${settings}/coreRPMatParams/0/transparencyMatParam/smoothness"
    },
    "expect": {
      "contains": "0.4"
    }
  }
]