Configure reactive armor
中文 | English
Run this command at the repository root to replay the examples through the local Unity MCP. The command also captures screenshots in both languages.
python Docs/Manual/manual/tools/tutorials.py run reactive-armor --capture
Click to expand MCP actionsClick to collapse MCP actions
Prepare the teaching sample. The recipe provides ${variables}.
{
  "variables": {
    "plate": "${fixture}/Tutorial_ReactivePlate.prefab"
  },
  "calls": [
    {
      "tool": "invoke",
      "arguments": {
        "path": "static:UnityEditor.AssetDatabase/CreateFolder",
        "args": [
          "${fixtureParent}",
          "${folder}"
        ]
      },
      "expect": {
        "regex": "\\(String\\) [a-f0-9]{32}"
      }
    }
  ]
}
Configure reactive armor on a HitBox in the vehicle's damage model. Reactive armor tracks spent areas near valid impact points.
1. Select the HitBox
Open the damage model prefab and select the part that will use reactive armor. Confirm that it has a HitBox component. The teaching recipe creates a separate armor sample.
Click to expand MCP actionsClick to collapse MCP actions
[
  {
    "tool": "prefab_edit",
    "arguments": {
      "json": {
        "path": "${plate}",
        "mode": "create",
        "component": "ShanghaiWindy.Core.HitBox"
      }
    },
    "expect": {
      "equals": {
        "ok": true
      }
    }
  }
]
2. Set the reactive armor fields
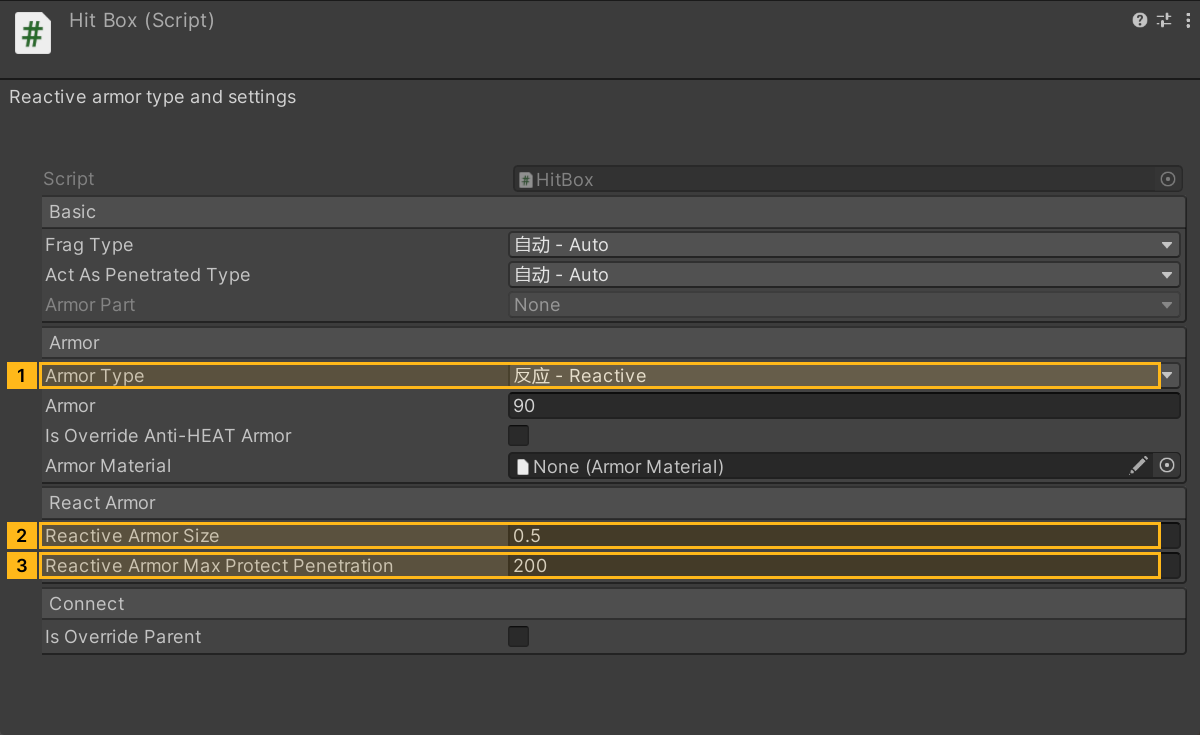
Set Armor Type to 反应 - Reactive. In the reactive armor group, set Reactive Armor Size to 0.5 and Reactive Armor Max Protect Penetration to 200. These are the code defaults used for the example.
The size is the distance from a recorded trigger point. A subsequent hit within that distance receives an armor value of 0 at that position. Unspent positions use the configured reactive armor value, with penetration resolved by the game's damage calculation.
Click to expand MCP actionsClick to collapse MCP actions
[
  {
    "tool": "prefab_edit",
    "arguments": {
      "json": {
        "path": "${plate}",
        "mode": "update",
        "component": "ShanghaiWindy.Core.HitBox",
        "values": {
          "hitBoxType": 3,
          "reactiveArmorSize": 0.5,
          "reactiveMaxProtectPenetration": 200
        }
      }
    },
    "expect": {
      "equals": {
        "ok": true
      }
    }
  }
]
3. Save and verify
Save the prefab and read back the armor type and both values. The recipe verifies the saved editor settings. Check triggering, repeated hits, and repairs in game.
Click to expand MCP actionsClick to collapse MCP actions
[
  {
    "tool": "inspect",
    "arguments": {
      "path": "asset:${plate}/HitBox/hitBoxType"
    },
    "expect": {
      "contains": "ReactiveArmor"
    }
  },
  {
    "tool": "inspect",
    "arguments": {
      "path": "asset:${plate}/HitBox/reactiveArmorSize"
    },
    "expect": {
      "contains": "(Single) 0.5"
    }
  },
  {
    "tool": "inspect",
    "arguments": {
      "path": "asset:${plate}/HitBox/reactiveMaxProtectPenetration"
    },
    "expect": {
      "contains": "(Single) 200"
    }
  }
]