Create a tank shell ejection animation
中文 | English
Run this command at the repository root to replay the examples through the local Unity MCP. The command also captures screenshots in both languages.
python Docs/Manual/manual/tools/tutorials.py run tank-shell-ejection-animation --capture
Click to expand MCP actionsClick to collapse MCP actions
Prepare the teaching sample. The recipe provides ${variables}.
{
  "variables": {
    "rig": "${fixture}/Tutorial_ShellRig.fbx",
    "model": "${fixture}/Tutorial_ShellRig.prefab",
    "clip": "${fixture}/Tutorial_ShellEject.anim",
    "script": "${fixture}/PlayAnimationComponent.lua"
  },
  "calls": [
    {
      "tool": "invoke",
      "arguments": {
        "path": "static:UnityEditor.AssetDatabase/CreateFolder",
        "args": [
          "${fixtureParent}",
          "${folder}"
        ]
      },
      "expect": {
        "regex": "\\(String\\) [a-f0-9]{32}"
      }
    }
  ]
}
Adapted from 樱花's original tank shell ejection tutorial. Build the casing and ejection mechanism under the turret in Blender, author the clip in Unity, then bind playback to the firing event in Lua.
1. Prepare and import the model
In Blender, place the casing inside the turret and parent it to the turret. The example names the casing Casing. Set the ejection mechanism's pivot at its center of rotation. If the rotation axis differs from the global axes, add an empty, orient it to the local axis, and parent the mechanism to it. The example calls this empty MechanismPivot.
Export an FBX and import it into Unity. Confirm that it contains Turret/Casing and Turret/MechanismPivot, then create a prefab for the setup. The recipe builds and exports the sample using Blender in background mode. If Unity cannot find Blender, set BLENDER to its executable before starting the editor.
Click to expand MCP actionsClick to collapse MCP actions
[
  {
    "tool": "invoke",
    "arguments": {
      "path": "static:ShanghaiWindy.Editor.ShellEjectionAuthoring/ExportRig",
      "args": [
        "${fixture}"
      ]
    },
    "expect": {
      "contains": "Tutorial_ShellRig.fbx"
    }
  },
  {
    "tool": "invoke",
    "arguments": {
      "path": "static:ShanghaiWindy.Editor.ShellEjectionAuthoring/EnsureRigPrefab",
      "args": [
        "${rig}",
        "${model}"
      ]
    },
    "expect": {
      "regex": "\\(String\\) [a-f0-9]{32}"
    }
  },
  {
    "tool": "inspect",
    "arguments": {
      "path": "asset:${model}/Turret/Casing/name"
    },
    "expect": {
      "contains": "(String) Casing"
    }
  },
  {
    "tool": "inspect",
    "arguments": {
      "path": "asset:${model}/Turret/MechanismPivot/Mechanism/name"
    },
    "expect": {
      "contains": "(String) Mechanism"
    }
  }
]
2. Author and assign the animation
Select the prefab root in Unity's Animation window and create Tutorial_ShellEject.anim. Add three keyframes to the casing's local Position for rest, ejection and return. The example moves the casing 0.35 units on local X at 0.2 seconds and returns it to its start at 0.4 seconds. The local Rotation curves on MechanismPivot open the mechanism by 35° at 0.2 seconds and then return it to rest.
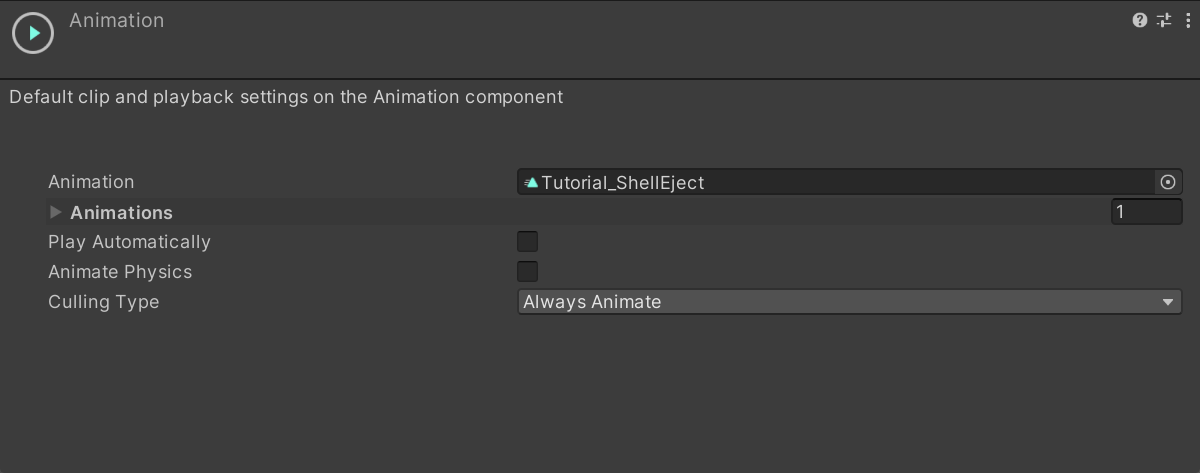
Set the clip to Legacy and leave its Wrap Mode at Default. Add Animation to the root, assign the default clip and turn off Play Automatically so Lua can start it.
Click to expand MCP actionsClick to collapse MCP actions
[
  {
    "tool": "invoke",
    "arguments": {
      "path": "static:ShanghaiWindy.Editor.ShellEjectionAuthoring/WriteClip",
      "args": [
        "${fixture}",
        "${model}"
      ]
    },
    "expect": {
      "contains": "Turret/Casing/m_LocalPosition.x: 3 keys"
    }
  },
  {
    "tool": "invoke",
    "arguments": {
      "path": "static:ShanghaiWindy.Editor.ShellEjectionAuthoring/AssignClip",
      "args": [
        "${model}",
        "${clip}"
      ]
    },
    "expect": {
      "contains": "Tutorial_ShellEject"
    }
  }
]
3. Bind the firing event
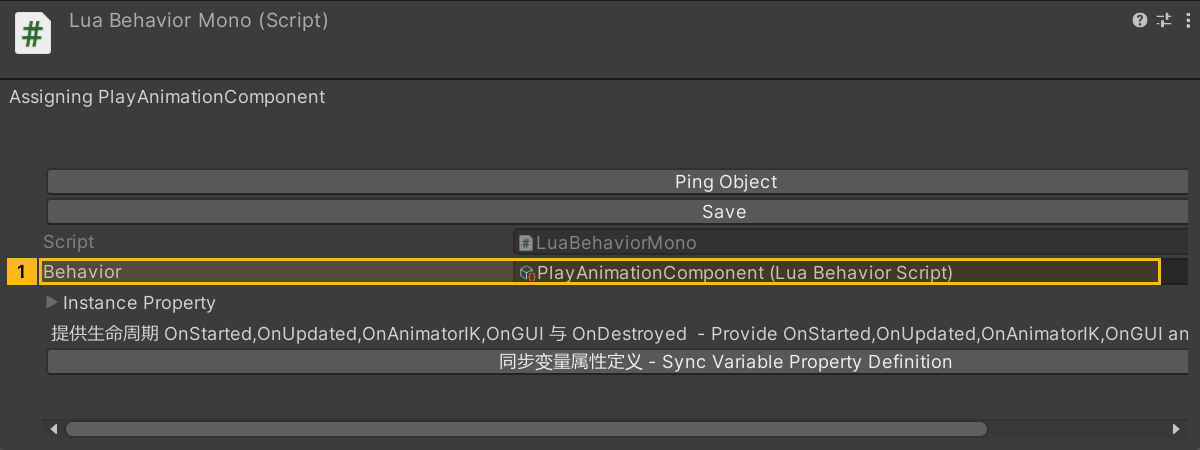
Add LuaBehaviorMono to the same root. Save this script as PlayAnimationComponent.lua and assign it to Behavior. The script registers for the first fire system after the vehicle loads. For a vehicle with multiple guns, use the index of the intended system in the fire list.
Behavior()
Property = {}

local PlayAnimationComponent = class("PlayAnimationComponent")

function PlayAnimationComponent:OnStarted()
    local animation = self.script:GetNativeComponent("Animation")
    local found, vehicle = self.script:TryGetTankInitSystem()
    if not animation or not found then
        return
    end

    VehicleAPI.RegisterVehicleLoadedEvent(vehicle, function()
        VehicleAPI.RegisterBulletFiredEvent(vehicle, 0, function()
            animation:Play()
        end)
    end)
end

return PlayAnimationComponent
Click to expand MCP actionsClick to collapse MCP actions
[
  {
    "tool": "invoke",
    "arguments": {
      "path": "static:ShanghaiWindy.Editor.ShellEjectionAuthoring/ImportBehavior",
      "args": [
        "${fixture}"
      ]
    },
    "expect": {
      "contains": "PlayAnimationComponent.lua"
    }
  },
  {
    "tool": "prefab_edit",
    "arguments": {
      "json": {
        "path": "${model}",
        "mode": "update",
        "component": "ShanghaiWindy.Core.Lua.LuaBehaviorMono",
        "references": [
          {
            "property": "luaBehavior",
            "asset": "${script}",
            "type": "ShanghaiWindy.Core.Lua.LuaBehaviorScript"
          }
        ]
      }
    },
    "expect": {
      "equals": {
        "ok": true
      }
    }
  }
]
4. Save and verify
Save the prefab and confirm that Animation and LuaBehaviorMono are on the same node. Check the default clip, its Legacy setting and the Lua reference. The recipe reads back the position and rotation curves. Fire the assembled vehicle in game to check the callback and playback.
Click to expand MCP actionsClick to collapse MCP actions
[
  {
    "tool": "inspect",
    "arguments": {
      "path": "asset:${clip}/legacy"
    },
    "expect": {
      "contains": "(Boolean) True"
    }
  },
  {
    "tool": "inspect",
    "arguments": {
      "path": "asset:${clip}/wrapMode"
    },
    "expect": {
      "contains": "Default"
    }
  },
  {
    "tool": "inspect",
    "arguments": {
      "path": "asset:${model}/Animation/clip/name"
    },
    "expect": {
      "contains": "Tutorial_ShellEject"
    }
  },
  {
    "tool": "inspect",
    "arguments": {
      "path": "asset:${model}/Animation/playAutomatically"
    },
    "expect": {
      "contains": "(Boolean) False"
    }
  },
  {
    "tool": "inspect",
    "arguments": {
      "path": "asset:${model}/LuaBehaviorMono/luaBehavior/name"
    },
    "expect": {
      "contains": "PlayAnimationComponent"
    }
  },
  {
    "tool": "inspect",
    "arguments": {
      "path": "asset:${model}/LuaBehaviorMono/luaBehavior/lua"
    },
    "expect": {
      "contains": "RegisterBulletFiredEvent"
    }
  }
]