Render and assign a vehicle thumbnail
中文 | English
Run this command at the repository root to replay the examples through the local Unity MCP. The command also captures screenshots in both languages.
python Docs/Manual/manual/tools/tutorials.py run vehicle-thumbnail --capture
Click to expand MCP actionsClick to collapse MCP actions
Prepare the teaching sample. The recipe provides ${variables}.
{
  "variables": {
    "vehicleInfo": "${fixture}/TutorialThumbnailInfo.asset",
    "source": "Packages/com.shanghaiwindy.coreresources/BuiltInVehicles/PatriotRadar/BuiltIn-Patriot-Radar",
    "thumbnail": "${fixture}/TutorialThumbnail.png"
  },
  "calls": [
    {
      "tool": "invoke",
      "arguments": {
        "path": "static:UnityEditor.AssetDatabase/CreateFolder",
        "args": [
          "${fixtureParent}",
          "${folder}"
        ]
      },
      "expect": {
        "contains": "(String)"
      }
    }
  ]
}
- Save the open scene. In the VehicleData Inspector, assign the main model and set the thumbnail camera's orthographic size,
thumbnailSize. Larger values show a wider area. The image stays 640 × 360. - Click Render Thumbnail. Unity switches to a preview scene, writes a transparent PNG named after the main model next to VehicleData, and imports it as a Sprite. An existing PNG with that name in the same folder is replaced.
Click to expand MCP actionsClick to collapse MCP actions
[
  {
    "tool": "inspect",
    "arguments": {
      "path": "static:UnityEngine.SystemInfo/graphicsDeviceName"
    },
    "expect": {
      "contains": "(String)"
    }
  }
]
Click to expand MCP actionsClick to collapse MCP actions
Save the scene first. Substitute your asset and PNG paths. The short wait may report the render as still running. Wait for the PNG to import before checking it.
[
  {
    "tool": "invoke",
    "arguments": {
      "path": "static:ShanghaiWindy.Editor.VehicleDataEditor/AsyncCreateThumbnail",
      "args": [
        "@asset:${yourVehicleData}"
      ],
      "timeout": 1
    }
  },
  {
    "tool": "invoke",
    "arguments": {
      "path": "static:System.IO.File/Exists",
      "args": [
        "${renderedPng}"
      ]
    }
  }
]
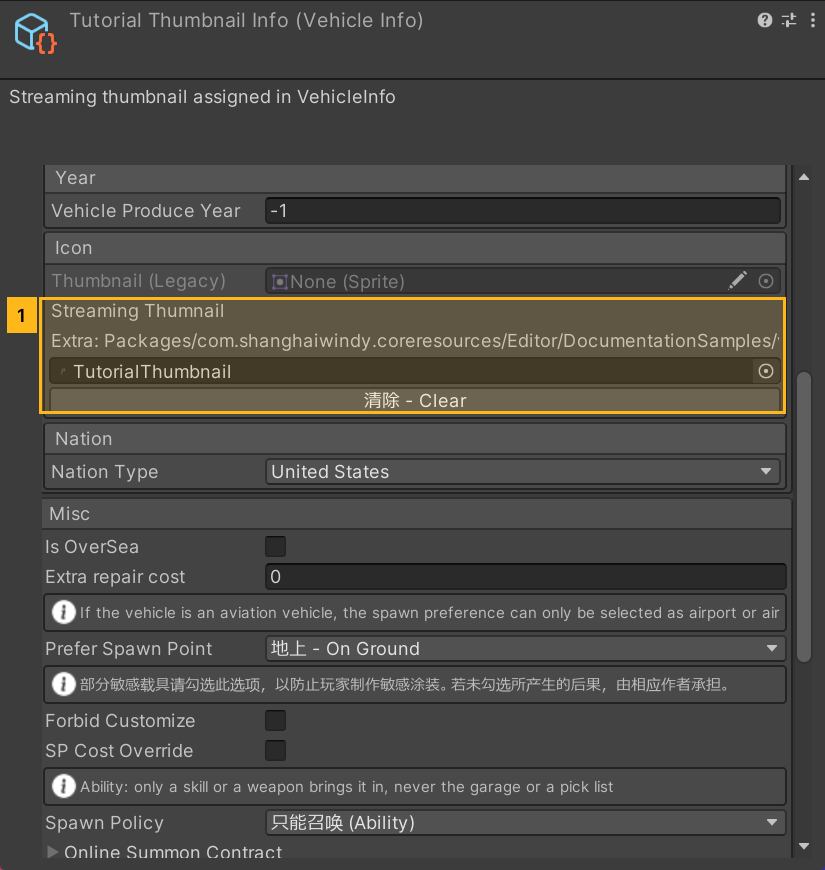
- Open the streaming thumbnail field in VehicleInfo and check the assignment. The editor uses the VehicleTextData
AssetNameto find the appropriate VehicleInfo. If it finds no match, assign the thumbnail manually. You can also import your own 640 × 360 Sprite and assign it here.
Click to expand MCP actionsClick to collapse MCP actions
[
  {
    "tool": "invoke",
    "arguments": {
      "path": "static:UnityEditor.AssetDatabase/CopyAsset",
      "args": [
        "${source}.asset",
        "${vehicleInfo}"
      ]
    },
    "expect": {
      "contains": "(Boolean) True"
    }
  },
  {
    "tool": "invoke",
    "arguments": {
      "path": "static:UnityEditor.AssetDatabase/CopyAsset",
      "args": [
        "Packages/com.shanghaiwindy.coreresources/Editor/DocumentationSamples/vehicle-thumbnail/TutorialThumbnail.png",
        "${thumbnail}"
      ]
    },
    "expect": {
      "contains": "(Boolean) True"
    },
    "phase": "build"
  },
  {
    "tool": "invoke",
    "arguments": {
      "path": "static:UnityEditor.AssetDatabase/AssetPathToGUID",
      "args": [
        "${thumbnail}"
      ]
    },
    "expect": {
      "contains": "(String)"
    },
    "capture": {
      "imageGuid": {
        "regex": "\\(String\\) ([a-f0-9]{32})"
      }
    }
  },
  {
    "tool": "inspect_set",
    "arguments": {
      "path": "asset:${vehicleInfo}/streamingThumnail/assetGUID",
      "value": "${imageGuid}"
    },
    "expect": {
      "contains": "OK:"
    }
  },
  {
    "tool": "inspect_set",
    "arguments": {
      "path": "asset:${vehicleInfo}/streamingThumnail/extra",
      "value": "${thumbnail}"
    },
    "expect": {
      "contains": "OK:"
    }
  },
  {
    "tool": "invoke",
    "arguments": {
      "path": "static:UnityEditor.EditorUtility/SetDirty",
      "args": [
        "@asset:${vehicleInfo}"
      ]
    },
    "expect": {
      "contains": "OK:"
    }
  },
  {
    "tool": "invoke",
    "arguments": {
      "path": "static:UnityEditor.AssetDatabase/SaveAssets",
      "args": []
    },
    "expect": {
      "contains": "OK:"
    }
  },
  {
    "tool": "inspect",
    "arguments": {
      "path": "asset:${vehicleInfo}/streamingThumnail/assetGUID"
    },
    "expect": {
      "contains": "${imageGuid}"
    }
  }
]