Damage model naming rules
中文 | English
Run this command at the repository root to replay the examples through the local Unity MCP. The command also captures screenshots in both languages.
python Docs/Manual/manual/tools/tutorials.py run hitbox-naming-conventions --capture
Click to expand MCP actionsClick to collapse MCP actions
Prepare the teaching sample. The recipe provides ${variables}.
{
  "variables": {
    "external": "${fixture}/Tutorial_ExternalSource.prefab",
    "internal": "${fixture}/Tutorial_InternalSource.prefab",
    "armor": "${fixture}/Tutorial_ImportedArmor.prefab",
    "module": "${fixture}/Tutorial_ImportedModule.prefab"
  },
  "calls": [
    {
      "tool": "invoke",
      "arguments": {
        "path": "static:UnityEditor.AssetDatabase/CreateFolder",
        "args": [
          "${fixtureParent}",
          "${folder}"
        ]
      },
      "expect": {
        "regex": "\\(String\\) [a-f0-9]{32}"
      }
    }
  ]
}
The damage model editor reads armor and internal module settings from mesh node names. The examples below apply to the vehicle's VehicleHitBox asset.
1. Prepare the source models
Import the external armor and internal modules into Unity as separate models. Rename the mesh nodes, then assign each model to ExternalArmorModel or InternalModuleModel. The importer processes nodes with a MeshFilter. The teaching recipe creates two separate source models.
Click to expand MCP actionsClick to collapse MCP actions
[
  {
    "tool": "prefab_edit",
    "arguments": {
      "json": {
        "path": "${external}",
        "mode": "create",
        "component": "UnityEngine.Transform",
        "children": [
          "Plate_100",
          "Plate_100_Inter",
          "Plate_100_React"
        ]
      }
    },
    "expect": {
      "equals": {
        "ok": true
      }
    }
  },
  {
    "tool": "prefab_edit",
    "arguments": {
      "json": {
        "path": "${external}",
        "mode": "update",
        "component": "UnityEngine.MeshFilter",
        "child": "Plate_100",
        "references": [
          {
            "property": "m_Mesh",
            "asset": "Packages/com.shanghaiwindy.coreresources/Light/AuthoringSamples/Square.obj",
            "type": "UnityEngine.Mesh"
          }
        ]
      }
    },
    "expect": {
      "equals": {
        "ok": true
      }
    }
  },
  {
    "tool": "prefab_edit",
    "arguments": {
      "json": {
        "path": "${external}",
        "mode": "update",
        "component": "UnityEngine.MeshFilter",
        "child": "Plate_100_Inter",
        "references": [
          {
            "property": "m_Mesh",
            "asset": "Packages/com.shanghaiwindy.coreresources/Light/AuthoringSamples/Square.obj",
            "type": "UnityEngine.Mesh"
          }
        ]
      }
    },
    "expect": {
      "equals": {
        "ok": true
      }
    }
  },
  {
    "tool": "prefab_edit",
    "arguments": {
      "json": {
        "path": "${external}",
        "mode": "update",
        "component": "UnityEngine.MeshFilter",
        "child": "Plate_100_React",
        "references": [
          {
            "property": "m_Mesh",
            "asset": "Packages/com.shanghaiwindy.coreresources/Light/AuthoringSamples/Square.obj",
            "type": "UnityEngine.Mesh"
          }
        ]
      }
    },
    "expect": {
      "equals": {
        "ok": true
      }
    }
  },
  {
    "tool": "prefab_edit",
    "arguments": {
      "json": {
        "path": "${internal}",
        "mode": "create",
        "component": "UnityEngine.Transform",
        "children": [
          "Transmission_120_15"
        ]
      }
    },
    "expect": {
      "equals": {
        "ok": true
      }
    }
  },
  {
    "tool": "prefab_edit",
    "arguments": {
      "json": {
        "path": "${internal}",
        "mode": "update",
        "component": "UnityEngine.MeshFilter",
        "child": "Transmission_120_15",
        "references": [
          {
            "property": "m_Mesh",
            "asset": "Packages/com.shanghaiwindy.coreresources/Light/AuthoringSamples/Square.obj",
            "type": "UnityEngine.Mesh"
          }
        ]
      }
    },
    "expect": {
      "equals": {
        "ok": true
      }
    }
  }
]
2. Generate external armor
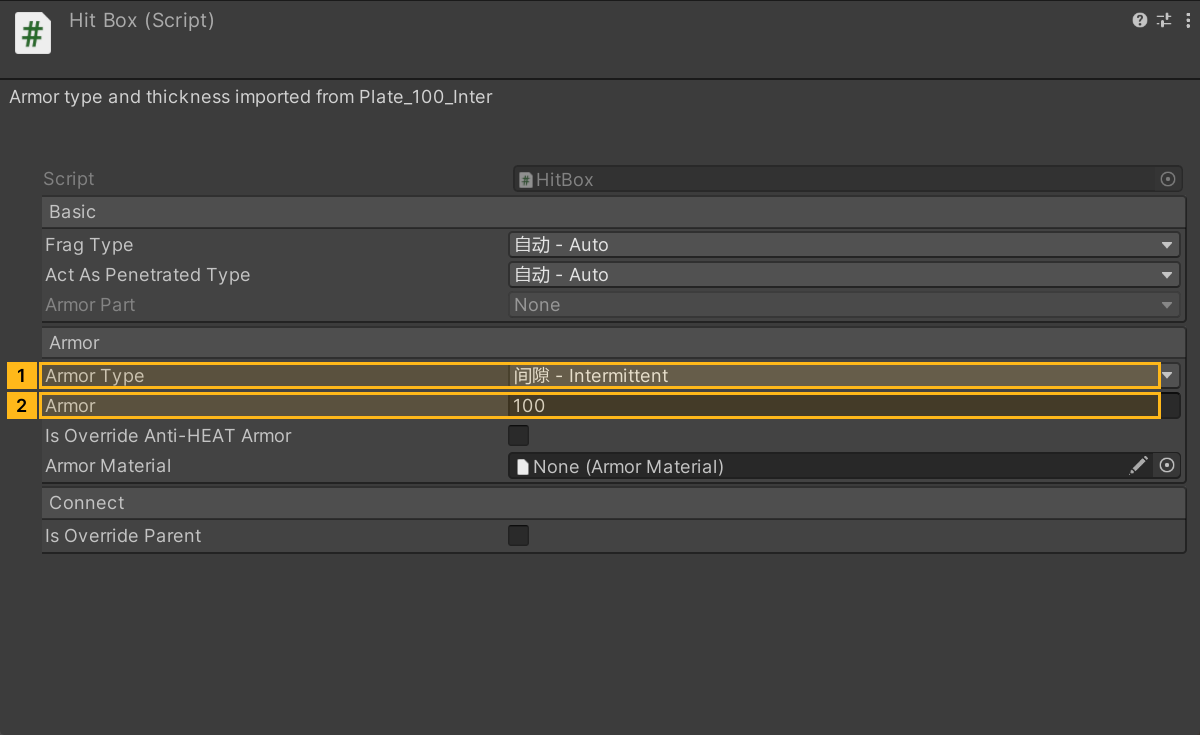
The second segment is the integer armor thickness. Use Inter for spaced armor and React for reactive armor.
| Node name | Armor type | Thickness |
|---|---|---|
Plate_100 |
Normal | 100 |
Plate_100_Inter |
Intermittent | 100 |
Plate_100_React |
Reactive | 100 |
In the damage model editor, click Generate External Armor. Move the generated armor under the corresponding parent nodes. See reactive armor for the extra settings on a reactive plate.
Click to expand MCP actionsClick to collapse MCP actions
[
  {
    "tool": "invoke",
    "arguments": {
      "path": "static:ShanghaiWindy.Editor.VehicleHitBoxModelImport/ImportPrefab",
      "args": [
        "${external}",
        "${armor}",
        "false"
      ]
    },
    "expect": {
      "regex": "\\(String\\) [a-f0-9]{32}"
    }
  }
]
3. Generate internal modules
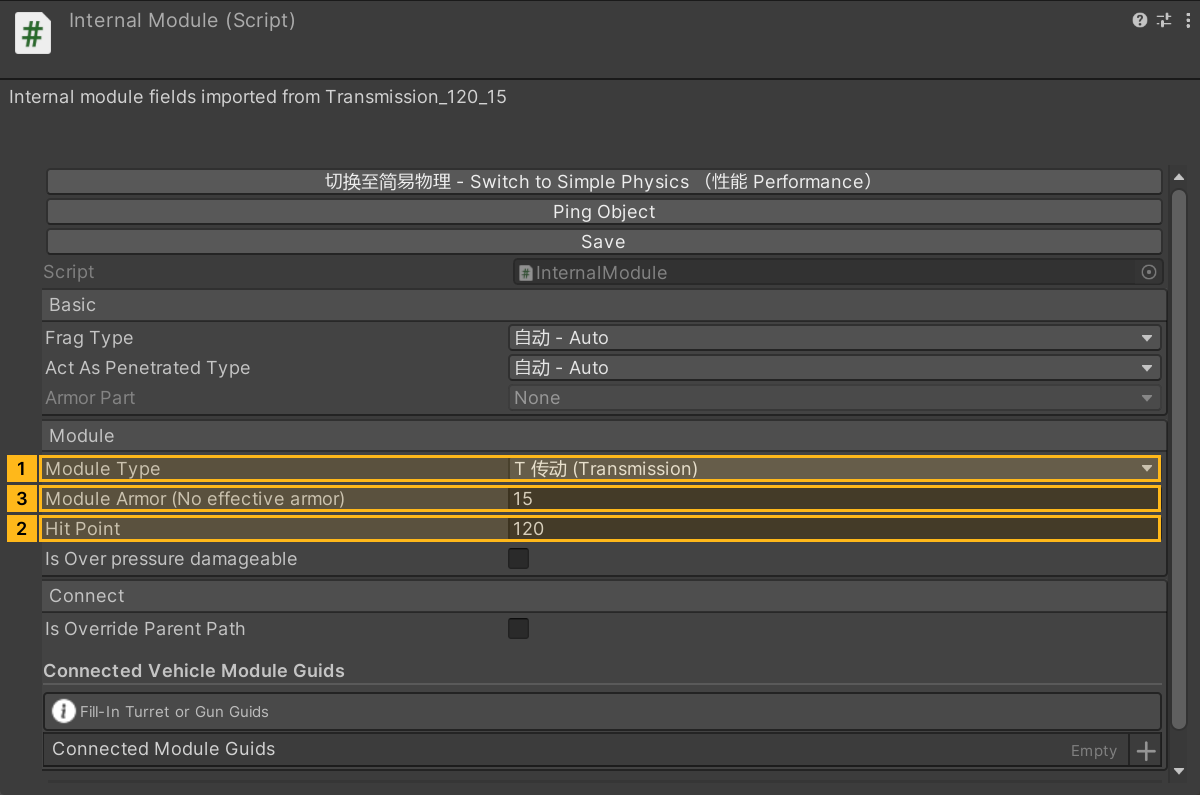
In Transmission_120_15, the segments identify the module type, hit points and module armor in that order. Type names are case-sensitive. The importer rounds the two numeric values up to integers. Include all three segments.
Click Generate Internal Armor, then move the generated modules under their corresponding parents. The numbers in the screenshot match the segments of the node name.
Module type codes
| Code | Explanation |
|---|---|
Transmission |
transmission |
Engine |
engine |
HeatSink |
heat sink |
OilTank |
fuel tank |
Traversing |
turret traverse mechanism |
Breech |
breech |
Elevator |
elevation mechanism |
Sighting |
sight |
AmmoShell |
ammunition rack |
Crew |
crew member |
InternalArmor |
internal armor |
Radiator |
radar (current Inspector label) |
AutoReloader |
autoloader |
OilPipline |
lubrication system |
SurfaceControlRope |
control-surface cable |
WingSurface |
wing |
Module naming examples
Transmission_120_15: transmission part with hit point 120 and armor 15.AmmoShell_50_15: ammunition rack part with hit point 50 and armor 15. If Blender appends a duplicate suffix, names such asAmmoShell_50_15.001andAmmoShell_50_15.002result; The importer accepts these Blender duplicate suffixes.
Crew naming format
Crew members also use Crew as the module code, followed by role codes at the end; separate multiple roles with underscores:
Crew_{HitPoint}_{ArmorValue}_{RoleCode}
Crew_{HitPoint}_{ArmorValue}_{RoleCode1}_{RoleCode2}
Write the role codes with the exact spelling and case:
Crew_10_0_Commander_Gunner: crew member serving as both commander and gunner.Crew_10_0_Radioer: radio operator role.Crew_10_0_Reloader: loader role. On duplicate names Blender producesCrew_10_0_Reloader.001,Crew_10_0_Reloader.002, and similar; the suffix does not change the role.
Crew role code reference
| Code | Explanation |
|---|---|
Commander |
commander |
Driver |
driver |
Gunner |
gunner |
Radioer |
radio operator |
Reloader |
loader |
Click to expand MCP actionsClick to collapse MCP actions
[
  {
    "tool": "invoke",
    "arguments": {
      "path": "static:ShanghaiWindy.Editor.VehicleHitBoxModelImport/ImportPrefab",
      "args": [
        "${internal}",
        "${module}",
        "true"
      ]
    },
    "expect": {
      "regex": "\\(String\\) [a-f0-9]{32}"
    }
  }
]
4. Assign module HP in bulk
- Open VehicleHitBox and set Total HitPoints for auto assign. The original guide and current Inspector give the starting values below.
- To give a module type a fixed value, add it to Override Module Hit Points. Other modules use the ratios below.
- Click Auto Assign Internal Module Hit Points in the HitBox editor. Verify the HP on the generated InternalModule components and press Ctrl+S to save.
| Vehicle rank | 1–3 | 4–6 | 7–8 | 9–10 | 11–12 | 13–15 |
|---|---|---|---|---|---|---|
| Base HP | 50 | 100 | 200 | 300 | 350 | 380 |
The original guide recommends a base HP of no more than 400. The columns below give results for each example base HP. The editor multiplies by the ratio and rounds the result, so in current Unity, 50 × 0.25 becomes 12.
| Module types | Ratio | 50 | 100 | 200 | 300 | 350 | 380 |
|---|---|---|---|---|---|---|---|
| Transmission, WheelOrTrack | 0.4 | 20 | 40 | 80 | 120 | 140 | 152 |
| Engine, MainStructure | 0.8 | 40 | 80 | 160 | 240 | 280 | 304 |
| HeatSink, Breech, Barrel, Elevator | 0.25 | 12 | 25 | 50 | 75 | 88 | 95 |
| OilTank, Traversing, AmmoShell, InternalArmor | 0.5 | 25 | 50 | 100 | 150 | 175 | 190 |
| Sighting, Radiator | 0.2 | 10 | 20 | 40 | 60 | 70 | 76 |
| Other types except Crew | 1 | 50 | 100 | 200 | 300 | 350 | 380 |
Crew HP comes from Crew Wear Type. None uses 10, Vast uses 20, Alien uses 50, and Huawei uses 100.
Click to expand MCP actionsClick to collapse MCP actions
Verify the actual name parser, duplicate-name suffixes, and the rounding rule used for module HP.
[
  {
    "tool": "invoke",
    "arguments": {
      "path": "static:ShanghaiWindy.Core.AssetBundleManager/LuaEnv/DoString",
      "args": [
        "local U, C = CS.UnityEngine, CS.ShanghaiWindy.Core\nlocal go = U.GameObject.CreatePrimitive(U.PrimitiveType.Cube)\nlocal ok, failure = pcall(function()\n    local sample = go:AddComponent(typeof(C.InternalModule))\n    C.VehicleHitBoxImportUtil.SetInternalModuleViaName('AmmoShell_50_15.002', sample)\n    assert(sample.moduleType == C.EInternalModuleType.AmmoShell)\n    assert(sample.HitPoint == 50 and sample.internalArmor == 15)\n    C.VehicleHitBoxImportUtil.SetInternalModuleViaName('Crew_10_0_Commander_Gunner.001', sample)\n    assert(sample.moduleType == C.EInternalModuleType.Crew)\n    assert(sample.isCommander and sample.isGunner and sample.HitPoint == 10)\n    assert(U.Mathf.RoundToInt(50 * 0.25) == 12 and U.Mathf.RoundToInt(350 * 0.25) == 88)\nend)\nU.Object.DestroyImmediate(go)\nassert(ok, failure)\nreturn 'Duplicate names, role flags, and HP rounding verified'\n",
        "hitbox-naming-hp",
        "null"
      ]
    },
    "expect": {
      "contains": "Duplicate names, role flags, and HP rounding verified"
    }
  }
]
5. Save and verify
Save the damage model prefab and check the HitBox and InternalModule fields. The recipe runs the same import processing in isolated prefabs. It verifies all three armor types and thickness values, plus the transmission's hit points and armor.
Click to expand MCP actionsClick to collapse MCP actions
[
  {
    "tool": "inspect",
    "arguments": {
      "path": "asset:${armor}/Plate_100/HitBox/Armor"
    },
    "expect": {
      "contains": "(Int32) 100"
    }
  },
  {
    "tool": "inspect",
    "arguments": {
      "path": "asset:${armor}/Plate_100_Inter/HitBox/Armor"
    },
    "expect": {
      "contains": "(Int32) 100"
    }
  },
  {
    "tool": "inspect",
    "arguments": {
      "path": "asset:${armor}/Plate_100_React/HitBox/Armor"
    },
    "expect": {
      "contains": "(Int32) 100"
    }
  },
  {
    "tool": "inspect",
    "arguments": {
      "path": "asset:${armor}/Plate_100/HitBox/hitBoxType"
    },
    "expect": {
      "contains": "Simple"
    }
  },
  {
    "tool": "inspect",
    "arguments": {
      "path": "asset:${armor}/Plate_100_Inter/HitBox/hitBoxType"
    },
    "expect": {
      "contains": "IntermittentArmor"
    }
  },
  {
    "tool": "inspect",
    "arguments": {
      "path": "asset:${armor}/Plate_100_React/HitBox/hitBoxType"
    },
    "expect": {
      "contains": "ReactiveArmor"
    }
  },
  {
    "tool": "inspect",
    "arguments": {
      "path": "asset:${module}/Transmission_120_15/InternalModule/moduleType"
    },
    "expect": {
      "contains": "Transmission"
    }
  },
  {
    "tool": "inspect",
    "arguments": {
      "path": "asset:${module}/Transmission_120_15/InternalModule/HitPoint"
    },
    "expect": {
      "contains": "(Int32) 120"
    }
  },
  {
    "tool": "inspect",
    "arguments": {
      "path": "asset:${module}/Transmission_120_15/InternalModule/internalArmor"
    },
    "expect": {
      "contains": "(Int32) 15"
    }
  }
]