Tank ammunition, projectile effects and impacts
中文 | English
Run this command at the repository root to replay the examples through the local Unity MCP. The command also captures screenshots in both languages.
python Docs/Manual/manual/tools/tutorials.py run tank-ammo-effects --capture
Click to expand MCP actionsClick to collapse MCP actions
Prepare the teaching sample. The recipe provides ${variables}.
{
  "variables": {
    "bullet": "${fixture}/Tutorial_AP_Shell.asset",
    "vfx": "${fixture}/Tutorial_AP_Effects.asset"
  },
  "calls": [
    {
      "tool": "invoke",
      "arguments": {
        "path": "static:UnityEditor.AssetDatabase/CreateFolder",
        "args": [
          "${fixtureParent}",
          "${folder}"
        ]
      },
      "expect": {
        "contains": "(String)"
      }
    },
    {
      "tool": "invoke",
      "arguments": {
        "path": "static:UnityEditor.AssetDatabase/CopyAsset",
        "args": [
          "Packages/com.shanghaiwindy.coreresources/Editor/DocumentationSamples/vehicle-basics/Tutorial-76mm-AP.asset",
          "${bullet}"
        ]
      },
      "expect": {
        "contains": "True"
      }
    },
    {
      "tool": "invoke",
      "arguments": {
        "path": "static:UnityEditor.AssetDatabase/CopyAsset",
        "args": [
          "Packages/com.shanghaiwindy.coreresources/BulletVFX/宝马鸽特效/AP-BulletVFX-M.asset",
          "${vfx}"
        ]
      },
      "expect": {
        "contains": "True"
      }
    }
  ]
}
Start with a configured main gun. This guide uses the SDK teaching tank's 76 mm AP round to inspect the ammunition asset, its flight and its effects separately.
1. Create and bind a test round
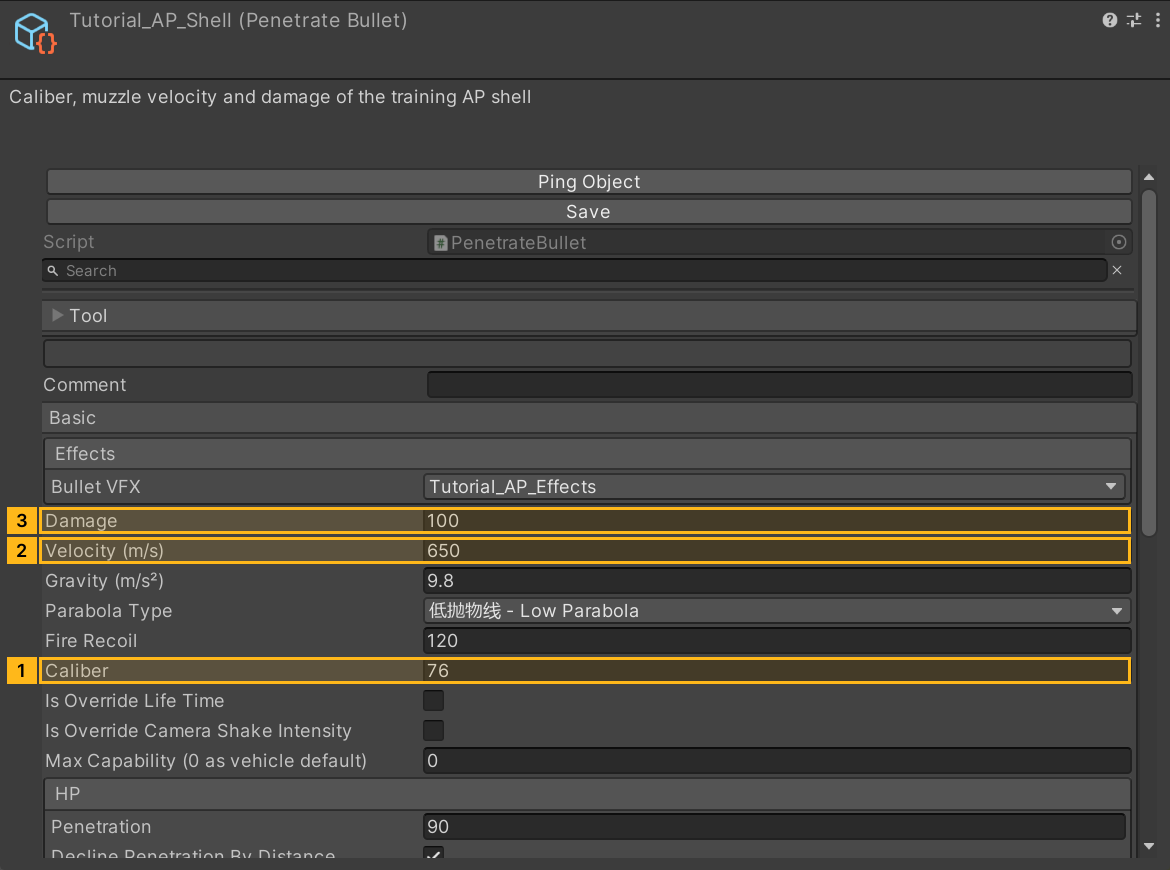
- Select a working Penetrate Bullet in Project and press Ctrl+D to duplicate it. You can also create Penetrate - 穿甲弹 from the Panzer War ammunition menu and compare it with a working asset of the same type. Use a distinct filename and keep
warheadset to AP. - Fill in the fields below. Save the asset and drag it into the active main gun's Bullet Data list. If a shared gun is assigned, replace the round in its SharedGunData. Rebuild and confirm the test range is using the updated package.
- For a gun with multiple ammunition types, create a separate asset for each round and give each a recognizable name and icon.
| Field | Teaching values and purpose |
|---|---|
caliber |
76 mm, used by caliber-dependent calculations. |
velocity |
650 m/s, the launch velocity. |
gravityDamper |
9.8 m/s², the downward acceleration setting. |
damage |
100, the base value for health-based damage calculations. |
penetration |
90 mm, the base penetration of this round. Impact angle and distance affect the outcome. |
isDeclineByDistance |
Set on the teaching round. Establish a baseline at close range, then compare at longer range. |
maxCapability |
A value of 0 inherits the vehicle limit. Set a positive value when this round needs its own limit. |
Module-based damage uses the same round asset and reads its module, projectile and penetration parameters. Test module damage separately after changing health-based damage values. Keep the working sample's module fields for the first pass.
Click to expand MCP actionsClick to collapse MCP actions
[
  {
    "tool": "inspect_set",
    "arguments": {
      "path": "asset:${bullet}/caliber",
      "value": "76"
    },
    "expect": {
      "contains": "OK:"
    }
  },
  {
    "tool": "inspect",
    "arguments": {
      "path": "asset:${bullet}/caliber"
    },
    "expect": {
      "contains": "76"
    }
  },
  {
    "tool": "inspect_set",
    "arguments": {
      "path": "asset:${bullet}/velocity",
      "value": "650"
    },
    "expect": {
      "contains": "OK:"
    }
  },
  {
    "tool": "inspect",
    "arguments": {
      "path": "asset:${bullet}/velocity"
    },
    "expect": {
      "contains": "650"
    }
  },
  {
    "tool": "inspect_set",
    "arguments": {
      "path": "asset:${bullet}/damage",
      "value": "100"
    },
    "expect": {
      "contains": "OK:"
    }
  },
  {
    "tool": "inspect",
    "arguments": {
      "path": "asset:${bullet}/damage"
    },
    "expect": {
      "contains": "100"
    }
  }
]
2. Assign flight and impact effects
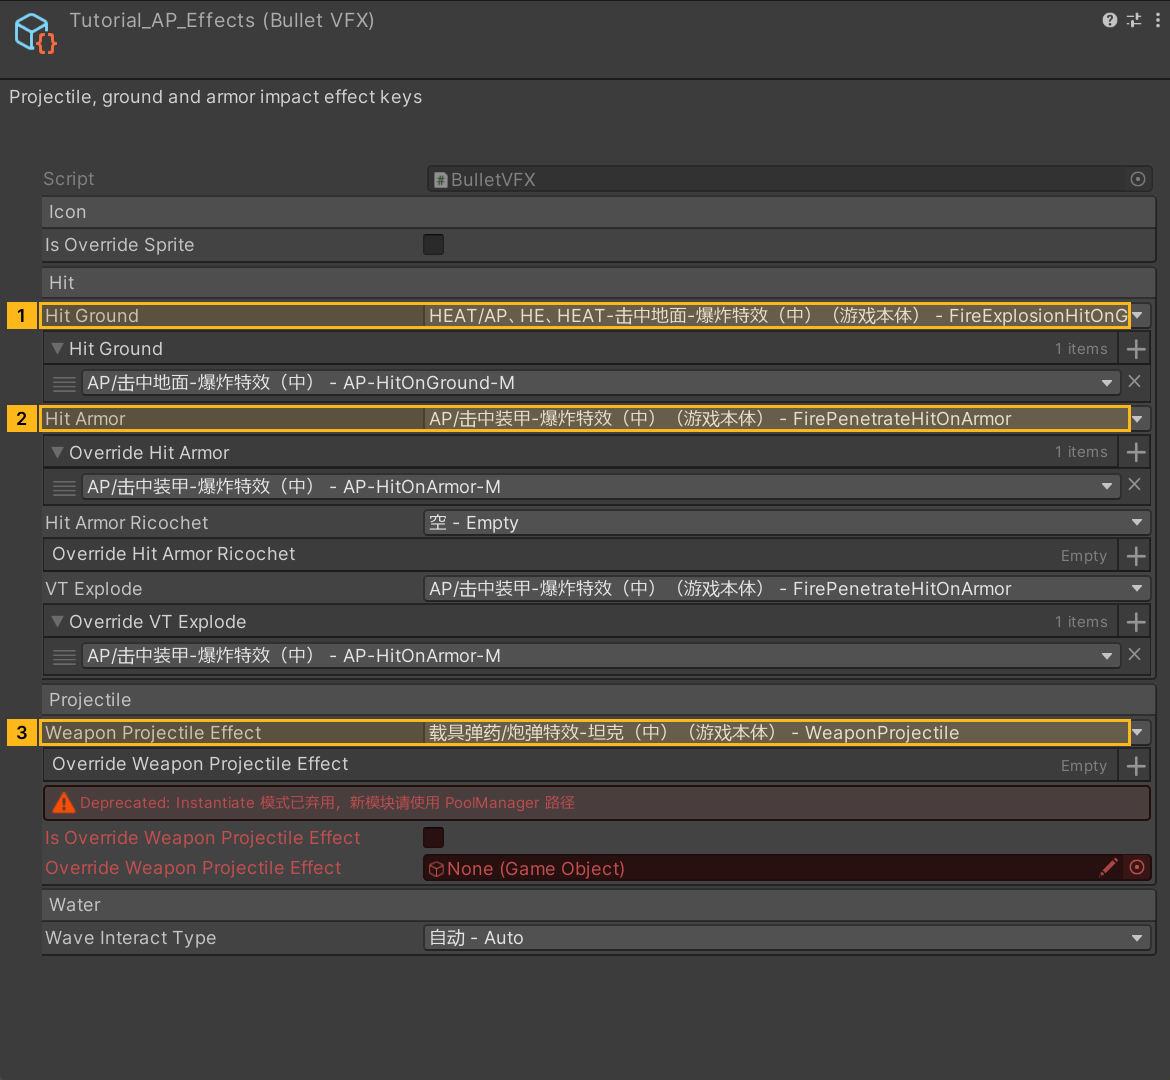
- Duplicate a working BulletVFX asset in Project, then drag the copy to the projectile's Bullet VFX slot (
bulletVFX). - Open BulletVFX and choose the keys below from the object-pool dropdowns. Ensure that the named effect resources load with the package.
- Set
isOverrideSpriteandbulletSpriteif the round needs a different HUD icon. Configure the muzzle flash and firing sound in the gun data.
| Event | Fields |
|---|---|
| Projectile in flight | weaponProjectileEffect and overrideWeaponProjectileEffects |
| Ground impact | hitGround and overrideHitGrounds |
| Armor impact | hitArmor and overrideHitArmors |
| Armor ricochet | hitArmorRicochet and overrideHitArmorRicochets |
| Water impact | hitWater and overrideHitWaters, displayed when the water interaction type exposes manual settings. |
Use object-pool keys for new assets. The two fields isOverrideWeaponProjectileEffect and overrideWeaponProjectileEffect reference a GameObject through the legacy Instantiate path.
Click to expand MCP actionsClick to collapse MCP actions
[
  {
    "tool": "inspect_set",
    "arguments": {
      "path": "asset:${bullet}/bulletVFX",
      "value": "@asset:${vfx}"
    },
    "expect": {
      "contains": "OK:"
    }
  },
  {
    "tool": "inspect",
    "arguments": {
      "path": "asset:${bullet}/bulletVFX/name"
    },
    "expect": {
      "contains": "Tutorial_AP_Effects"
    }
  },
  {
    "tool": "inspect",
    "arguments": {
      "path": "asset:${vfx}/hitGround"
    }
  },
  {
    "tool": "inspect",
    "arguments": {
      "path": "asset:${vfx}/hitArmor"
    }
  },
  {
    "tool": "inspect",
    "arguments": {
      "path": "asset:${vfx}/weaponProjectileEffect"
    }
  }
]
3. Check projectile flight and impact feedback
Open the vehicle test range and choose the new round. Fire at the front of a nearby target. Check the projectile, hit result and armor effect. Then try the ground, sloped armor and water to check the corresponding effects. When comparing penetration at different distances, use the same plate and a similar impact angle.
- If the round is missing, check the active gun's Bullet Data and rebuild the test package.
- If a hit registers but no effect appears, check the BulletVFX reference and the matching pool key.
- In MCP, use
range_fireinshellmode to test projectile flight. Theimpactmode runs the hit pipeline directly so you can isolate a damage test.
Click to expand MCP actionsClick to collapse MCP actions
[
  {
    "tool": "inspect",
    "arguments": {
      "path": "asset:${bullet}/velocity"
    },
    "expect": {
      "contains": "650"
    }
  }
]
Click to expand MCP actionsClick to collapse MCP actions
Runtime test pending. Bind the shooter and target IDs in the range. Check ammo consumption, reload and visual effects using the guide.
[
  {
    "tool": "runtime_status",
    "arguments": {}
  },
  {
    "tool": "range_ammo",
    "arguments": {
      "id": "${tankEntityId}"
    }
  },
  {
    "tool": "range_fire",
    "arguments": {
      "shooter": "${tankEntityId}",
      "target": "${targetEntityId}",
      "gun": 0,
      "ammo": "0",
      "mode": "shell"
    }
  }
]