Set up a Track IK suspension arm
中文 | English
Run this command at the repository root to replay the examples through the local Unity MCP. The command also captures screenshots in both languages.
python Docs/Manual/manual/tools/tutorials.py run track-ik-suspension --capture
Click to expand MCP actionsClick to collapse MCP actions
Prepare the teaching sample. The recipe provides ${variables}.
{
  "variables": {
    "model": "${fixture}/Tutorial_TrackIK.prefab"
  },
  "calls": [
    {
      "tool": "invoke",
      "arguments": {
        "path": "static:UnityEditor.AssetDatabase/CreateFolder",
        "args": [
          "${fixtureParent}",
          "${folder}"
        ]
      },
      "expect": {
        "regex": "\\(String\\) [a-f0-9]{32}"
      }
    }
  ]
}
TrackIK rotates a suspension arm as its road wheel moves. This example uses one arm and one road wheel in the same model prefab.
1. Prepare the model hierarchy
Separate the suspension arm into its own node and put its pivot at the hull connection. Add SuspensionArm and RoadWheel under MainBody. Add an empty StandardUCS node in the same prefab and align its up and right axes to the hull. Place the wheel forward of the arm pivot. The example wheel's local position is (0, -0.25, 1).
Click to expand MCP actionsClick to collapse MCP actions
[
  {
    "tool": "prefab_edit",
    "arguments": {
      "json": {
        "path": "${model}",
        "mode": "create",
        "component": "UnityEngine.Transform",
        "children": [
          "MainBody/SuspensionArm",
          "MainBody/RoadWheel",
          "StandardUCS"
        ]
      }
    },
    "expect": {
      "equals": {
        "ok": true
      }
    }
  },
  {
    "tool": "prefab_edit",
    "arguments": {
      "json": {
        "path": "${model}",
        "mode": "update",
        "component": "UnityEngine.Transform",
        "child": "MainBody/RoadWheel",
        "values": {
          "m_LocalPosition": {
            "x": 0,
            "y": -0.25,
            "z": 1
          }
        }
      }
    },
    "expect": {
      "equals": {
        "ok": true
      }
    }
  }
]
2. Configure TrackIK
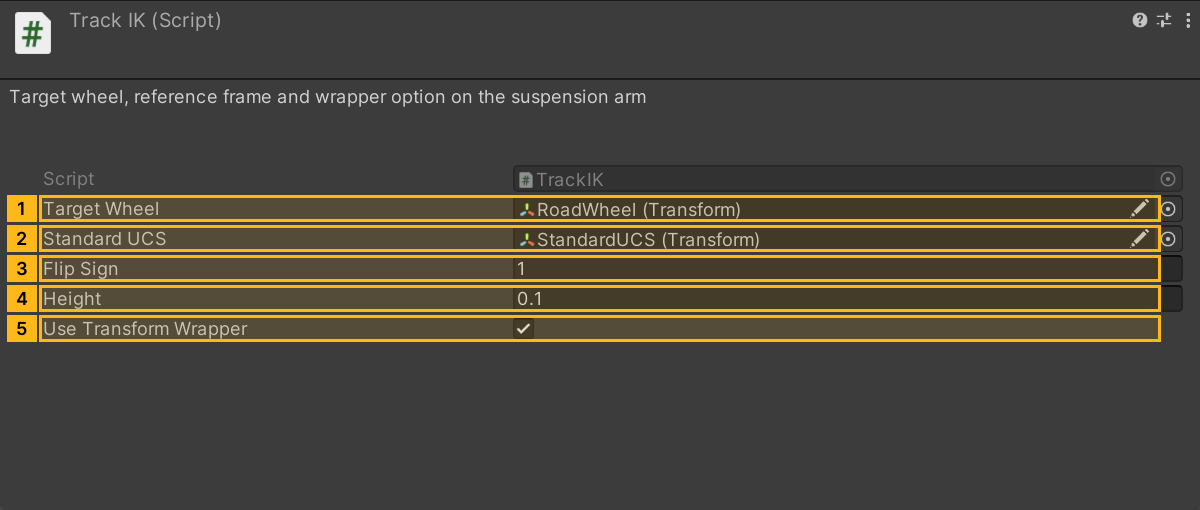
Add TrackIK to SuspensionArm. Set Target Wheel to RoadWheel and Standard UCS to StandardUCS. The example uses a Height of 0.1 and a Flip Sign of 1.
Leave Use Transform Wrapper enabled. In game, the wrapper at the pivot points its local Z+ toward the target direction while preserving the mesh's initial placement relative to the wrapper. With the wrapper disabled, the script rotates the arm directly, so the arm model's Z+ should point forward along the arm.
Repeat on every arm on both sides. In the original KV-2 example, MainBody/TrackIK_011 points to the sixth left road wheel, L6. Its reference is StandardUCS at the model root. Give each arm the wheel that matches its position. The original screenshot used a Height of 0. This tutorial uses 0.1 to illustrate the offset.
Click to expand MCP actionsClick to collapse MCP actions
[
  {
    "tool": "prefab_edit",
    "arguments": {
      "json": {
        "path": "${model}",
        "mode": "update",
        "component": "ShanghaiWindy.Core.TrackIK",
        "child": "MainBody/SuspensionArm",
        "values": {
          "isFlip": 1,
          "height": 0.1,
          "useTransformWrapper": true
        },
        "references": [
          {
            "property": "target",
            "child": "MainBody/RoadWheel",
            "component": "UnityEngine.Transform"
          },
          {
            "property": "standardUCS",
            "child": "StandardUCS",
            "component": "UnityEngine.Transform"
          }
        ]
      }
    },
    "expect": {
      "equals": {
        "ok": true
      }
    }
  }
]
3. Save and verify
Save the collision prefab in Prefab Mode, then recheck both Transform references on each arm. Select an arm in Scene view and check that its guide line points to the intended road wheel. Pack again and check the rotation and height offset in the Vehicle Playground.
Click to expand MCP actionsClick to collapse MCP actions
[
  {
    "tool": "inspect",
    "arguments": {
      "path": "asset:${model}/MainBody/SuspensionArm/TrackIK/target/name"
    },
    "expect": {
      "contains": "RoadWheel"
    }
  },
  {
    "tool": "inspect",
    "arguments": {
      "path": "asset:${model}/MainBody/SuspensionArm/TrackIK/standardUCS/name"
    },
    "expect": {
      "contains": "StandardUCS"
    }
  },
  {
    "tool": "inspect",
    "arguments": {
      "path": "asset:${model}/MainBody/SuspensionArm/TrackIK/height"
    },
    "expect": {
      "contains": "0.1"
    }
  },
  {
    "tool": "inspect",
    "arguments": {
      "path": "asset:${model}/MainBody/SuspensionArm/TrackIK/useTransformWrapper"
    },
    "expect": {
      "contains": "True"
    }
  },
  {
    "tool": "inspect",
    "arguments": {
      "path": "asset:${model}/MainBody/RoadWheel/transform/localPosition/z"
    },
    "expect": {
      "contains": "(Single) 1"
    }
  }
]