VehicleLightAttachment Guide
中文 | English
Run this command at the repository root to replay the examples through the local Unity MCP. The command also captures screenshots in both languages.
python Docs/Manual/manual/tools/tutorials.py run vehicle-light-component --capture
Click to expand MCP actionsClick to collapse MCP actions
Prepare the teaching sample. The recipe provides ${variables}.
{
  "variables": {
    "asset": "${fixture}/Tutorial_Light.prefab"
  },
  "calls": [
    {
      "tool": "invoke",
      "arguments": {
        "path": "static:UnityEditor.AssetDatabase/CreateFolder",
        "args": [
          "${fixtureParent}",
          "${folder}"
        ]
      },
      "expect": {
        "regex": "\\(String\\) [a-f0-9]{32}"
      }
    }
  ]
}
This example configures a circular low-beam light. VehicleLightAttachment is serialized configuration data; VehicleLightAttachmentMonoComponent is the component attached to a GameObject. Field names keep their original C# identifiers.
1. Create the component and bind the object
- Create a light object in the vehicle prefab and add
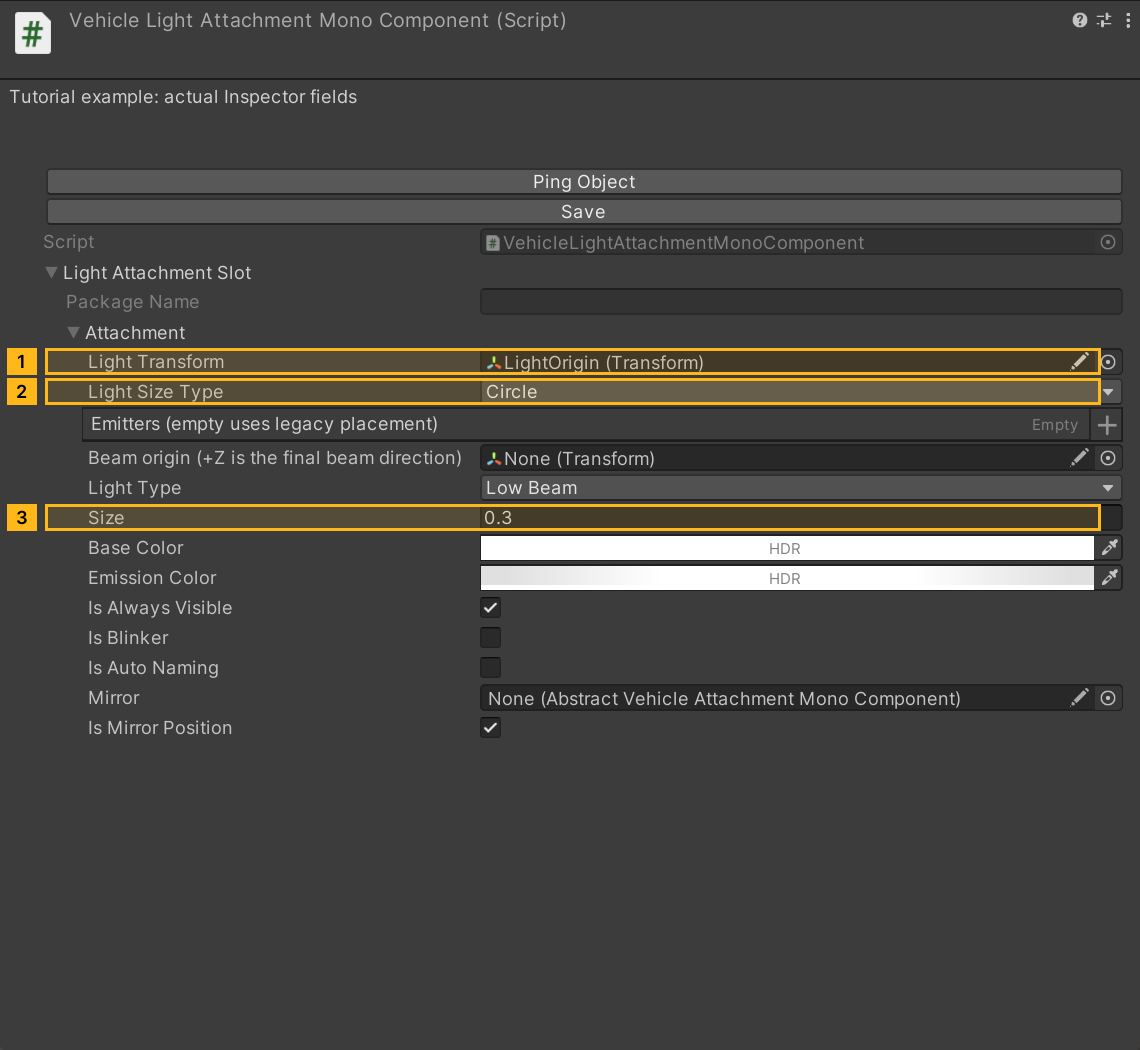
VehicleLightAttachmentMonoComponent. ExpandlightAttachmentSlot, thenattachment, and assign the light origin tolightTransform. This example uses a separateTutorial_Light.prefabwith a node namedLightOrigin. - The same object needs
VehicleAttachmentMonoComponentfor runtime discovery. SetattachmentSlotTypetoSpecificand assign the light component tospecificAttachmentMonoComponent. The project's CustomEditor adds this companion when drawing the light Inspector; the recipe creates and saves it explicitly.
For a complete vehicle, create separate origin nodes under MainBody for left and right low beams, high beams, brake lights, reverse lights and indicators. Line up one side, then use Create Mirror and check the other side. Use Duplicate to make another independent light.
Click to expand MCP actionsClick to collapse MCP actions
[
  {
    "tool": "prefab_edit",
    "arguments": {
      "json": {
        "path": "${asset}",
        "mode": "create",
        "component": "ShanghaiWindy.Core.VehicleLightAttachmentMonoComponent",
        "values": {
          "lightAttachmentSlot": {
            "attachment": {}
          }
        },
        "children": [
          "LightOrigin"
        ]
      }
    },
    "expect": {
      "equals": {
        "ok": true
      }
    }
  },
  {
    "tool": "prefab_edit",
    "arguments": {
      "json": {
        "path": "${asset}",
        "mode": "update",
        "component": "ShanghaiWindy.Core.VehicleAttachmentMonoComponent",
        "values": {
          "attachmentSlotType": 1
        },
        "references": [
          {
            "property": "specificAttachmentMonoComponent",
            "child": "",
            "component": "ShanghaiWindy.Core.VehicleLightAttachmentMonoComponent"
          }
        ]
      }
    },
    "expect": {
      "equals": {
        "ok": true
      }
    }
  },
  {
    "tool": "prefab_edit",
    "arguments": {
      "json": {
        "path": "${asset}",
        "mode": "update",
        "component": "ShanghaiWindy.Core.VehicleLightAttachmentMonoComponent",
        "references": [
          {
            "property": "lightAttachmentSlot.attachment.lightTransform",
            "child": "LightOrigin"
          }
        ]
      }
    },
    "expect": {
      "equals": {
        "ok": true
      }
    }
  }
]
2. Shape and size
- Set the shape to
Circle.CircleandHalfCircleshowradiusSize; this example uses 0.3. - Rectangles use
rectSizeinstead, andCustomShapeusescustomShapeRenderers; the existing Light/AuthoringSamples assets are a reference.
Click to expand MCP actionsClick to collapse MCP actions
[
  {
    "tool": "prefab_edit",
    "arguments": {
      "json": {
        "path": "${asset}",
        "mode": "update",
        "component": "ShanghaiWindy.Core.VehicleLightAttachmentMonoComponent",
        "values": {
          "lightAttachmentSlot": {
            "attachment": {
              "lightSizeType": 0,
              "radiusSize": 0.3
            }
          }
        }
      }
    },
    "expect": {
      "equals": {
        "ok": true
      }
    }
  }
]
3. Appearance and visibility
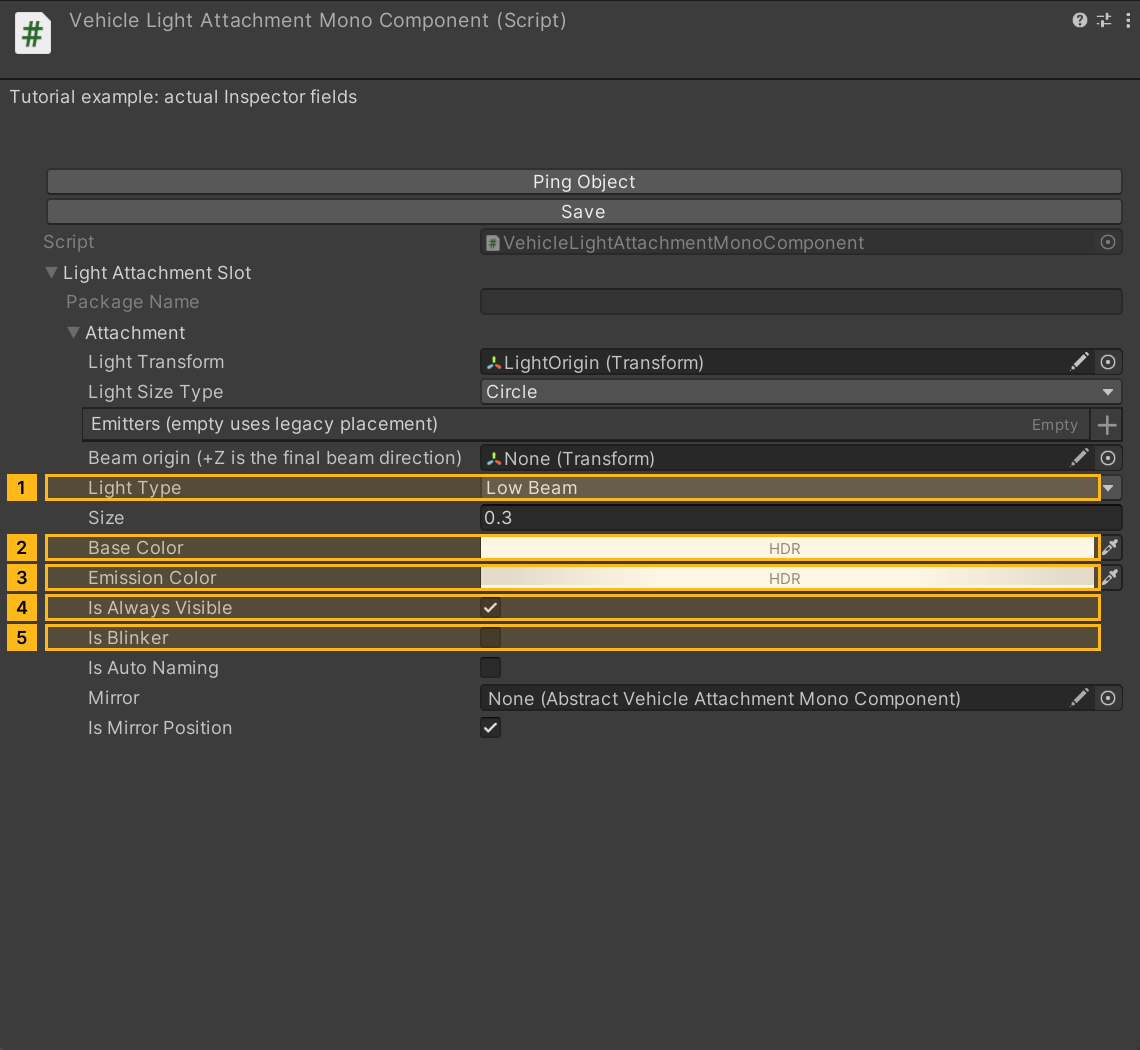
- Set
lightTypetoLowBeam, then use Set From Preset to fill its colors. To tune the light by hand, editbaseColorand HDRemissionColorseparately. The brightness and radius in the older VT-1A example suit that vehicle. - Keep
isAlwaysVisible = trueandisBlinker = false, and turn offisAutoNamingfor this example. EnablingisBlinkerreveals frequency and the fraction of each cycle spent on. AtblinkerFrequency = 1andblinkerStep = 0.5, the light stays on for about half a second per cycle. lensEmittersholds up to eight lens-glare sampling nodes.beamOriginsets a separate beam origin, whose local +Z points along the beam. Both are optional for this basic Circle setup. WithCustomShape, use Preview lights on/off to check the renderers.
Click to expand MCP actionsClick to collapse MCP actions
[
  {
    "tool": "prefab_edit",
    "arguments": {
      "json": {
        "path": "${asset}",
        "mode": "update",
        "component": "ShanghaiWindy.Core.VehicleLightAttachmentMonoComponent",
        "values": {
          "lightAttachmentSlot": {
            "attachment": {
              "lightType": 0,
              "baseColor": {
                "r": 1,
                "g": 1,
                "b": 1,
                "a": 1
              },
              "emissionColor": {
                "r": 3.5,
                "g": 3.5,
                "b": 3.5,
                "a": 1
              },
              "isAlwaysVisible": true,
              "isBlinker": false,
              "isAutoNaming": false
            }
          }
        }
      }
    },
    "expect": {
      "equals": {
        "ok": true
      }
    }
  }
]
4. Verify
- Check the object binding to
lightTransform, that the companion runtime components were saved, that the Circle radius and colors were written, and thatlensEmittershas at most 8 entries; Inspector screenshots show field locations and values, not runtime behavior, so look at the light in game once as well.
Click to expand MCP actionsClick to collapse MCP actions
[
  {
    "tool": "inspect",
    "arguments": {
      "path": "asset:${asset}/GetComponent(ShanghaiWindy.Core.VehicleAttachmentMonoComponent)/attachmentSlotType"
    },
    "expect": {
      "contains": "Specific"
    }
  },
  {
    "tool": "inspect",
    "arguments": {
      "path": "asset:${asset}/GetComponent(ShanghaiWindy.Core.VehicleAttachmentMonoComponent)/specificAttachmentMonoComponent"
    },
    "expect": {
      "contains": "--- VehicleLightAttachmentMonoComponent ---"
    }
  },
  {
    "tool": "inspect",
    "arguments": {
      "path": "asset:${asset}/GetComponent(ShanghaiWindy.Core.VehicleLightAttachmentMonoComponent)/lightAttachmentSlot/attachment/lightTransform/name"
    },
    "expect": {
      "contains": "LightOrigin"
    }
  },
  {
    "tool": "inspect",
    "arguments": {
      "path": "asset:${asset}/GetComponent(ShanghaiWindy.Core.VehicleLightAttachmentMonoComponent)/lightAttachmentSlot/attachment/radiusSize"
    },
    "expect": {
      "contains": "0.3"
    }
  }
]