VehicleLightAttachment 使用说明
中文 | English
在仓库根目录运行以下命令,用本机 Unity MCP 回放本页示例。 命令也会重拍两种语言的配图。
python Docs/Manual/manual/tools/tutorials.py run vehicle-light-component --capture
点击展开 MCP 操作点击收起 MCP 操作
准备教学样例。${变量} 由配方提供。
{
  "variables": {
    "asset": "${fixture}/Tutorial_Light.prefab"
  },
  "calls": [
    {
      "tool": "invoke",
      "arguments": {
        "path": "static:UnityEditor.AssetDatabase/CreateFolder",
        "args": [
          "${fixtureParent}",
          "${folder}"
        ]
      },
      "expect": {
        "regex": "\\(String\\) [a-f0-9]{32}"
      }
    }
  ]
}
本例配置一个圆形近光灯。VehicleLightAttachment 是序列化配置数据;挂载到 GameObject 的组件是 VehicleLightAttachmentMonoComponent。字段名保留 C# 原始标识符。
1. 创建组件并绑定对象
- 在载具 prefab 中创建灯光物体,添加
VehicleLightAttachmentMonoComponent。展开lightAttachmentSlot和其中的attachment,将灯光定位节点赋给lightTransform。本例使用独立的Tutorial_Light.prefab,节点名为LightOrigin。 - 同一对象上还需要
VehicleAttachmentMonoComponent:attachmentSlotType设为Specific,specificAttachmentMonoComponent指向灯光组件。项目 CustomEditor 显示灯光 Inspector 时会自动补这个伴随组件;配方会显式创建并保存它。
配置整车时,在 MainBody 下为左右近光、远光、刹车、倒车和转向灯各建定位节点。先校好一侧,再用 创建镜像 - Create Mirror 检查另一侧。要添加独立实例时可用 复制 - Duplicate。
点击展开 MCP 操作点击收起 MCP 操作
[
  {
    "tool": "prefab_edit",
    "arguments": {
      "json": {
        "path": "${asset}",
        "mode": "create",
        "component": "ShanghaiWindy.Core.VehicleLightAttachmentMonoComponent",
        "values": {
          "lightAttachmentSlot": {
            "attachment": {}
          }
        },
        "children": [
          "LightOrigin"
        ]
      }
    },
    "expect": {
      "equals": {
        "ok": true
      }
    }
  },
  {
    "tool": "prefab_edit",
    "arguments": {
      "json": {
        "path": "${asset}",
        "mode": "update",
        "component": "ShanghaiWindy.Core.VehicleAttachmentMonoComponent",
        "values": {
          "attachmentSlotType": 1
        },
        "references": [
          {
            "property": "specificAttachmentMonoComponent",
            "child": "",
            "component": "ShanghaiWindy.Core.VehicleLightAttachmentMonoComponent"
          }
        ]
      }
    },
    "expect": {
      "equals": {
        "ok": true
      }
    }
  },
  {
    "tool": "prefab_edit",
    "arguments": {
      "json": {
        "path": "${asset}",
        "mode": "update",
        "component": "ShanghaiWindy.Core.VehicleLightAttachmentMonoComponent",
        "references": [
          {
            "property": "lightAttachmentSlot.attachment.lightTransform",
            "child": "LightOrigin"
          }
        ]
      }
    },
    "expect": {
      "equals": {
        "ok": true
      }
    }
  }
]
2. 形状与尺寸
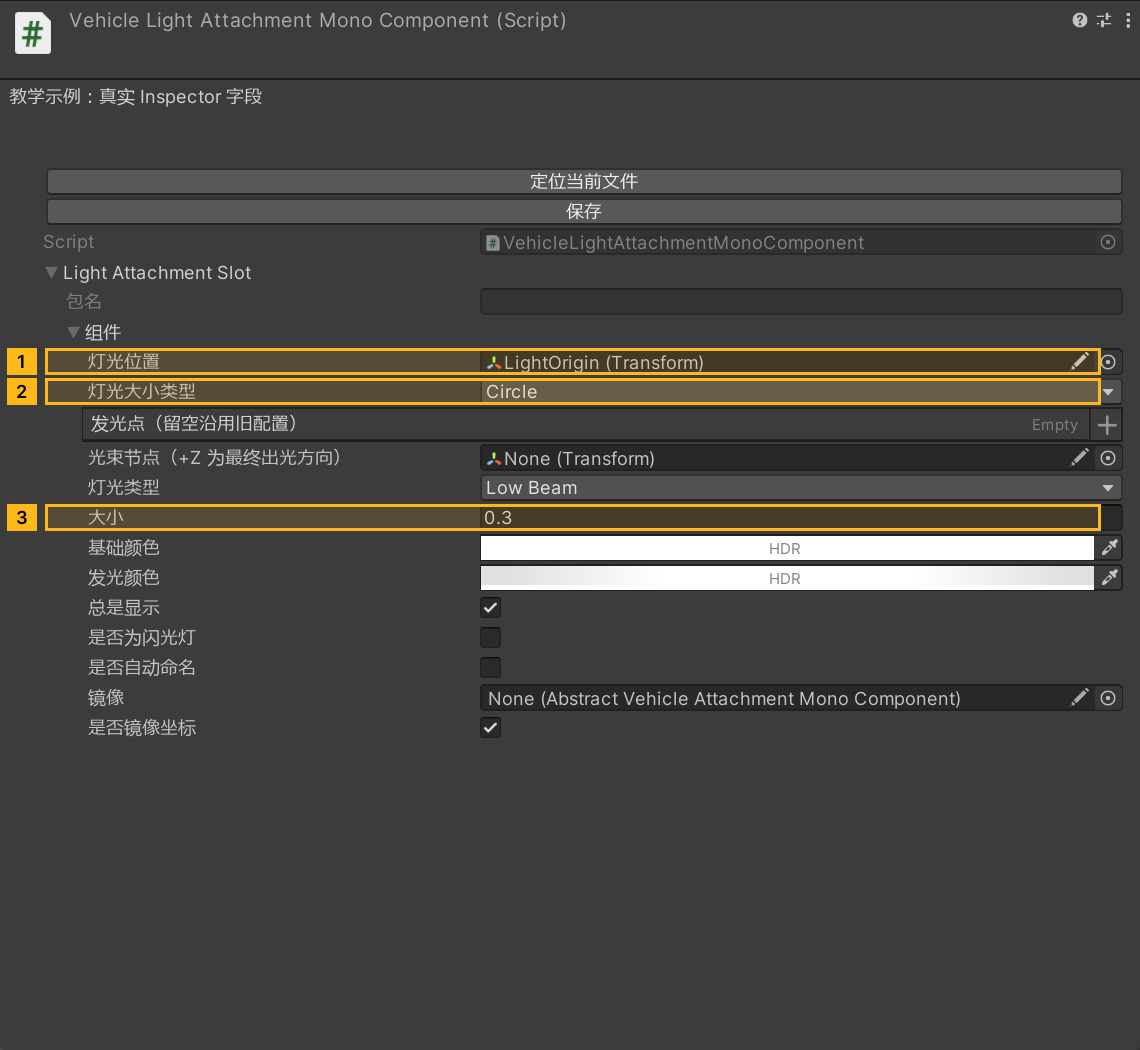
- 把形状设为
Circle;Circle与HalfCircle显示radiusSize,本例填 0.3。 - 矩形改用
rectSize;CustomShape改用customShapeRenderers,现有 Light/AuthoringSamples 资源可作参考。
点击展开 MCP 操作点击收起 MCP 操作
[
  {
    "tool": "prefab_edit",
    "arguments": {
      "json": {
        "path": "${asset}",
        "mode": "update",
        "component": "ShanghaiWindy.Core.VehicleLightAttachmentMonoComponent",
        "values": {
          "lightAttachmentSlot": {
            "attachment": {
              "lightSizeType": 0,
              "radiusSize": 0.3
            }
          }
        }
      }
    },
    "expect": {
      "equals": {
        "ok": true
      }
    }
  }
]
3. 外观与可见性
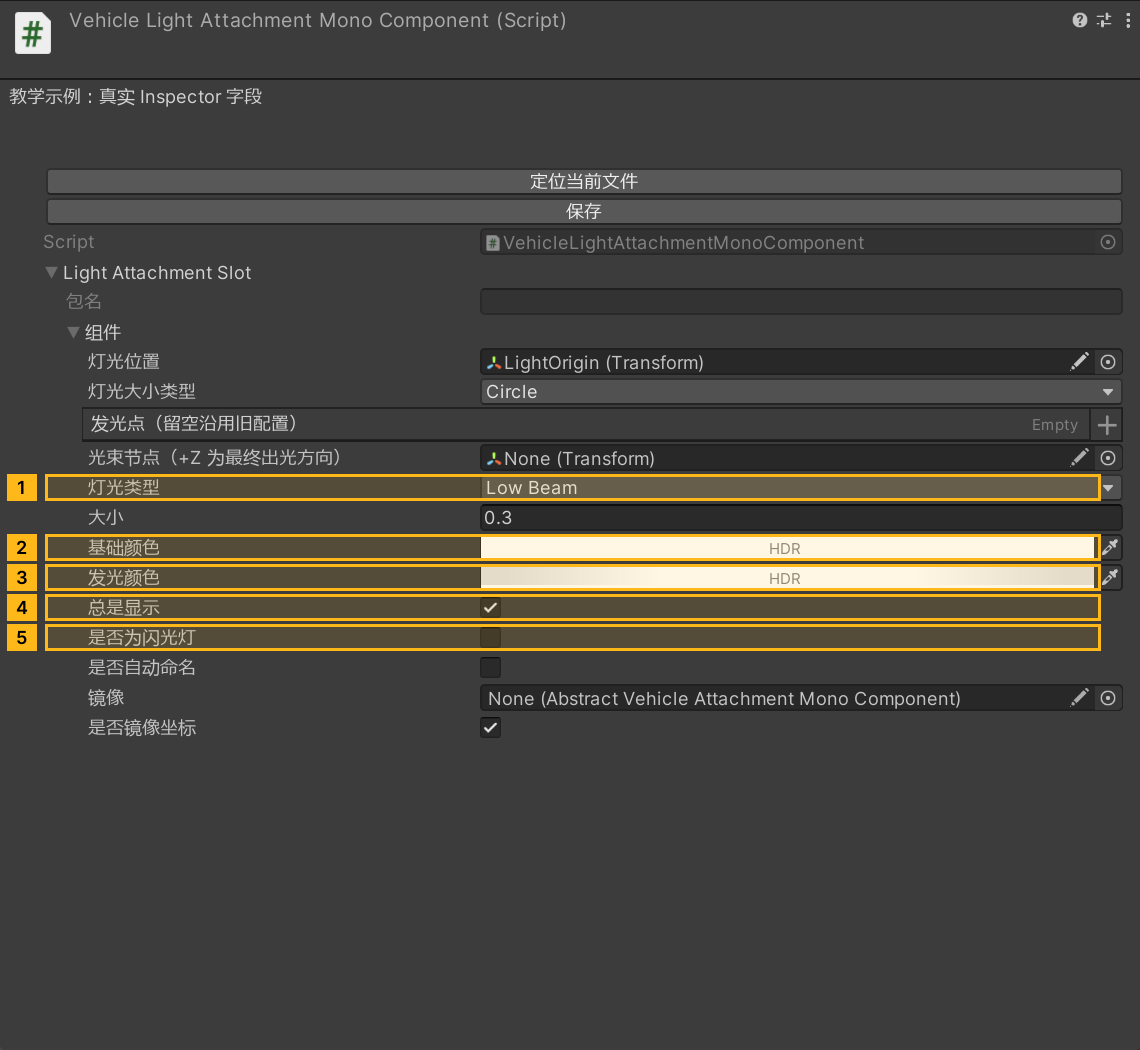
lightType选LowBeam。点击 使用预设 - Set From Preset 可应用近光的基础色和 HDR 自发光。手动配色时分别编辑baseColor与emissionColor。旧 VT-1A 图中的亮度和半径是该车的示例值。- 本例保持
isAlwaysVisible = true、isBlinker = false,关闭isAutoNaming。勾选isBlinker后会显示频率与点亮比例。以blinkerFrequency = 1、blinkerStep = 0.5为例,每秒约亮半秒。 lensEmitters是镜片眩光采样节点,最多 8 个。可在beamOrigin指定光束的单独原点,节点的局部 +Z 是出光方向。基础 Circle 可将两项留空。使用CustomShape时,可用 预览开灯/关灯 查看 Renderer 的切换。
点击展开 MCP 操作点击收起 MCP 操作
[
  {
    "tool": "prefab_edit",
    "arguments": {
      "json": {
        "path": "${asset}",
        "mode": "update",
        "component": "ShanghaiWindy.Core.VehicleLightAttachmentMonoComponent",
        "values": {
          "lightAttachmentSlot": {
            "attachment": {
              "lightType": 0,
              "baseColor": {
                "r": 1,
                "g": 1,
                "b": 1,
                "a": 1
              },
              "emissionColor": {
                "r": 3.5,
                "g": 3.5,
                "b": 3.5,
                "a": 1
              },
              "isAlwaysVisible": true,
              "isBlinker": false,
              "isAutoNaming": false
            }
          }
        }
      }
    },
    "expect": {
      "equals": {
        "ok": true
      }
    }
  }
]
4. 检查
- 确认对象与
lightTransform绑定、伴随运行时组件已保存、Circle 半径与颜色写入正确、lensEmitters不超过 8 个;Inspector 截图只证明字段位置与取值,代表不了实际表现,仍需在游戏里再看一次。
点击展开 MCP 操作点击收起 MCP 操作
[
  {
    "tool": "inspect",
    "arguments": {
      "path": "asset:${asset}/GetComponent(ShanghaiWindy.Core.VehicleAttachmentMonoComponent)/attachmentSlotType"
    },
    "expect": {
      "contains": "Specific"
    }
  },
  {
    "tool": "inspect",
    "arguments": {
      "path": "asset:${asset}/GetComponent(ShanghaiWindy.Core.VehicleAttachmentMonoComponent)/specificAttachmentMonoComponent"
    },
    "expect": {
      "contains": "--- VehicleLightAttachmentMonoComponent ---"
    }
  },
  {
    "tool": "inspect",
    "arguments": {
      "path": "asset:${asset}/GetComponent(ShanghaiWindy.Core.VehicleLightAttachmentMonoComponent)/lightAttachmentSlot/attachment/lightTransform/name"
    },
    "expect": {
      "contains": "LightOrigin"
    }
  },
  {
    "tool": "inspect",
    "arguments": {
      "path": "asset:${asset}/GetComponent(ShanghaiWindy.Core.VehicleLightAttachmentMonoComponent)/lightAttachmentSlot/attachment/radiusSize"
    },
    "expect": {
      "contains": "0.3"
    }
  }
]