坦克主动防御系统
中文 | English
在仓库根目录运行以下命令,用本机 Unity MCP 回放本页示例。 命令也会重拍两种语言的配图。
python Docs/Manual/manual/tools/tutorials.py run tank-active-protection --capture
点击展开 MCP 操作点击收起 MCP 操作
准备教学样例。${变量} 由配方提供。
{
  "variables": {
    "aps": "${fixture}/Tutorial_ApsPart.asset",
    "native": "${fixture}/Tutorial_NativeAps.prefab"
  },
  "calls": [
    {
      "tool": "invoke",
      "arguments": {
        "path": "static:UnityEditor.AssetDatabase/CreateFolder",
        "args": [
          "${fixtureParent}",
          "${folder}"
        ]
      },
      "expect": {
        "contains": "(String)"
      }
    },
    {
      "tool": "invoke",
      "arguments": {
        "path": "static:UnityEditor.AssetDatabase/CopyAsset",
        "args": [
          "Packages/com.shanghaiwindy.coreresources/DIY/Function/Aps/Aps.asset",
          "${aps}"
        ]
      },
      "expect": {
        "contains": "True"
      }
    }
  ]
}
本教程说明主动防护系统(APS)的数据入口、覆盖范围的判定方式,以及如何在编辑器里验证一次拦截配置。
1. 挂载 APS 组件
按基础载具找到显示模型,在 Unity 的 Prefab Mode 中打开它,在 Hierarchy 里选择车体或车体下合适的挂载子节点,然后在 Inspector 中 Add Component > Vehicle Aps Attachment Mono Component(C# 类名 VehicleApsAttachmentMonoComponent)。
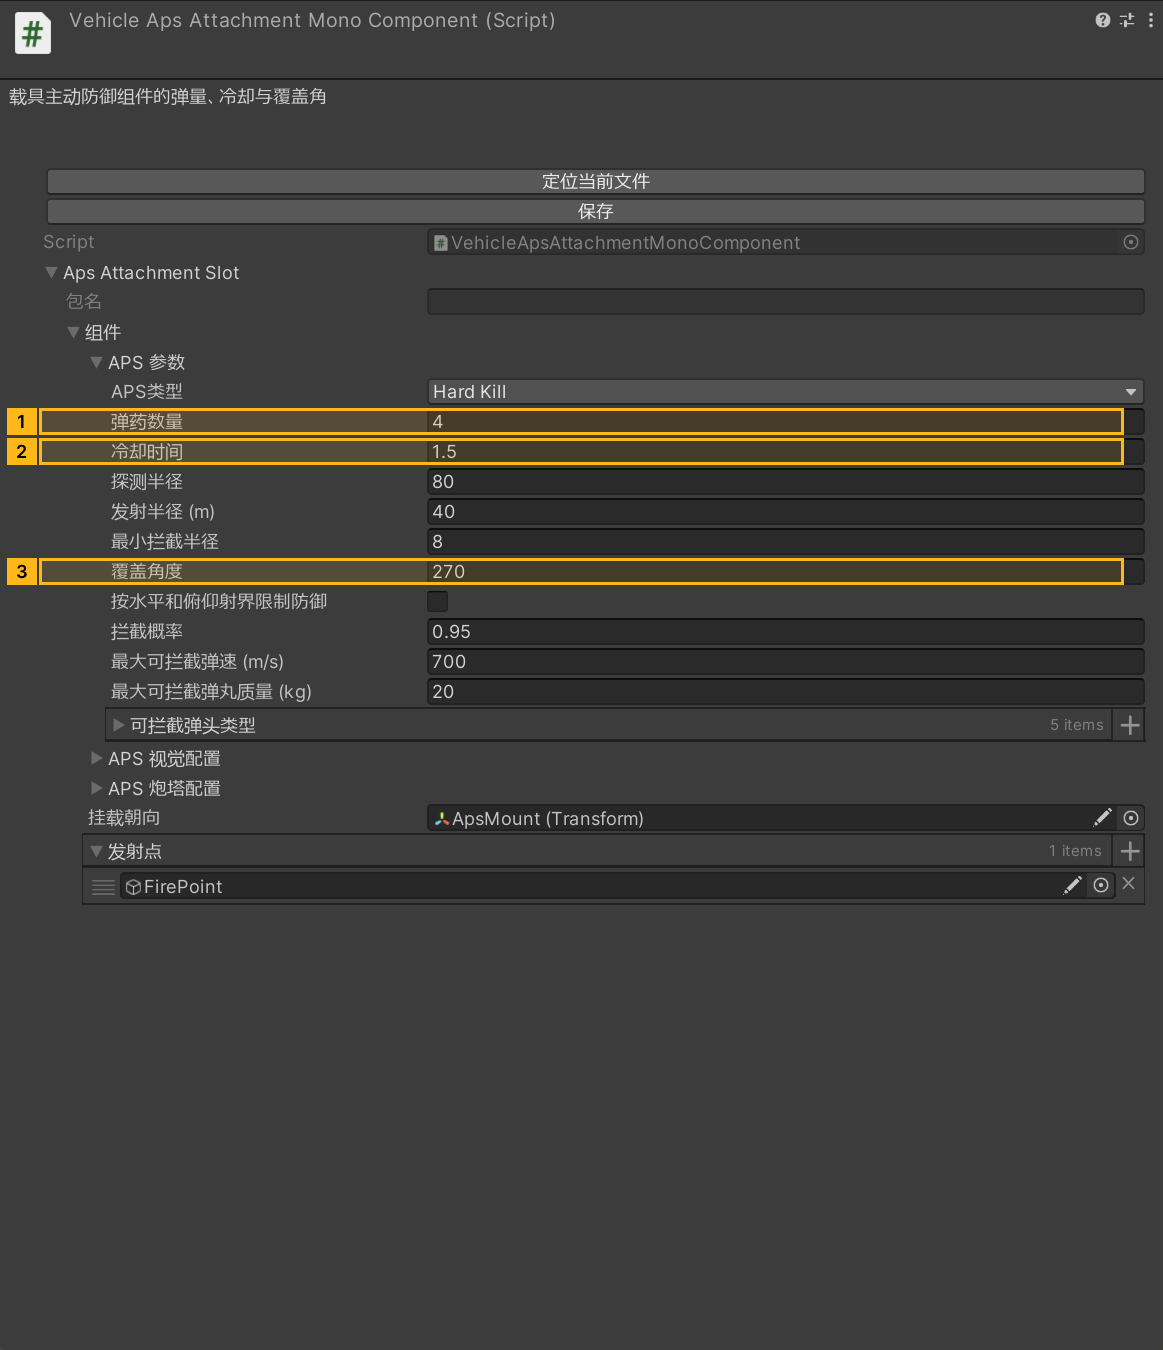
确认同节点的 VehicleAttachmentMonoComponent 已选择 Specific,组件引用指向刚添加的 APS。展开 apsAttachmentSlot,配置 APS Profile。截图示例把车体下的 ApsMount transform 指定为挂载点,并在 Fire Points 里至少绑定一个 FirePoint。
蓝色 Z 轴箭头表示前向;如果不指定,覆盖计算使用载具自身的旋转。
Visual Profile 控制视听反馈;Turret Profile 是可选项,只在发射器需要转向时配置。
内置 DIY 示例位于 Packages/com.shanghaiwindy.coreresources/DIY/Function/Aps/Aps.asset,它是一个 DIYApsData,可视 prefab 提供 ApsTurret 与 ApsTurret/ApsGun 路径,预设可能覆盖基础 DIY profile。该 prefab 保存的是图形层级,截图展示的是组件配置。
点击展开 MCP 操作点击收起 MCP 操作
[
  {
    "tool": "prefab_edit",
    "arguments": {
      "json": {
        "path": "${native}",
        "mode": "create",
        "component": "ShanghaiWindy.Core.VehicleApsAttachmentMonoComponent",
        "children": [
          "ApsMount",
          "ApsMount/FirePoint"
        ],
        "values": {
          "apsAttachmentSlot": {
            "attachment": {
              "apsProfile": {
                "coverageAngle": 270,
                "ammoCount": 4,
                "cooldown": 1.5
              },
              "firePoints": [
                null
              ]
            }
          }
        },
        "references": [
          {
            "property": "apsAttachmentSlot.attachment.mountTransform",
            "child": "ApsMount"
          },
          {
            "property": "apsAttachmentSlot.attachment.firePoints.Array.data[0]",
            "child": "ApsMount/FirePoint",
            "component": "UnityEngine.GameObject"
          }
        ]
      }
    },
    "expect": {
      "equals": {
        "ok": true
      }
    }
  },
  {
    "tool": "prefab_edit",
    "arguments": {
      "json": {
        "path": "${native}",
        "mode": "update",
        "component": "ShanghaiWindy.Core.VehicleAttachmentMonoComponent",
        "values": {
          "attachmentSlotType": 1
        },
        "references": [
          {
            "property": "specificAttachmentMonoComponent",
            "child": "",
            "component": "ShanghaiWindy.Core.VehicleApsAttachmentMonoComponent"
          }
        ]
      }
    },
    "expect": {
      "equals": {
        "ok": true
      }
    }
  },
  {
    "tool": "inspect",
    "arguments": {
      "path": "asset:${aps}/turretPath"
    },
    "expect": {
      "contains": "ApsTurret"
    }
  },
  {
    "tool": "inspect",
    "arguments": {
      "path": "asset:${aps}/gunPath"
    },
    "expect": {
      "contains": "ApsTurret/ApsGun"
    }
  },
  {
    "tool": "inspect",
    "arguments": {
      "path": "asset:${native}/VehicleApsAttachmentMonoComponent/apsAttachmentSlot/attachment/firePoints/0/name"
    },
    "expect": {
      "contains": "FirePoint"
    }
  }
]
2. 理解覆盖范围与拦截条件
截图展示的是原生 VehicleApsAttachmentMonoComponent 的配置:ApsMount 与 FirePoint 已指定,装填 4 发、冷却 1.5 秒、coverageAngle 270 度。这些是原生教学样例的取值。
detectionRadius 是威胁探测距离,fireRadius 是跟踪中的接近弹可以触发拦截的距离,minInterceptRadius 是符合条件的最小距离。APSProfile 源码默认值为 80 m、40 m、8 m,interceptProbability 默认 0.95。
覆盖范围以挂载点前向为基准计算。没有启用 useTraverseLimits 时覆盖是一个三维锥体;启用后按本地偏航在半覆盖角内判定,并额外检查上下仰角限制。
HardKill 分支执行拦截开火,另一个扫描分支只探测、不开火。弹头质量与概率影响拦截是否成功,不影响探测。冷却与剩余装填数同样限制连续拦截。
点击展开 MCP 操作点击收起 MCP 操作
[
  {
    "tool": "inspect",
    "arguments": {
      "path": "asset:${native}/VehicleApsAttachmentMonoComponent/apsAttachmentSlot/attachment/apsProfile/coverageAngle"
    },
    "expect": {
      "contains": "270"
    }
  },
  {
    "tool": "inspect",
    "arguments": {
      "path": "asset:${aps}/apsProfile"
    }
  },
  {
    "tool": "inspect",
    "arguments": {
      "path": "asset:${aps}/presets"
    }
  },
  {
    "tool": "inspect",
    "arguments": {
      "path": "asset:${aps}/launcherParameter/maxTurretAngle"
    }
  }
]
3. 测试 APS 配置
APS 在编辑器中启用。打包版本还会检查运行时的功能开关。
- 先在 Prefab Mode 打开载具模型,检查
apsAttachmentSlot、APS Profile、ApsMount和Fire Points是否指向正确节点。 - 保存并重打包,进入测试场。从挂载覆盖范围内发射一枚兼容的游戏来袭弹,观察是否被拦截,以及状态显示和装填消耗是否符合预期。
- 再从覆盖范围外发射一次,确认不会被拦截。
- 用完装填后再发射一次,确认没有剩余弹药时不会拦截。
诊断:如果完全不触发,先确认编辑器中的 APS 运行时功能已启用,再检查覆盖角度、仰角限制、弹头允许列表、速度与质量阈值。
点击展开 MCP 操作点击收起 MCP 操作
[
  {
    "tool": "inspect",
    "arguments": {
      "path": "asset:${aps}/apsProfile"
    }
  }
]
点击展开 MCP 操作点击收起 MCP 操作
运行时未执行。绑定测试场射手和配有 APS 的目标实体 ID,并确认射手支持该弹种。以 HUD 的 APS 弹量和拦截反馈作为观察项。
[
  {
    "tool": "runtime_status",
    "arguments": {}
  },
  {
    "tool": "range_fire",
    "arguments": {
      "shooter": "${shooterEntityId}",
      "target": "${apsEntityId}",
      "gun": 0,
      "ammo": "HEAT",
      "mode": "shell"
    }
  }
]