Tank active protection system
中文 | English
Run this command at the repository root to replay the examples through the local Unity MCP. The command also captures screenshots in both languages.
python Docs/Manual/manual/tools/tutorials.py run tank-active-protection --capture
Click to expand MCP actionsClick to collapse MCP actions
Prepare the teaching sample. The recipe provides ${variables}.
{
  "variables": {
    "aps": "${fixture}/Tutorial_ApsPart.asset",
    "native": "${fixture}/Tutorial_NativeAps.prefab"
  },
  "calls": [
    {
      "tool": "invoke",
      "arguments": {
        "path": "static:UnityEditor.AssetDatabase/CreateFolder",
        "args": [
          "${fixtureParent}",
          "${folder}"
        ]
      },
      "expect": {
        "contains": "(String)"
      }
    },
    {
      "tool": "invoke",
      "arguments": {
        "path": "static:UnityEditor.AssetDatabase/CopyAsset",
        "args": [
          "Packages/com.shanghaiwindy.coreresources/DIY/Function/Aps/Aps.asset",
          "${aps}"
        ]
      },
      "expect": {
        "contains": "True"
      }
    }
  ]
}
This tutorial covers the APS data entry point, how coverage is evaluated, and how to validate one interception setup in the editor.
1. Attach the APS component
Find the visual model using the first-tank guide and open it in Prefab Mode, pick the hull or a suitable mount child under it in the Hierarchy, then use Inspector > Add Component > Vehicle Aps Attachment Mono Component (C# type VehicleApsAttachmentMonoComponent).
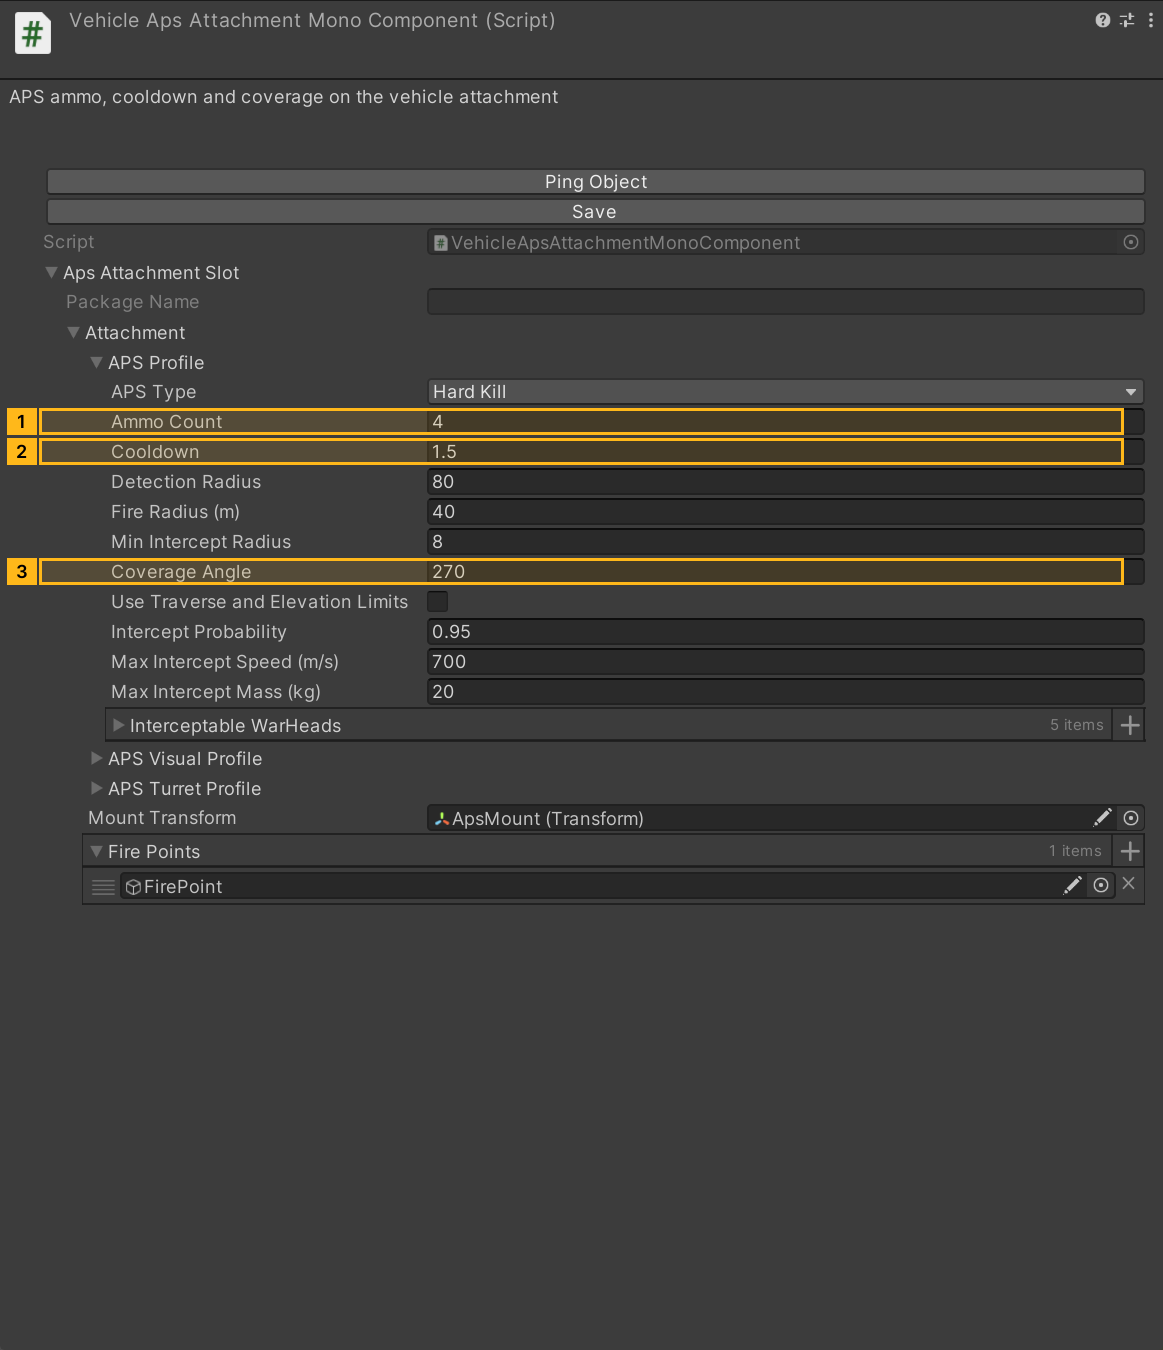
On the same node, check that VehicleAttachmentMonoComponent uses Specific and points to the APS component. Expand apsAttachmentSlot, then configure the APS Profile. The screenshot example assigns the ApsMount transform under the hull as the mount point and binds at least one FirePoint in Fire Points.
The blue Z arrow sets forward; when no transform is assigned, the vehicle's own rotation is used for coverage.
The Visual Profile controls audiovisual feedback, and the Turret Profile is optional, needed only when the launcher rotates.
The built-in DIY example lives at Packages/com.shanghaiwindy.coreresources/DIY/Function/Aps/Aps.asset and is a DIYApsData; its visual prefab supplies the ApsTurret and ApsTurret/ApsGun paths, and presets may override the base DIY profile. That prefab stores the graphics hierarchy, while the screenshot shows the component configuration.
Click to expand MCP actionsClick to collapse MCP actions
[
  {
    "tool": "prefab_edit",
    "arguments": {
      "json": {
        "path": "${native}",
        "mode": "create",
        "component": "ShanghaiWindy.Core.VehicleApsAttachmentMonoComponent",
        "children": [
          "ApsMount",
          "ApsMount/FirePoint"
        ],
        "values": {
          "apsAttachmentSlot": {
            "attachment": {
              "apsProfile": {
                "coverageAngle": 270,
                "ammoCount": 4,
                "cooldown": 1.5
              },
              "firePoints": [
                null
              ]
            }
          }
        },
        "references": [
          {
            "property": "apsAttachmentSlot.attachment.mountTransform",
            "child": "ApsMount"
          },
          {
            "property": "apsAttachmentSlot.attachment.firePoints.Array.data[0]",
            "child": "ApsMount/FirePoint",
            "component": "UnityEngine.GameObject"
          }
        ]
      }
    },
    "expect": {
      "equals": {
        "ok": true
      }
    }
  },
  {
    "tool": "prefab_edit",
    "arguments": {
      "json": {
        "path": "${native}",
        "mode": "update",
        "component": "ShanghaiWindy.Core.VehicleAttachmentMonoComponent",
        "values": {
          "attachmentSlotType": 1
        },
        "references": [
          {
            "property": "specificAttachmentMonoComponent",
            "child": "",
            "component": "ShanghaiWindy.Core.VehicleApsAttachmentMonoComponent"
          }
        ]
      }
    },
    "expect": {
      "equals": {
        "ok": true
      }
    }
  },
  {
    "tool": "inspect",
    "arguments": {
      "path": "asset:${aps}/turretPath"
    },
    "expect": {
      "contains": "ApsTurret"
    }
  },
  {
    "tool": "inspect",
    "arguments": {
      "path": "asset:${aps}/gunPath"
    },
    "expect": {
      "contains": "ApsTurret/ApsGun"
    }
  },
  {
    "tool": "inspect",
    "arguments": {
      "path": "asset:${native}/VehicleApsAttachmentMonoComponent/apsAttachmentSlot/attachment/firePoints/0/name"
    },
    "expect": {
      "contains": "FirePoint"
    }
  }
]
2. Understand coverage and interception conditions
The screenshot depicts the native VehicleApsAttachmentMonoComponent configured with an ApsMount and a FirePoint, 4 charges, a 1.5 s cooldown, and 270 degrees of coverage. These are the teaching values.
detectionRadius is the threat detection distance, fireRadius is where a tracked closing projectile can trigger an interception, and minInterceptRadius is the smallest qualifying distance. The 80 m, 40 m, and 8 m figures, along with 0.95 for interceptProbability, are APSProfile source defaults.
Coverage is evaluated relative to the mounted forward direction. With no useTraverseLimits, coverage is a 3D cone; with it enabled, the check uses local yaw within half the coverage angle plus up/down elevation limits.
HardKill uses interception and fires, while the other scanning branch detects without firing. Warhead mass and chance relate to whether an interception succeeds, not to detection. Cooldown and remaining charges likewise limit consecutive interceptions.
Click to expand MCP actionsClick to collapse MCP actions
[
  {
    "tool": "inspect",
    "arguments": {
      "path": "asset:${native}/VehicleApsAttachmentMonoComponent/apsAttachmentSlot/attachment/apsProfile/coverageAngle"
    },
    "expect": {
      "contains": "270"
    }
  },
  {
    "tool": "inspect",
    "arguments": {
      "path": "asset:${aps}/apsProfile"
    }
  },
  {
    "tool": "inspect",
    "arguments": {
      "path": "asset:${aps}/presets"
    }
  },
  {
    "tool": "inspect",
    "arguments": {
      "path": "asset:${aps}/launcherParameter/maxTurretAngle"
    }
  }
]
3. Test the APS setup
APS is enabled in the Editor. Packaged builds also check runtime feature availability.
- First open the visual model in Prefab Mode and check that
apsAttachmentSlot, the APS Profile,ApsMount, andFire Pointspoint at the right nodes. - Save, rebuild and enter the test range. Try a compatible incoming game projectile from within the mounted coverage, then watch whether it is intercepted and whether the status display and charge use match expectations.
- Repeat the shot from outside coverage and confirm nothing is intercepted.
- Run out of charges, fire once more, and confirm no further interception happens.
Diagnosis: if nothing triggers, confirm the APS runtime feature is enabled in the Editor, then check coverage angle, elevation limits, the warhead allowlist, and the speed and mass thresholds.
Click to expand MCP actionsClick to collapse MCP actions
[
  {
    "tool": "inspect",
    "arguments": {
      "path": "asset:${aps}/apsProfile"
    }
  }
]
Click to expand MCP actionsClick to collapse MCP actions
Runtime test pending. Bind the shooter and the APS-equipped target in the test range and confirm the shooter carries the selected ammunition. Observe the APS ammo count and interception feedback in the HUD.
[
  {
    "tool": "runtime_status",
    "arguments": {}
  },
  {
    "tool": "range_fire",
    "arguments": {
      "shooter": "${shooterEntityId}",
      "target": "${apsEntityId}",
      "gun": 0,
      "ammo": "HEAT",
      "mode": "shell"
    }
  }
]