Build your first tank from scratch
中文 | English
Run this command at the repository root to replay the examples through the local Unity MCP. The command also captures screenshots in both languages.
python Docs/Manual/manual/tools/tutorials.py run vehicle-basics --capture
Click to expand MCP actionsClick to collapse MCP actions
Prepare the teaching sample. The recipe provides ${variables}.
{
  "variables": {
    "source": "Packages/com.shanghaiwindy.coreresources/BuiltInVehicles/PatriotRadar/BuiltIn-Patriot-Radar",
    "vehicleData": "${fixture}/Tutorial_NativeVehicleData.asset",
    "vehicleText": "${fixture}/Tutorial_NativeText.asset",
    "vehicleInfo": "${fixture}/Tutorial_NativeVehicleInfo.asset",
    "packModel": "${fixture}/Tutorial_NativePackModel.prefab",
    "vehicleName": "Docs-Vehicle-Basics-${runId}",
    "vehicleGuid": "2a1fb39dea694fdab732${runId}",
    "cooked": "${fixture}/2a1fb39dea694fdab732${runId}_pre.prefab",
    "package": "${fixture}/Docs_${runId}_Package.asset",
    "pipeline": "${fixture}/Docs_${runId}_Pipeline.asset",
    "packageGuid": "f2f8a67f-7edd-5f4d-9bc4-a53463120f09",
    "wheel": "${fixture}/Tutorial_WheelCollider.prefab",
    "track": "${fixture}/Tutorial_Track.asset",
    "link": "${fixture}/Tutorial_TrackLink.prefab",
    "armor": "${fixture}/Tutorial_TankHitBox.asset",
    "armorDraft": "${fixture}/Tutorial_TankHitBox_Setup.asset",
    "armorSource": "${fixture}/Tutorial_ArmorSource.prefab",
    "armorPrefab": "${fixture}/Tutorial_Armor.prefab",
    "bullet": "${fixture}/Tutorial-76mm-AP.asset",
    "gunSound": "Packages/com.shanghaiwindy.coreresources/FMod/Tank/Gun/76mm_zis5.asset",
    "engine": "Packages/com.shanghaiwindy.coreresources/FMod/Tank/Engine/kv220.asset",
    "bulletVfx": "Packages/com.shanghaiwindy.coreresources/BulletVFX/宝马鸽特效/AP-BulletVFX-M.asset",
    "moduleSource": "${fixture}/Tutorial_InternalSource.prefab"
  },
  "calls": [
    {
      "tool": "invoke",
      "arguments": {
        "path": "static:UnityEditor.AssetDatabase/CreateFolder",
        "args": [
          "${fixtureParent}",
          "${folder}"
        ]
      },
      "expect": {
        "contains": "(String)"
      }
    },
    {
      "tool": "invoke",
      "arguments": {
        "path": "static:UnityEditor.AssetDatabase/CreateAsset",
        "args": [
          "@static:UnityEngine.ScriptableObject/CreateInstance(ShanghaiWindy.Core.ModPackageData)",
          "${package}"
        ]
      },
      "expect": {
        "contains": "OK:"
      },
      "phase": "build"
    },
    {
      "tool": "invoke",
      "arguments": {
        "path": "static:UnityEditor.AssetDatabase/CreateAsset",
        "args": [
          "@static:UnityEngine.ScriptableObject/CreateInstance(ShanghaiWindy.Core.ModPackageBuildPiplineData)",
          "${pipeline}"
        ]
      },
      "expect": {
        "contains": "OK:"
      },
      "phase": "build"
    },
    {
      "tool": "inspect_set",
      "arguments": {
        "path": "asset:${package}/localizedModName/defaultName",
        "value": "Tutorial Package"
      },
      "expect": {
        "contains": "OK:"
      },
      "phase": "build"
    },
    {
      "tool": "inspect_set",
      "arguments": {
        "path": "asset:${package}/localizedDescription/defaultName",
        "value": "Documentation teaching package"
      },
      "expect": {
        "contains": "OK:"
      },
      "phase": "build"
    },
    {
      "tool": "inspect_set",
      "arguments": {
        "path": "asset:${package}/author",
        "value": "Documentation"
      },
      "expect": {
        "contains": "OK:"
      },
      "phase": "build"
    },
    {
      "tool": "inspect_set",
      "arguments": {
        "path": "asset:${package}/supportURL",
        "value": "https://doc.game.windyverse.net/"
      },
      "expect": {
        "contains": "OK:"
      },
      "phase": "build"
    },
    {
      "tool": "inspect_set",
      "arguments": {
        "path": "asset:${package}/guid",
        "value": "${packageGuid}"
      },
      "expect": {
        "contains": "OK:"
      },
      "phase": "build"
    },
    {
      "tool": "inspect_set",
      "arguments": {
        "path": "asset:${pipeline}/linkedModPackage",
        "value": "@asset:${package}"
      },
      "expect": {
        "contains": "OK:"
      },
      "phase": "build"
    }
  ]
}
Start with a Blender model, then build, package, and test-drive a single-turret tracked tank named Tutorial-Tank. The tables give values you can use for a first test. The KV-2 illustrations show the same hierarchy and asset relationships on a finished vehicle.
1. Prepare the project, model, and sounds
- Follow Project setup to open the SDK project in the required Unity version. Resolve any compilation errors in the Console before opening the mod tools. Check the Console first if a menu is missing.
- Prepare a visual model and a separate damage model in Blender. You can author base-color and normal textures in tools such as Substance 3D Painter and Photoshop. Gather engine start, idle, and running audio and near and distant firing audio. For the first test, you can reference compatible FMOD configurations already in the SDK.
- Create a folder for this vehicle in Unity's Project window, with subfolders for models, materials, and the collision prefab. Keep your source files. When re-exporting an existing FBX, keep its path and
.metafile to preserve the Unity references.
2. Organize and export the Blender model
Keep one root object in Blender's Outliner. Select the child, Shift-select its parent, and use Ctrl+P → Object (Keep Transform). To separate part of a mesh, select its faces in Edit Mode and use P → Selection. Put object origins at their actual pivots so the parts rotate around their own axes in Unity.
| Node under the model root | What to put there |
|---|---|
MainBody |
The hull mesh. |
Turret → Gun → Dym |
Turret, gun elevation node, and recoiling barrel. Nest all three. Place the turret origin at the turret ring and the gun origin at its elevation pivot. The barrel points forward. |
LeftWheel and RightWheel |
Empty grouping objects. Name the road wheels l_1, l_2… and r_1, r_2… and place their origins at the axles. |
LeftUpperWheel and RightUpperWheel |
Empty groups for the return rollers. Put each side's rollers in its own group, using names such as lu_1 and ru_1. The current builder orders the wheels by their front-to-back position. |
LeftTrack and RightTrack |
Static track meshes or their placeholders. You will set up moving track links and their path later. |
- Model to scale in meters. Select the objects and choose File → Export → FBX. The original guide used Scale 1.00, Apply Scalings → FBX Units Scale, Forward → −Z Forward, and Up → Y Up. In Unity, verify +Z forward and +Y up, then measure the hull against a known dimension. See Correct model axes in Blender.
- Export a separate, low-poly damage model. Split plates by armor thickness, material type, and moving part. Each plate gets its own thickness in Unity and belongs under the part it moves with. Separate the internal modules too. Follow the damage-model naming conventions.
- For a small first vehicle, the original art budgets are a useful starting point. Aim for about 20,000 faces or fewer on the visual model, about four materials, textures at 2048 × 2048 or lower, and about 5,000 faces or fewer on the damage model. Consolidate duplicate materials and simplify hidden surfaces and collision shapes.
Drag the imported FBX into a Unity scene and expand its root. This KV-2 comes from the vehicle project. Locate MainBody and Turret in the Hierarchy, then expand Turret → Gun → Dym and match the hierarchy to the parts in Scene View.
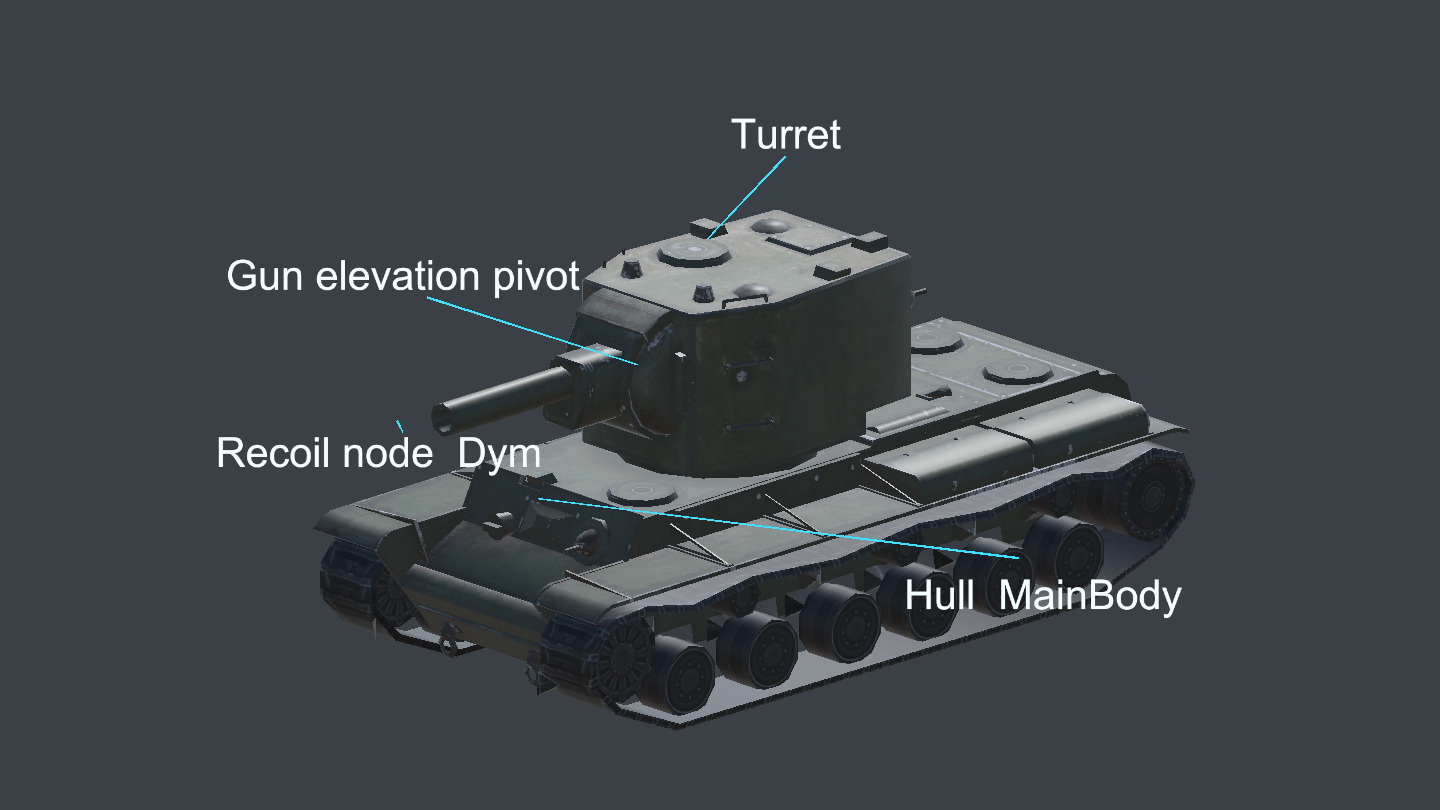
KV-2
├── MainBody
├── Turret
│   └── Gun
│       └── Dym
├── LeftWheel / LeftUpperWheel / LeftTrack
└── RightWheel / RightUpperWheel / RightTrack
3. Set materials and physical collision in Unity
- Import the visual FBX, damage FBX, and textures into Project. In the visual FBX's Model tab, start with Scale Factor = 1. Keep the FBX units and hierarchy and leave Generate Colliders off. Enable Read/Write in the damage FBX's Model tab so the damage mesh can be read. Click Apply, then check that the root instance scale is
1, 1, 1and the muzzle points along +Z. Compare the hull with a one-metre reference cube. - In Project choose Create → Material and select a compatible vehicle shader. Assign the color texture to Base Map. Import the normal texture as Normal map, then assign that texture in the material. Set the hull, wheel, and track slots under Mesh Renderer → Materials. If the material appears pink, check its shader and the project's render pipeline.
- Expand the model in Hierarchy. Add a Box Collider to the solid hull and turret meshes, with Is Trigger off. Use Edit Collider to size each Center and Size. Check the shape from the front and side. Cover the solid hull and leave clearance above the road wheels' ground contact points.
- Drag the model root into the Collision folder to create a prefab. Use this prefab for MainModel later. The separate damage model supplies the penetration hitboxes.
Click to expand MCP actionsClick to collapse MCP actions
Rebuild the tracked hierarchy with simple geometry. Check hull collision, the turret hierarchy, and forward and up before saving.
[
  {
    "tool": "invoke",
    "arguments": {
      "path": "static:ShanghaiWindy.Core.AssetBundleManager/LuaEnv/DoString",
      "args": [
        "local U = CS.UnityEngine\nlocal E = CS.UnityEditor\nlocal function empty(name, parent, x, y, z)\n    local obj = U.GameObject(name)\n    if parent then obj.transform:SetParent(parent.transform, false) end\n    obj.transform.localPosition = U.Vector3(x, y, z)\n    return obj\nend\nlocal function cube(name, parent, x, y, z, sx, sy, sz)\n    local obj = U.GameObject.CreatePrimitive(U.PrimitiveType.Cube)\n    obj.name = name\n    obj.transform:SetParent(parent.transform, false)\n    obj.transform.localPosition = U.Vector3(x, y, z)\n    obj.transform.localScale = U.Vector3(sx, sy, sz)\n    return obj\nend\n\nlocal root = empty('TutorialTank', nil, 0, 0, 0)\ncube('MainBody', root, 0, 0.9, 0, 2.6, 0.75, 5)\nlocal turret = empty('Turret', root, 0, 1.55, 0)\ncube('TurretMesh', turret, 0, 0, 0, 1.8, 0.65, 1.6)\nlocal gun = empty('Gun', turret, 0, 0, 0.75)\ncube('GunMesh', gun, 0, 0, 0, 0.6, 0.34, 0.35)\nempty('GunSight', gun, 0.24, 0.2, 0.15)\nlocal barrel = empty('Dym', gun, 0, 0, 0)\ncube('BarrelMesh', barrel, 0, 0, 1.2, 0.17, 0.17, 2.4)\nfor _, side in ipairs({{'Left', 'l', -1.42}, {'Right', 'r', 1.42}}) do\n    local sideName, prefix, x = side[1], side[2], side[3]\n    local wheel = empty(sideName .. 'Wheel', root, 0, 0, 0)\n    local upperWheel = empty(sideName .. 'UpperWheel', root, 0, 0, 0)\n    for index, z in ipairs({1.8, 0.6, -0.6, -1.8}) do\n        local axis = empty(prefix .. '_' .. index, wheel, x, 0.43, z)\n        local mesh = U.GameObject.CreatePrimitive(U.PrimitiveType.Cylinder)\n        mesh.name = 'WheelMesh'\n        mesh.transform:SetParent(axis.transform, false)\n        mesh.transform.localRotation = U.Quaternion.Euler(0, 0, 90)\n        mesh.transform.localScale = U.Vector3(0.86, 0.17, 0.86)\n        U.Object.DestroyImmediate(mesh:GetComponent(typeof(U.Collider)))\n    end\n    empty(prefix .. 'u_1', upperWheel, x, 0.91, 0)\n    local track = cube(sideName .. 'Track', root, x, 0.45, 0, 0.34, 0.14, 4.6)\n    U.Object.DestroyImmediate(track:GetComponent(typeof(U.Collider)))\nend\nfor _, path in ipairs({'Turret/Gun/GunMesh', 'Turret/Gun/Dym/BarrelMesh'}) do\n    U.Object.DestroyImmediate(root.transform:Find(path):GetComponent(typeof(U.Collider)))\nend\nassert(root.transform:Find('MainBody'):GetComponent(typeof(U.BoxCollider)) ~= nil)\nassert(root.transform:Find('Turret/Gun/Dym') ~= nil)\nlocal target = E.PrefabUtility.SaveAsPrefabAsset(root, '${packModel}')\nU.Object.DestroyImmediate(root)\nassert(target ~= nil)\nreturn 'Ground-model hierarchy and physical hull created'\n",
        "tank-geometry",
        "null"
      ]
    },
    "expect": {
      "contains": "Ground-model"
    }
  },
  {
    "tool": "inspect",
    "arguments": {
      "path": "asset:${packModel}/transform/forward"
    },
    "expect": {
      "contains": "(Vector3) (0.00, 0.00, 1.00)"
    }
  },
  {
    "tool": "inspect",
    "arguments": {
      "path": "asset:${packModel}/transform/up"
    },
    "expect": {
      "contains": "(Vector3) (0.00, 1.00, 0.00)"
    }
  }
]
4. Create and locate the vehicle assets
- In Unity, open Framework - 框架 → 0. Home Page and select the Vehicle Creation Guide. Use Open on the first step to reach Vehicle → Vehicle Creation in the GM Editor. You can also navigate directly to that section.
- Choose Ground and enter a unique internal name such as
Tutorial-Tank. The current tool accepts uppercase and lowercase English letters, digits, and hyphens. You can add a prefix and assign a separate display name later. Click Create Vehicle and confirm. - In Project, open
Assets/Res/Vehicles/Ground/Data/Vehicle/Tutorial-Tank/and find the assets below. Enter the same internal name in the guide to jump to each file.
| Generated asset | Where you use it |
|---|---|
Tutorial-Tank.asset (VehicleInfo) |
Set the display name, rank, nation, and thumbnail. Add this asset to the mod build pipeline. |
Tutorial-Tank_VehicleHitBox.asset |
Assign external armor, internal modules, and the generated damage prefab. |
Tutorial-Tank_VehicleTextData.asset |
Configure basic, movement, firing, and turret parameters. |
Tutorial-Tank_VehicleData.asset |
Bind the models and data, edit key nodes, and build the vehicle prefab. |
Tutorial-Tank_WheelCollider.prefab and Tutorial-Tank_VehicleTrack.asset |
Supply the movement configuration with wheel colliders and dynamic tracks. |
Click to expand MCP actionsClick to collapse MCP actions
[
  {
    "tool": "invoke",
    "arguments": {
      "path": "static:UnityEditor.AssetDatabase/CopyAsset",
      "args": [
        "${source}_VehicleData.asset",
        "${vehicleData}"
      ]
    },
    "expect": {
      "contains": "(Boolean) True"
    }
  },
  {
    "tool": "invoke",
    "arguments": {
      "path": "static:UnityEditor.AssetDatabase/CopyAsset",
      "args": [
        "${source}_VehicleTextData.asset",
        "${vehicleText}"
      ]
    },
    "expect": {
      "contains": "(Boolean) True"
    }
  },
  {
    "tool": "invoke",
    "arguments": {
      "path": "static:UnityEditor.AssetDatabase/CopyAsset",
      "args": [
        "${source}.asset",
        "${vehicleInfo}"
      ]
    },
    "expect": {
      "contains": "(Boolean) True"
    }
  },
  {
    "tool": "inspect_set",
    "arguments": {
      "path": "asset:${vehicleText}/AssetName",
      "value": "${vehicleName}"
    },
    "expect": {
      "contains": "OK:"
    }
  },
  {
    "tool": "inspect_set",
    "arguments": {
      "path": "asset:${vehicleInfo}/vehicleName",
      "value": "${vehicleName}"
    },
    "expect": {
      "contains": "OK:"
    }
  },
  {
    "tool": "inspect_set",
    "arguments": {
      "path": "asset:${vehicleInfo}/assetGuid",
      "value": "${vehicleGuid}"
    },
    "expect": {
      "contains": "OK:"
    }
  },
  {
    "tool": "inspect_set",
    "arguments": {
      "path": "asset:${vehicleInfo}/cookedDirectory",
      "value": "${fixture}"
    },
    "expect": {
      "contains": "OK:"
    }
  },
  {
    "tool": "inspect_set",
    "arguments": {
      "path": "asset:${vehicleData}/vehicleTextData",
      "value": "@asset:${vehicleText}"
    },
    "expect": {
      "contains": "OK:"
    }
  },
  {
    "tool": "inspect_set",
    "arguments": {
      "path": "asset:${vehicleData}/modelData/MainModel",
      "value": "@asset:${packModel}"
    },
    "expect": {
      "contains": "OK:"
    }
  },
  {
    "tool": "inspect_set",
    "arguments": {
      "path": "asset:${vehicleData}/cookedLocation",
      "value": "NextToData"
    },
    "expect": {
      "contains": "OK:"
    }
  },
  {
    "tool": "inspect",
    "arguments": {
      "path": "asset:${vehicleData}/modelData/MainModel/name"
    },
    "expect": {
      "contains": "Tutorial_NativePackModel"
    }
  },
  {
    "tool": "inspect",
    "arguments": {
      "path": "asset:${vehicleData}/vehicleTextData/AssetName"
    },
    "expect": {
      "contains": "${vehicleName}"
    }
  }
]
5. Generate and configure the damage model
5.1 Assign the source models and create the prefab
- Select VehicleHitBox in Project. Drag the external armor FBX into External Armor Model. If you have a separate internal module FBX, assign it to Internal Module Model. Before importing, check both source models against the visual model for origin, orientation, and scale. The two source assets in the screenshot are the sample prefabs used by the tutorial's MCP replay.
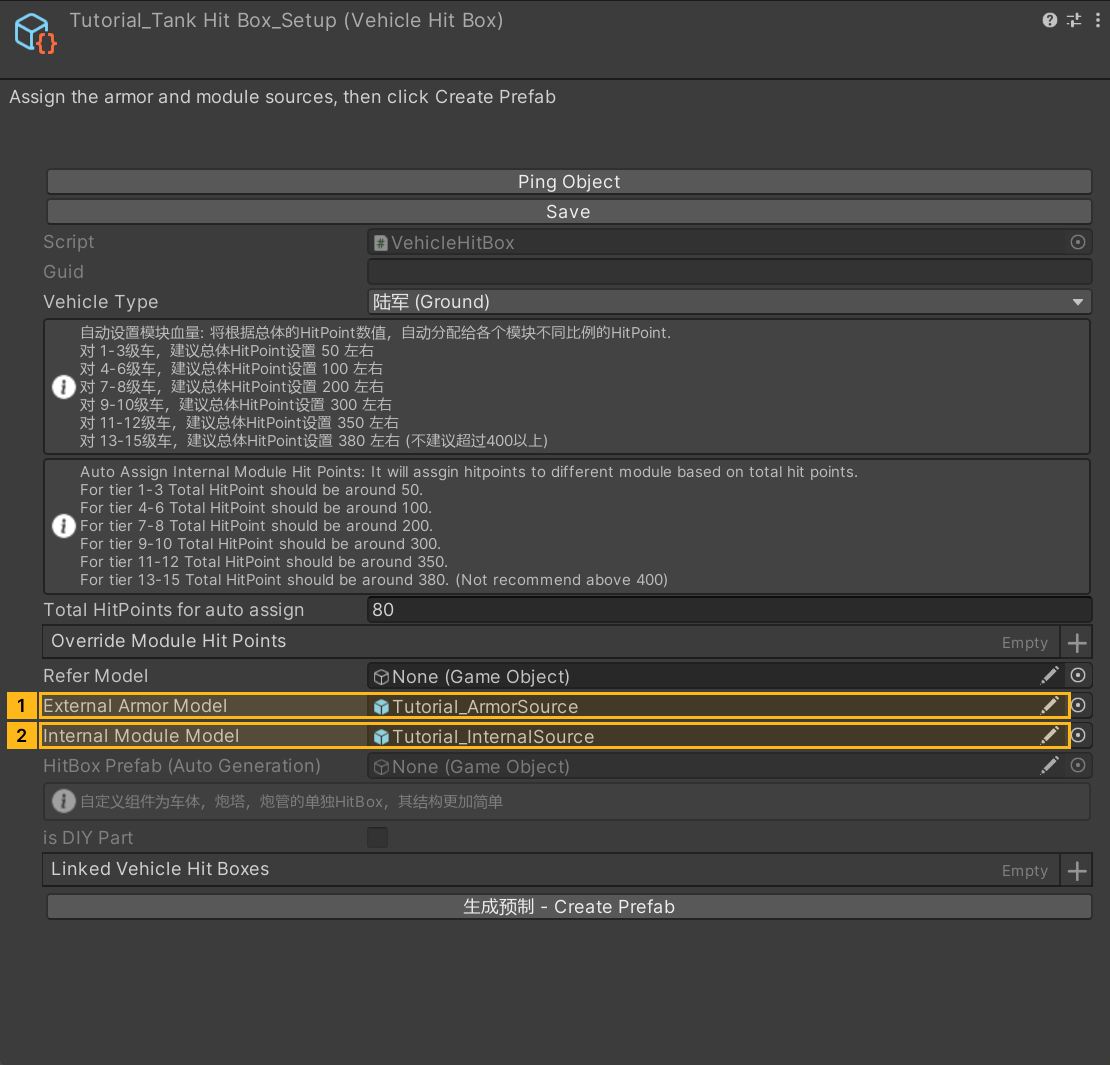
- Click Create Prefab, then Open Edit Mode. Check that Unity opened this vehicle in Prefab Mode. In the lower part of the separate HitBox Editor window, click Generate External Armor. If you assigned an internal FBX, click Generate Internal Armor as well. Both buttons add objects to the current prefab. For a reimport, back up the prefab and remove the existing nodes you intend to replace first.

5.2 Check the armor plates and module hierarchy
- Expand
HitBox/Mainin Hierarchy and select the teaching tank'sHullFront_65. Check the armor type and the 65 mm thickness in its HitBox component. Check thatHitBox/Main,HitBox/Turret,HitBox/Gun, andHitBox/Dymcorrespond to the hull, turret, gun elevation, and recoil respectively. Source groups such asHitBox_MainandHitBox_Turretcan be matched automatically. If a mesh stays under the newly imported root, drag it into the corresponding group while keeping its position relative to the vehicle. See damage-model naming and import.
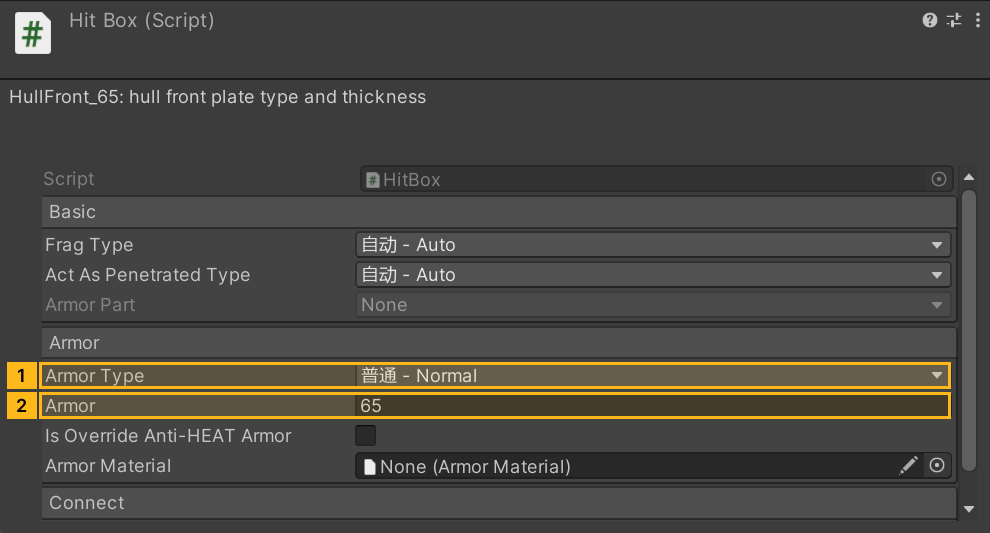
For plates that record which areas have already been used after a hit, configure the corresponding HitBox using the reactive armor guide.
- In the HitBox Editor, select a module type and a preset, place it, and move it into position. Use the same four groups under
InternalModule. The internal source model can useModule_Main,Module_Turret, and the equivalent group names for automatic placement. Set individual HP values in each InternalModule component. To assign HP in bulk, set the total and any per-type overrides on VehicleHitBox, then click Auto Assign Internal Module Hit Points in the editor. Recheck any individual values you want to keep. - Tick the roles on the crew modules. For module mode on a tracked vehicle, check for commander, driver, gunner, radio operator, and either loader or autoloader. You can leave module mode off for the first drive test and enable it after configuring the interior below.
- Press Ctrl+S in Prefab Mode to save. After leaving Prefab Mode, confirm that the generated prefab field in the VehicleHitBox Inspector points to the prefab you just edited.
Configure the internal modules
- Open the generated damage prefab and select a mesh under
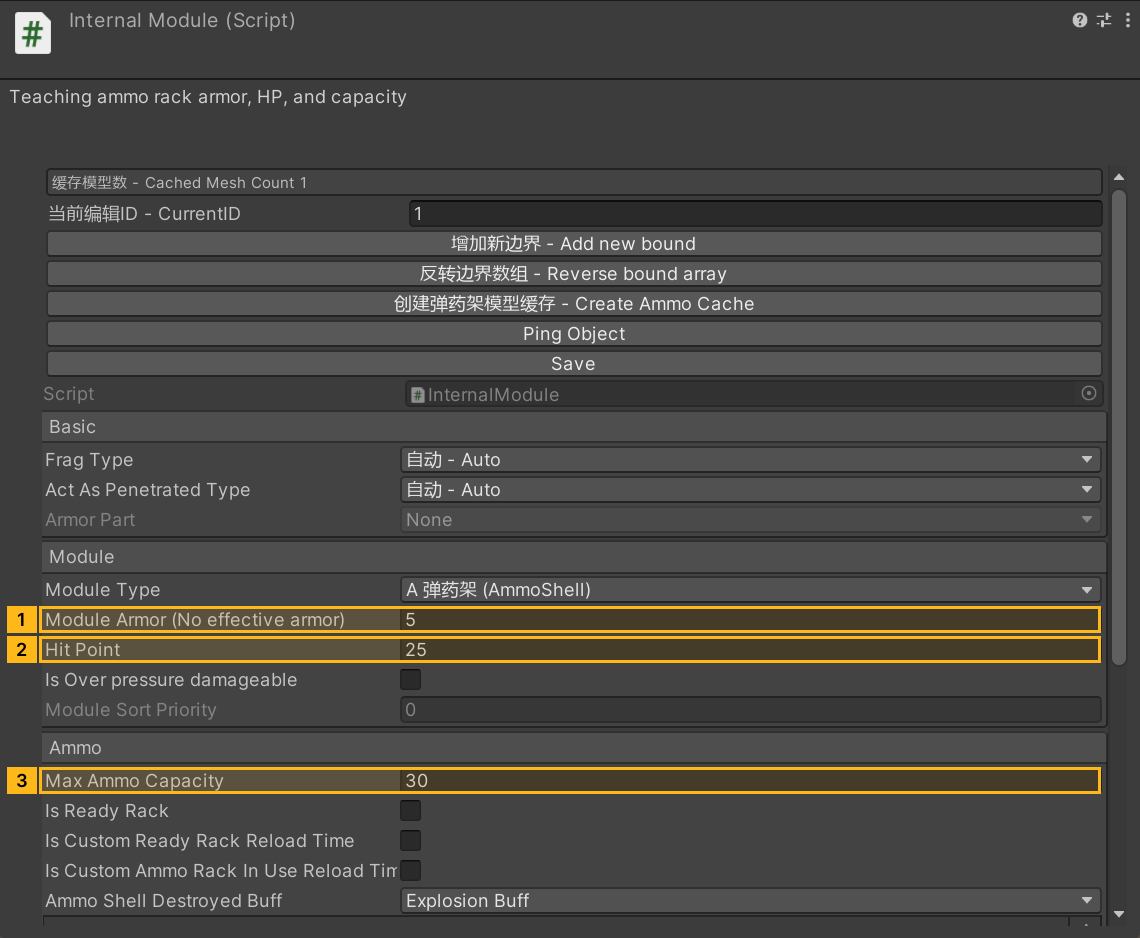
InternalModule. In its InternalModule component, check Module Type, Module Armor (mm), and Hit Point (module HP). For FBX import, use the node names in the first column. For a manually placed preset, enter the values and role flags in the Inspector.
| Teaching node | Group under InternalModule |
HP / armor | Position or roles |
|---|---|---|---|
Engine_40_10 |
Main |
40 / 10 mm | Engine bay |
Crew_10_0_Driver_Radioer |
Main |
10 / 0 mm | Front of the hull, driver and radio operator |
Crew_10_0_Commander_Gunner |
Turret |
10 / 0 mm | In the turret, commander and gunner |
Crew_10_0_Reloader |
Turret |
10 / 0 mm | In the turret, loader |
Breech_12_5 |
Gun |
12 / 5 mm | Behind the gun, moving with elevation |
AmmoShell_25_5 |
Main |
25 / 5 mm | Ammo storage on one side of the hull |
- Select
InternalModule/Main/AmmoShell_25_5, set Max Ammo Capacity to 30, and leave Is Ready Rack off. The importer may have created the first bound. Check CurrentID = 1 and look for the box in Scene View. If there is no box, click Add new bound and use its Scene handles to enclose the ammo mesh. Click Create Ammo Cache after editing. The sample in the screenshot shows Cached Mesh Count 1. For a rack with several visual fill steps, set the bounds separately and rebake. To process several racks, use Multi-Update Ammo Model Cache in the HitBox Editor and check the result for each rack. - To connect a damaged module to a specific gun or turret, check Connectable Vehicle Module at the bottom of the component. Copy the corresponding GUID from VehicleTextData → Module Guid into Connected Vehicle Module Guids. The hierarchy controls where the mesh moves. The GUID identifies the system affected when the module is damaged.
- Save the damage prefab with Ctrl+S. Enable Is Module Ready on VehicleInfo, repack, and choose Module Based in the playground. Check that the vehicle can drive, aim, and fire. Switch to the interior view and confirm that the driver stays with the hull and the gunner follows the turret. Shoot a known module with an opposing vehicle and check its HP or damage state.
Click to expand MCP actionsClick to collapse MCP actions
[
  {
    "tool": "invoke",
    "arguments": {
      "path": "static:UnityEditor.AssetDatabase/CreateAsset",
      "args": [
        "@static:UnityEngine.ScriptableObject/CreateInstance(ShanghaiWindy.Core.VehicleHitBox)",
        "${armor}"
      ]
    },
    "expect": {
      "contains": "OK:"
    }
  },
  {
    "tool": "invoke",
    "arguments": {
      "path": "static:ShanghaiWindy.Core.AssetBundleManager/LuaEnv/DoString",
      "args": [
        "local run = assert(loadfile(\"../../Tools/ManualMcp/TankTutorial/armor.lua\"))()\nreturn run({armorSource = \"${armorSource}\", moduleSource = \"${moduleSource}\", armorPrefab = \"${armorPrefab}\", armorDraft = \"${armorDraft}\"})\n",
        "tank-armor",
        "null"
      ]
    },
    "expect": {
      "contains": "six internal modules saved"
    }
  },
  {
    "tool": "inspect_set",
    "arguments": {
      "path": "asset:${armor}/ExternalArmorModel",
      "value": "@asset:${armorSource}"
    },
    "expect": {
      "contains": "OK:"
    }
  },
  {
    "tool": "inspect_set",
    "arguments": {
      "path": "asset:${armor}/InternalModuleModel",
      "value": "@asset:${moduleSource}"
    },
    "expect": {
      "contains": "OK:"
    }
  },
  {
    "tool": "inspect_set",
    "arguments": {
      "path": "asset:${armor}/HitBoxPrefab",
      "value": "@asset:${armorPrefab}"
    },
    "expect": {
      "contains": "OK:"
    }
  },
  {
    "tool": "inspect",
    "arguments": {
      "path": "asset:${armorPrefab}/HitBox/Main/HullFront_65/HitBox/Armor"
    },
    "expect": {
      "contains": "65"
    }
  },
  {
    "tool": "inspect_set",
    "arguments": {
      "path": "asset:${vehicleData}/modelData/HitBox",
      "value": "@asset:${armor}"
    },
    "expect": {
      "contains": "OK:"
    }
  },
  {
    "tool": "inspect_set",
    "arguments": {
      "path": "asset:${vehicleInfo}/isModuleReady",
      "value": "true"
    },
    "expect": {
      "contains": "OK:"
    }
  },
  {
    "tool": "inspect",
    "arguments": {
      "path": "asset:${armorPrefab}/InternalModule/Main/AmmoShell_25_5/InternalModule/maxAmmoCapacity"
    },
    "expect": {
      "contains": "30"
    }
  }
]
6. Set vehicle information, shells, audio, and parameters
- In VehicleInfo, set the display name to
Tutorial Tankand the rank to3. Under Spawn Policy, choose Player Pick. Check this when copying a radar or summoned unit. Match the nation in VehicleTextData → Base. Packing copies the nation from the detailed parameters. Add a picture with Vehicle thumbnails. - For the first test, assign compatible VehicleEngineFmodSoundData and BulletFmodSound assets. To make your own, import the recordings into a compatible FMOD project. Author engine start and running events with idle and acceleration sounds, and configure the firing event for near and distant sounds. Build and refresh the banks, then bind events with the picker. Fire Near and Fire Far were fields on the old audio assets. FMOD project setup
- Open the bullet editor at the bottom of VehicleTextData. Create a penetrating shell named
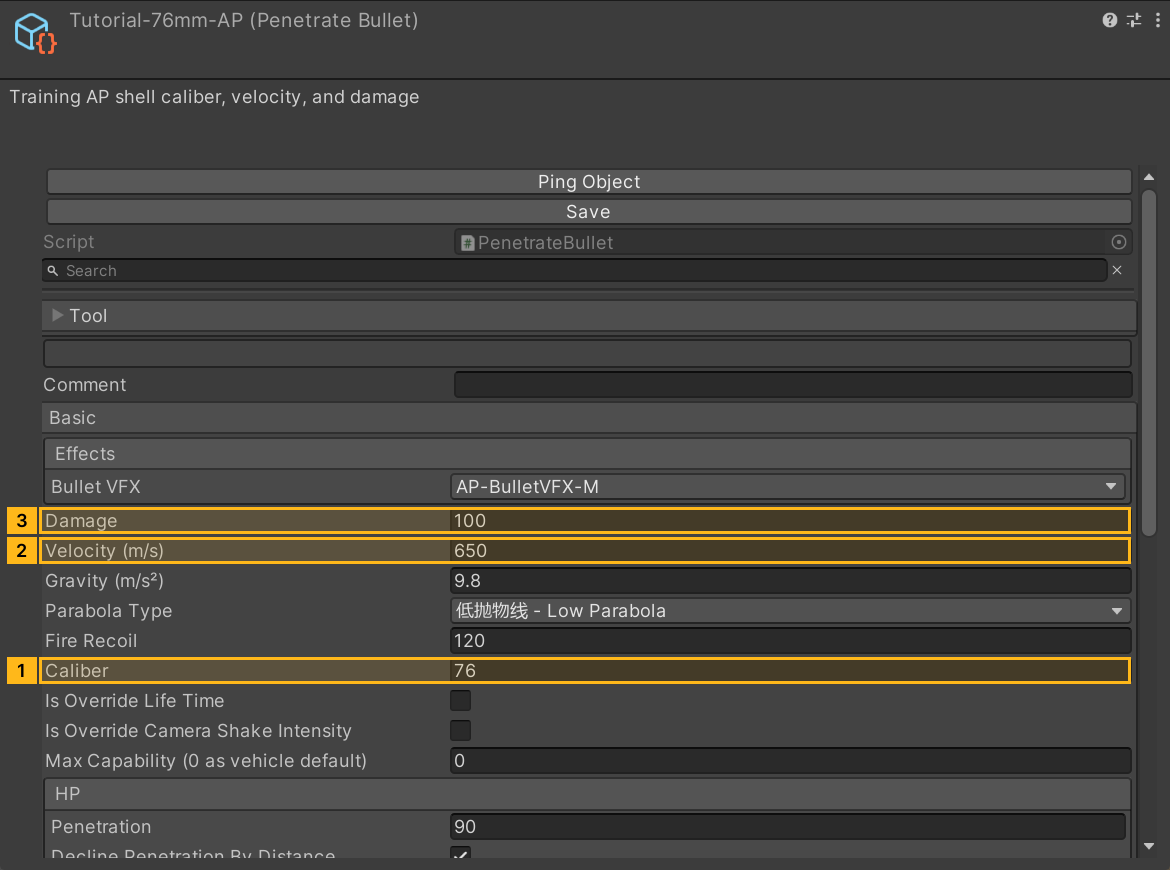
Tutorial-76mm-AP, choose warhead AP, and set Caliber = 76 mm, Velocity = 650 m/s, Penetration = 90 mm, and Damage = 100. Under Module, enter a projectile mass of 6.5 kg. This solid shot uses0for fuse delay and TNT equivalent. Assign a matching AP Bullet VFX, then add this shell as the only entry in the Fire tab's ammo list. - Set the VehicleTextData values below. Save, reselect the asset, and check the values and references. This sample uses local gun and turret parameters. If a shared asset hides those settings, clear Shared Gun Data or Shared Turret Data first.
| Tab | What to configure |
|---|---|
Base · PSParameter |
Health 600 and View Range 360 m. Leave the custom sight point off until the orientation and muzzle position pass your test. |
Movement · PTCParameter |
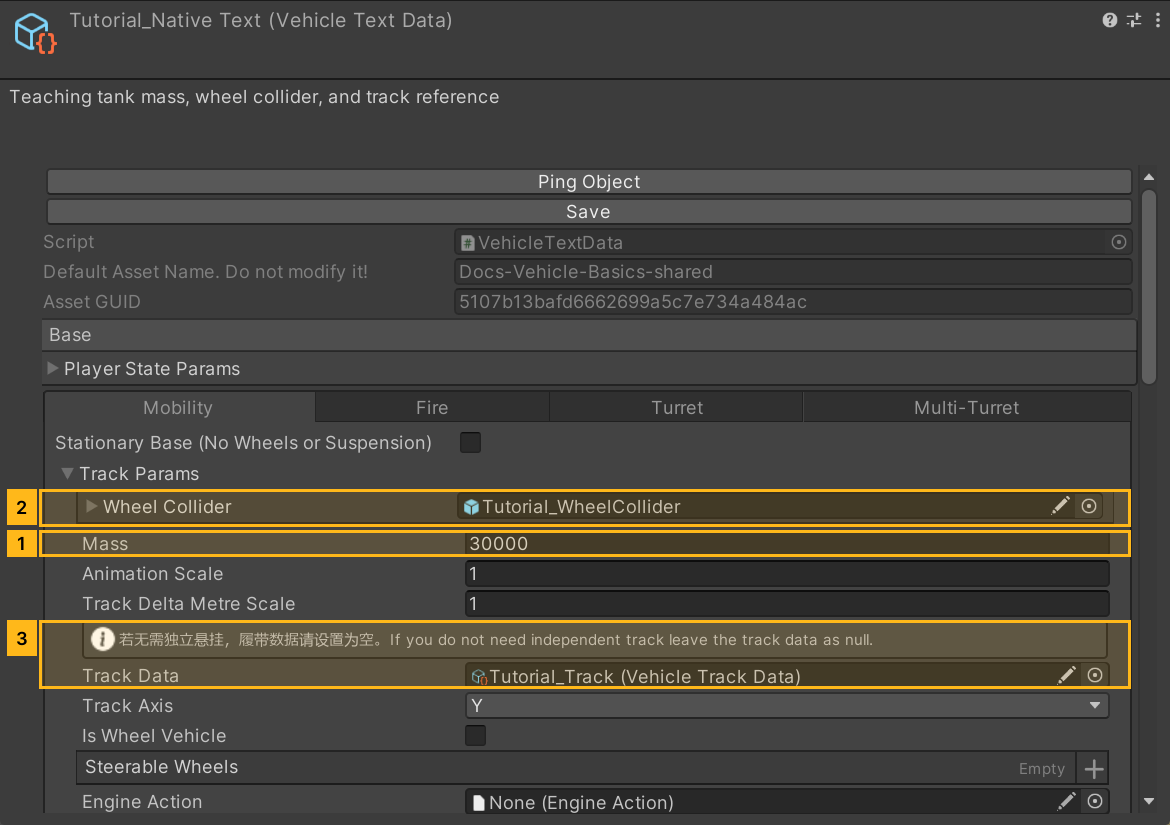
Use the track controller. Set mass to 30,000 kg, forward and reverse caps to 35 and 10 km/h, forward and reverse torque to 3500 and 2600, and brake torque to 5000. Use torque-curve points (0, 1) and (35, 0.35). Assign working engine audio, then check TankWheelCollider and Track Data in section 8. See engine, gears and RPM to tune the curve, shift thresholds, or RPM input for audio. |
Fire · TFParameter |
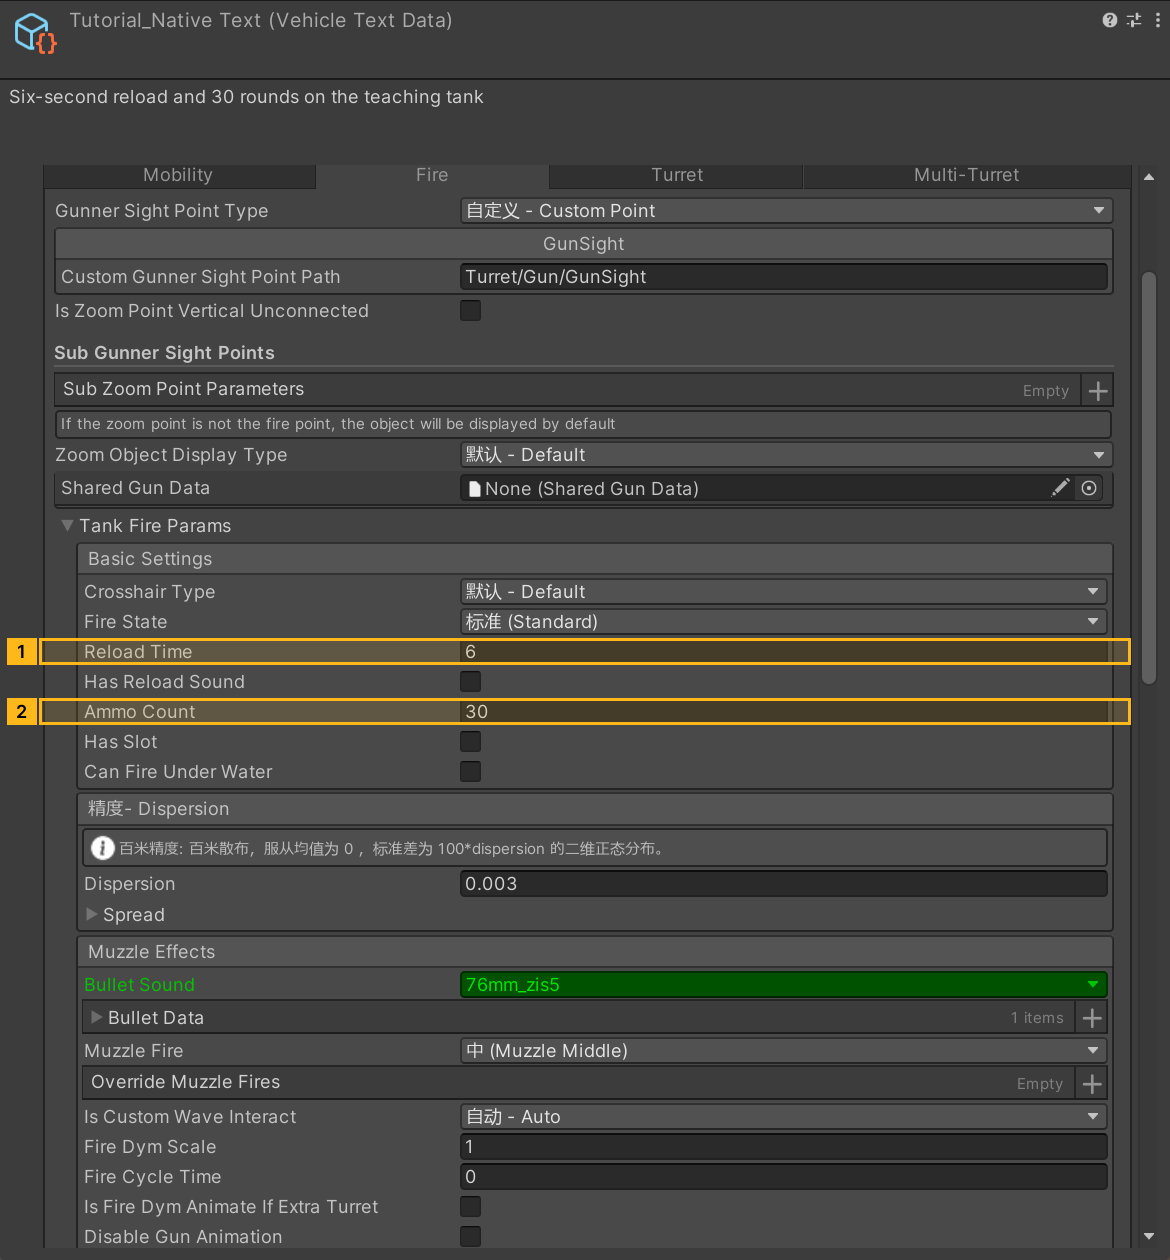
Choose Standard, reload time 6 s, total ammo 30, and leave Has Slot off. Use a shot interval of 0, recoil scale 1, one AP shell, and a firing sound. Set base dispersion to 0.003. Expand Spread and enter the default settings below for 76 mm. The caliber comes from the shell asset. |
Turret · MTParameter |
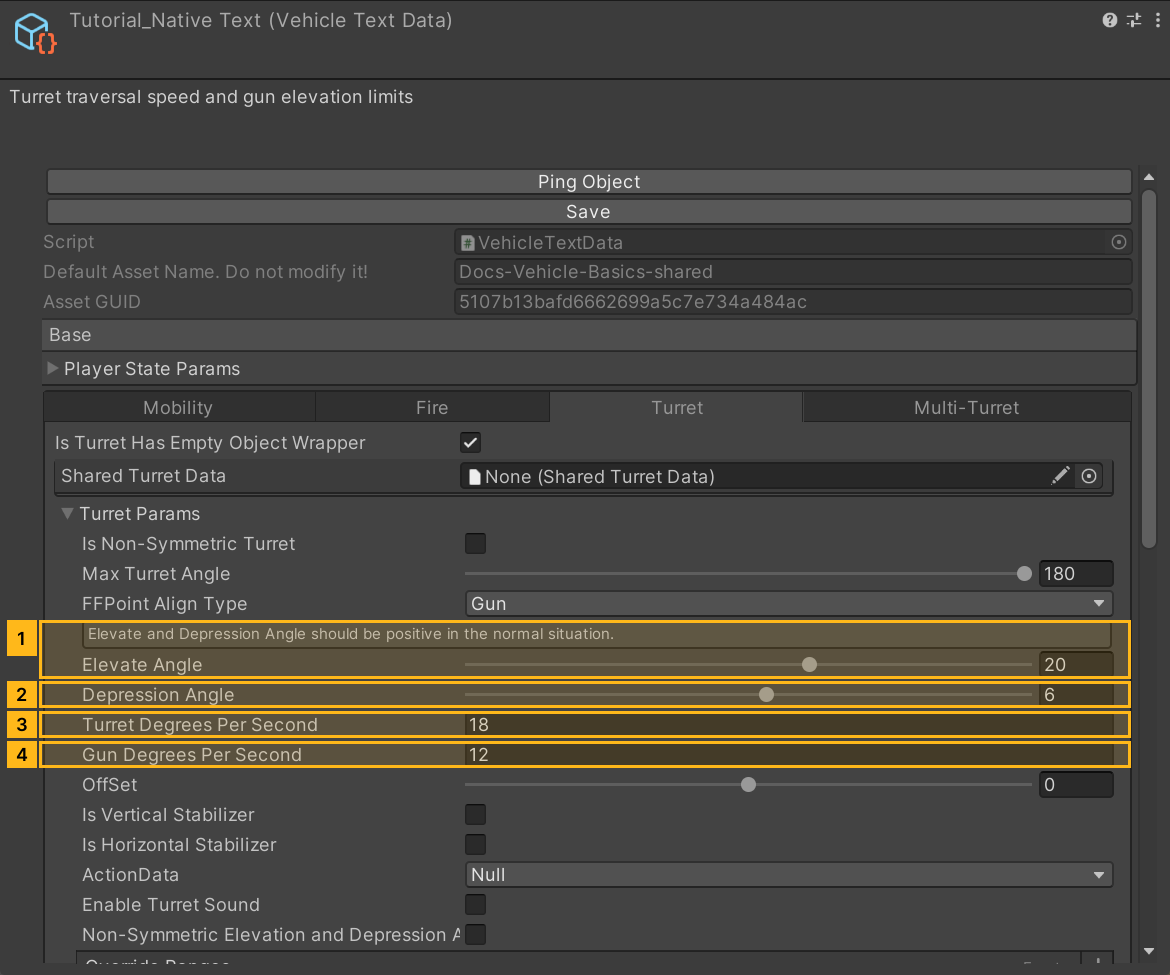
Set the symmetric traverse limit to 180°, turret speed to 18°/s, and gun elevation speed to 12°/s. Enter 20° of elevation and 6° of depression as positive values. Leave direction-specific overrides empty initially. See turret traverse, elevation and stabilizers to set asymmetric limits, clear the hull, or configure stabilization. |
The aiming values in Spread are separate from base dispersion. The defaults for 76 mm are spread 0.35, aim time 1.92 s, movement and turret traverse coefficients 0.14 each, gun movement coefficient 0.11, after-shot coefficient 3, and damaged coefficient 2. Save and check that the Inspector has cleared the spread and projectile damage warnings.
See gun setup, firing and reloading for magazines, drums, and energy weapons. If the barrel needs to return to a particular angle for reloading, see fixed-angle reload.
These Inspector screenshots come from the same teaching tank. They show movement, fire, turret, and projectile settings.
Click to expand MCP actionsClick to collapse MCP actions
Set the spawn role, mobility, gun, turret, and firing nodes on the teaching sample, then read back the values.
[
  {
    "tool": "inspect_set",
    "arguments": {
      "path": "asset:${vehicleData}/isGenLOD",
      "value": "false"
    },
    "expect": {
      "contains": "OK:"
    }
  },
  {
    "tool": "invoke",
    "arguments": {
      "path": "static:ShanghaiWindy.Core.AssetBundleManager/LuaEnv/DoString",
      "args": [
        "local setup = assert(loadfile(\"../../Tools/ManualMcp/TankTutorial/configure.lua\"))()\nreturn setup({\n    text = \"${vehicleText}\", data = \"${vehicleData}\", info = \"${vehicleInfo}\",\n    bullet = \"${bullet}\", bulletVfx = \"${bulletVfx}\", gunSound = \"${gunSound}\", engine = \"${engine}\"\n})\n",
        "tank-first-drive-parameters",
        "null"
      ]
    },
    "expect": {
      "contains": "Player-selectable tank parameters and 76 mm AP ready"
    }
  },
  {
    "tool": "inspect",
    "arguments": {
      "path": "asset:${vehicleInfo}/spawnPolicy"
    },
    "expect": {
      "contains": "PlayerPick"
    }
  },
  {
    "tool": "inspect",
    "arguments": {
      "path": "asset:${vehicleText}/PTCParameter/Mass"
    },
    "expect": {
      "contains": "(Int32) 30000"
    }
  },
  {
    "tool": "inspect",
    "arguments": {
      "path": "asset:${vehicleText}/TFParameter/AmmoCount"
    },
    "expect": {
      "contains": "(Int32) 30"
    }
  },
  {
    "tool": "inspect",
    "arguments": {
      "path": "asset:${vehicleText}/MTParameter/UpMaxDegree"
    },
    "expect": {
      "contains": "20"
    }
  }
]
Set up muzzle flash, projectile, and impact effects
- In VehicleTextData → Fire → Muzzle Effects, set Muzzle Fire to Muzzle Middle. The flash appears at
EffectStart, positioned in section 7. Leave Override Muzzle Fires empty to start. The flash should stay in front of the muzzle when the turret turns. - Select
Tutorial-76mm-AP, assign the SDK'sAP-BulletVFX-Min Bullet VFX, and open the referenced asset. For impact overrides, the game uses the first registered key in the list, then the base key if none is available. This preset leaves the ricochet key empty. Use Hit Armor Ricochet to assign a specific ricochet effect.
| BulletVFX field | Base key | Teaching override |
|---|---|---|
| Projectile | WeaponProjectile |
Empty |
| Hit Ground | FireExplosionHitOnGround |
AP-HitOnGround-M |
| Hit Armor | FirePenetrateHitOnArmor |
AP-HitOnArmor-M |
- For custom effects, duplicate a BulletVFX asset. Register the particle prefab in a Pool Resource under a unique name, then pick the same name in the copied asset. Add the Pool Resource to the build pipeline. If the effects are in a separate package, add its GUID to the vehicle package dependencies. Leave the legacy projectile GameObject override off to use the pool. Effect assets and dependencies
- In the playground, shoot a patch of ground and then a target vehicle. If the flash is offset, check
EffectStartfirst. If you see the flash but no visible projectile, check its key. If the effect is missing only on impact, check the hit type, the override key, and whether the effects package loaded.
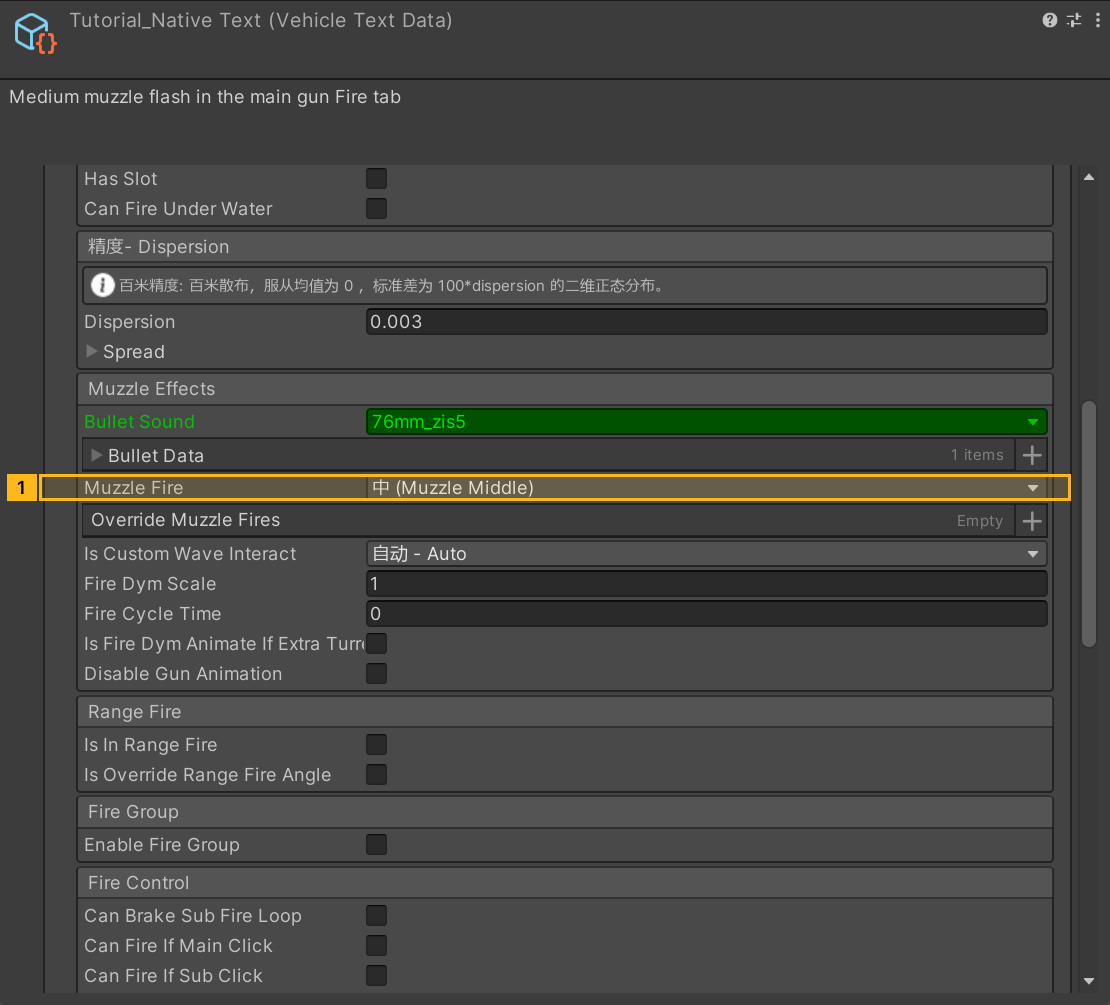
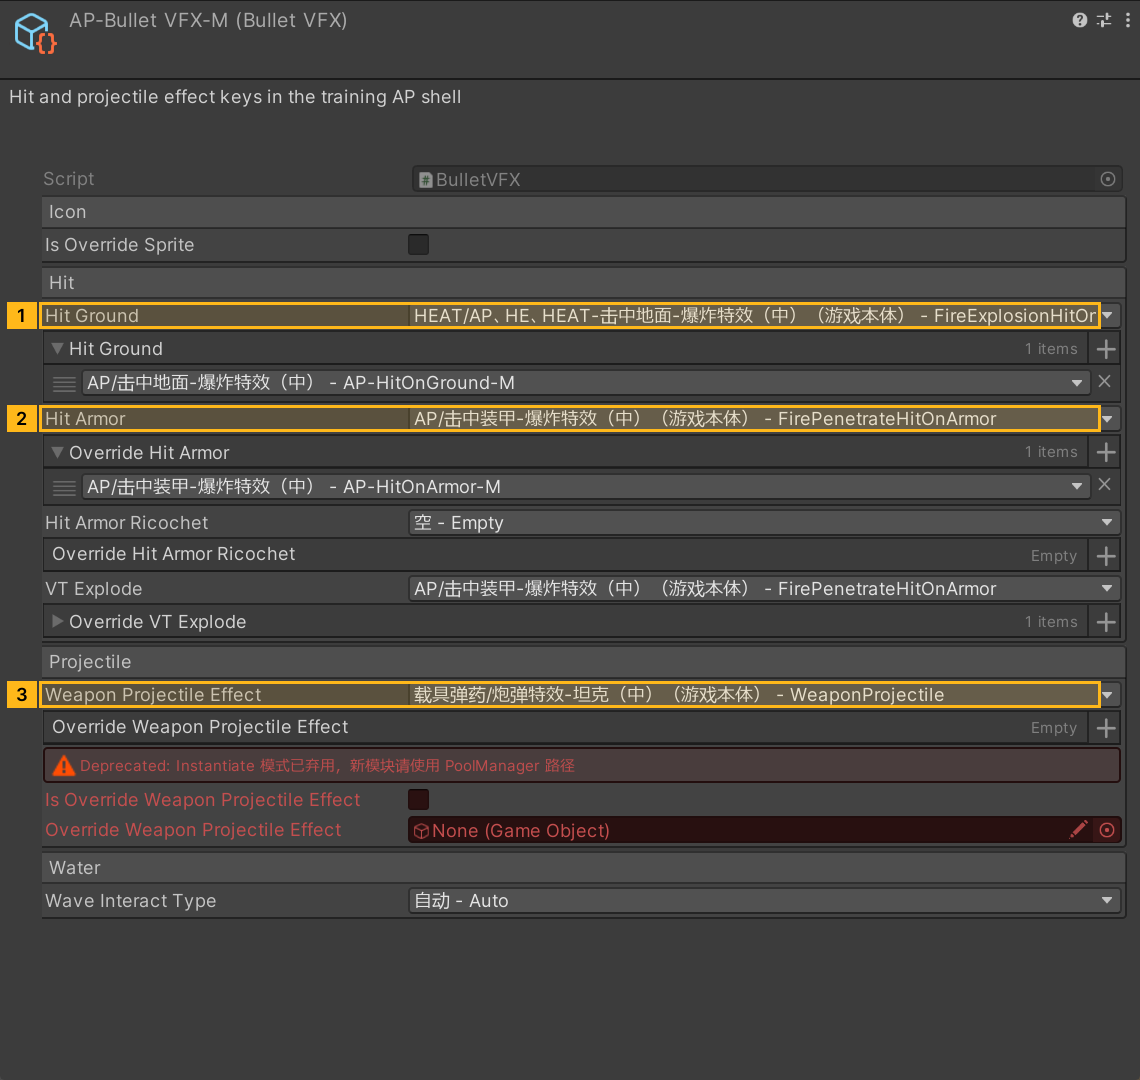
Click to expand MCP actionsClick to collapse MCP actions
[
  {
    "tool": "invoke",
    "arguments": {
      "path": "static:ShanghaiWindy.Core.AssetBundleManager/LuaEnv/DoString",
      "args": [
        "local verify = assert(loadfile(\"../../Tools/ManualMcp/TankTutorial/check_details.lua\"))()\nreturn verify.effects(\"${vehicleText}\", \"${bulletVfx}\")\n",
        "tank-effects",
        "null"
      ]
    },
    "expect": {
      "contains": "Muzzle preset and AP effect keys verified"
    }
  }
]
When changing ammunition, use ammunition and effects to check penetration, projectile flight, the per-round-type ammo limit, and impact effects. To animate a spent case when the gun fires, follow the tank shell ejection guide.
For comparison, the KV-2 source sets mass to 52,850 kg, speed caps to 37 and 7 km/h, and track-link spacing to 0.275 m. Its shared turret has a speed of 14°/s, 12° of elevation, and 5° of depression. Its shells come from a shared gun asset. The first shell read in the test range was OF-530, at 152 mm and 530 m/s.
The optional Tanks.gg tools are still in VehicleTextData. Set tanksGGName and use Import spread data from tank gg to retrieve dispersion data. The broader override changes several existing settings, so save the asset in Git or make a backup first. The service may be unavailable. Review the imported values and fill in the remaining fields. VehicleTextData fields and screenshots
7. Bind the main model and position the firing nodes
- Select VehicleData. Assign the collision prefab from section 3 to Model Data → MainModel. Check that VehicleTextData and HitBox refer to this vehicle's assets.
- Click Edit to show the orange node icons in Scene View. Press K to save each group of adjustments. Check sideways alignment from the front, height from the side, and orientation from a three-quarter view.
| Node | Position |
| --- | --- |
| FFPoint, EffectStart | Centered just beyond the muzzle, pointing along +Z. The teaching model uses Gun as the parent and local position (0, 0, 2.45). |
| CenterOfGravity | Inside the hull, centered between the wheel rows. The teaching model uses (0, 0.78, 0). Recheck this if the suspension sinks or the hull pitches unusually on takeoff. |
| MainCameraFollowTarget, MainCameraGunner | Put the third-person follow point above the hull. Put the gunner view at the forward-facing sight. |
| EngineSound, EngineSmoke | Put the first in the engine bay and the second at the exhaust. Reopen the editor to confirm that the positions were saved. |
3. Click Unlock Inspector. Check the selected asset and reopen the editor if needed to confirm that the positions were saved.
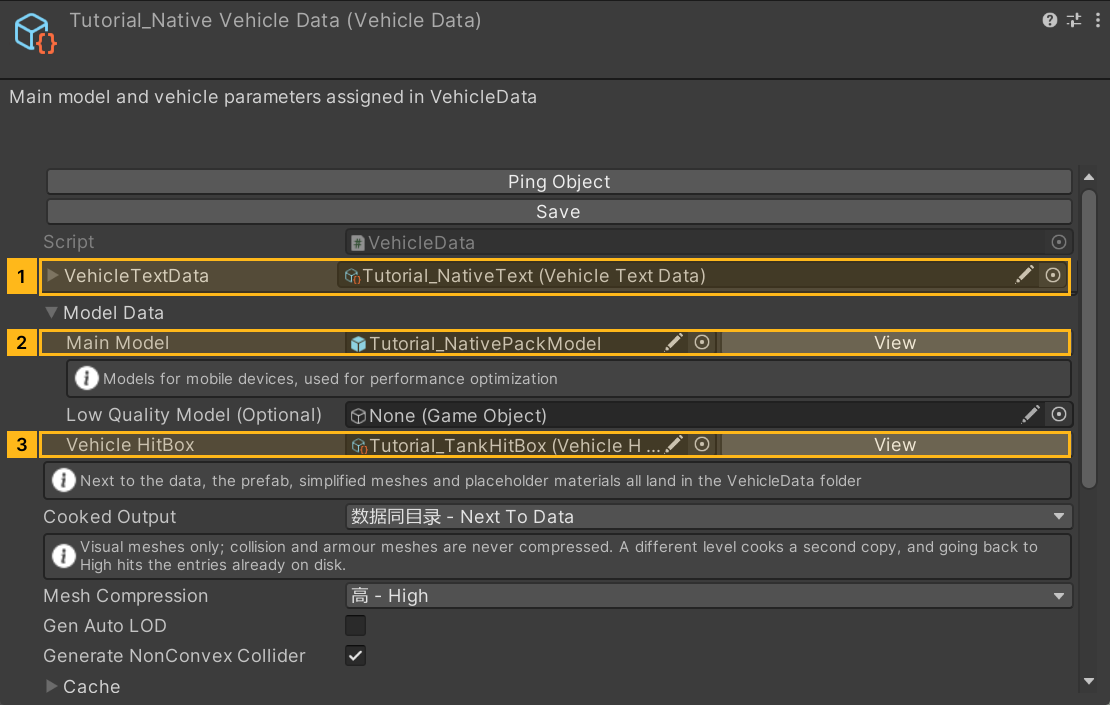
To give the gunner view additional magnification settings, see vehicle zoom profiles.
Optional vehicle attachments
- For low beams, high beams, or brake lights, create separate lamp nodes under
MainBody. Follow tank lighting to set the lamp type, emitters, and beam direction. For a complete round low-beam example, see the light component guide. - When fitting active protection, keep the mount and firing-point nodes on the hull and use the active protection guide to check orientation, coverage, and cooldown.
- For in-game search and target locking, open VehicleTextData → Misc → AA Radar. Use ground-vehicle radar to configure the scan and check any optional antenna model.
8. Set up wheel colliders and moving tracks
- Find the template at VehicleTextData → Movement → TankWheelCollider. Open it in Prefab Mode and select the root with the Wheel Collider component. Use a scene instance alongside the visual model to compare the wheel pivots. If you edit that instance, use Overrides → Apply to save the values to the same prefab.
- Enter the values in the table. Expand Suspension Spring, Forward Friction, and Sideways Friction to find their child fields. Return to the vehicle and confirm that it still refers to the saved template.
| WheelCollider field | Sample value | What to check |
|---|---|---|
| Radius / Mass | 0.43 m / 320 kg |
Match the radius to the visible road wheel. This is the mass of one wheel. Set the vehicle mass in section 6. |
| Center | (0, 0, 0) |
Start with the wheel origin at its axle. For tracks, also check the suspension Y offset in TrackData. |
| Suspension Distance / Force App Point Distance | 0.2 m / 0.4 m |
Suspension travel and the force application distance above the resting wheel's base. |
| Suspension Spring | Spring 205000, Damper 14500, Target Position 0.5 |
Restoring force, resistance to oscillation, and the target position along the travel. |
| Forward Friction | Extremum Slip / Value 1 / 1, Asymptote Slip / Value 1 / 1, Stiffness 1.7 |
Start and brake in a straight line and check for sustained slip. |
| Sideways Friction | Extremum Slip / Value 1.2 / 1.2, Asymptote Slip / Value 1 / 1, Stiffness 4 |
Turn at the same speed and compare sideways slip and body roll. |
Leave the template's Wheel Damping Rate and Layer Overrides at their defaults to start. The track controller sets damping and collision layers at runtime. Align the pivots, radius, and track path first. Change one suspension or friction parameter at a time, repack, and compare runs on the same flat ground and gentle slope. Unity WheelCollider reference · Wheeled vehicles
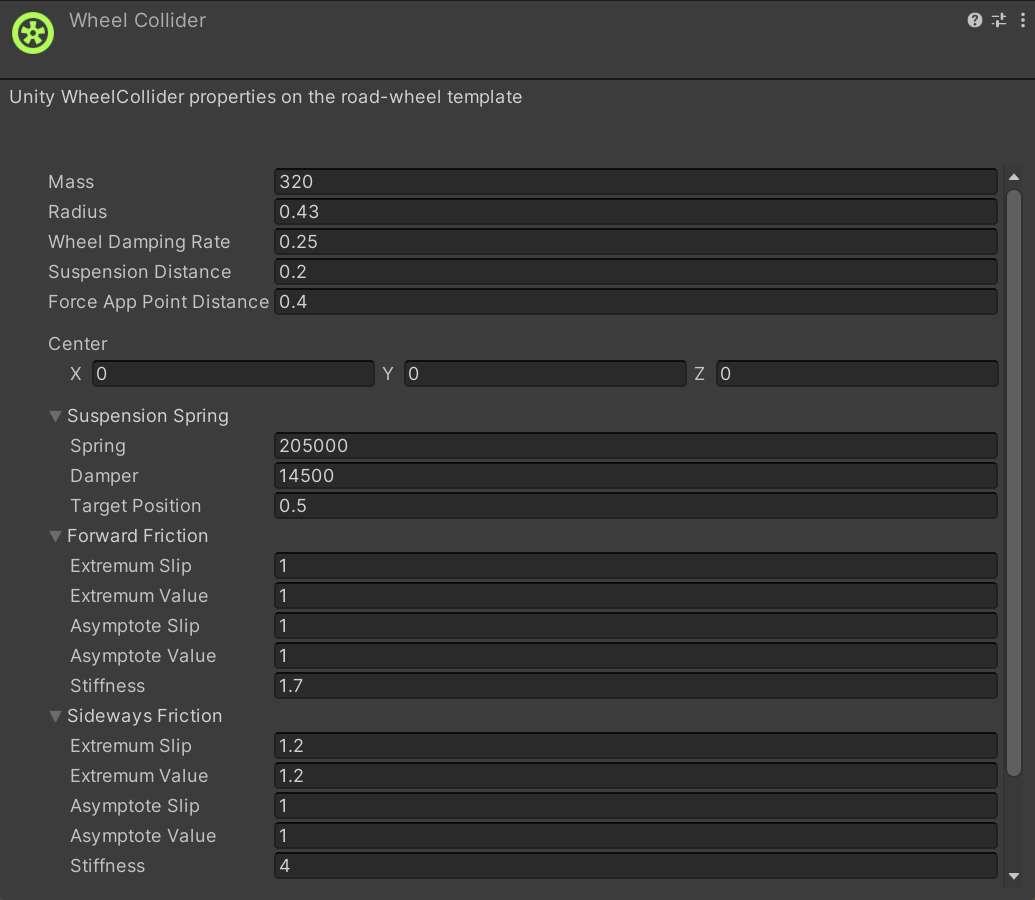
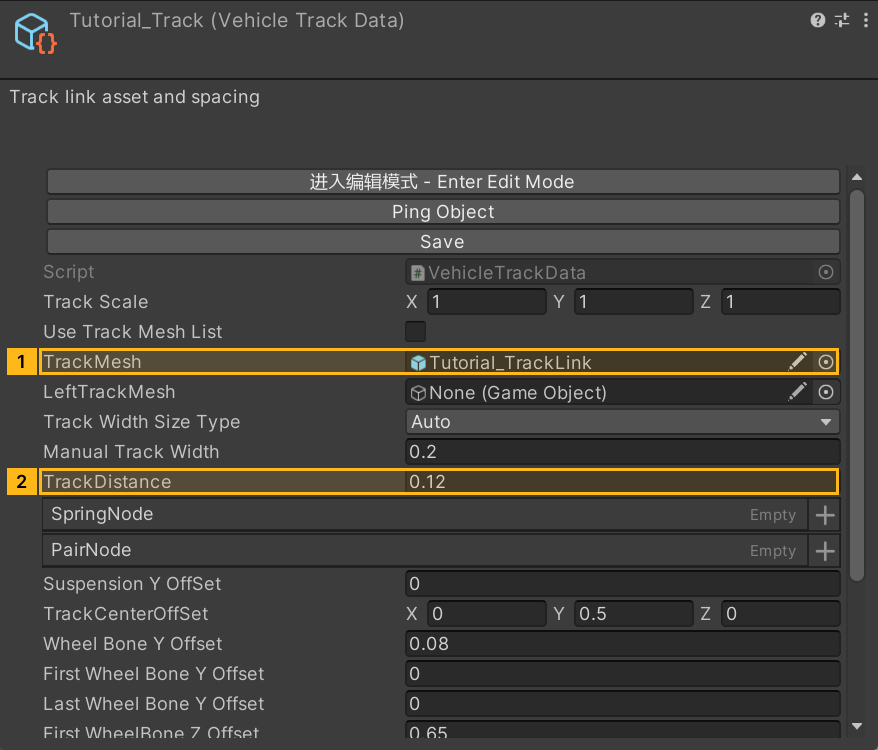
- Select VehicleTrackData and assign one track-link prefab to TrackMesh. Use LeftTrackMesh if the left side uses a different shape. Start with the default TrackDistance of
0.12and adjust it against the actual link length. Leave the generated suspension data in place. - Click Edit Track in the VehicleData Inspector. If you opened the track asset's editor directly, assign the vehicle edit object to Target Edit Object, then click Load Suspension Data. If the edit object is missing, return to VehicleData and enter edit mode to generate it again.
- View the wheels from the side. Use Create Node in order around the loop, under the road wheels, over the return rollers, and around both ends. Temporarily hide damage geometry or static tracks if they obscure the path.
- Click Preview Track and check link orientation, corners, and spacing on both sides. Use Update Preview after changes. Finish with Save and Unlock Inspector and check the track reference on the vehicle. Track IK and suspension guide
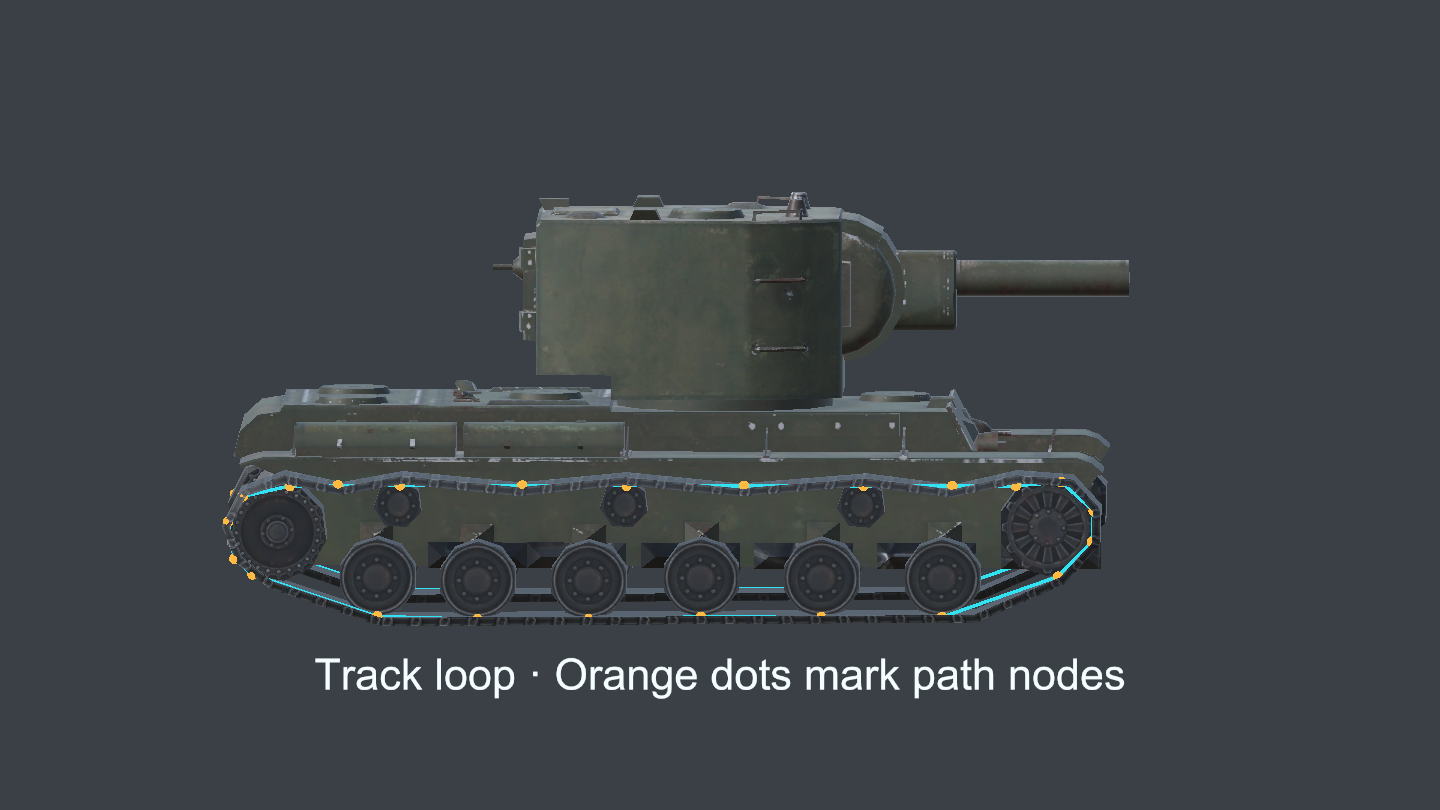
The KV-2 example below uses the track data from the vehicle project. Orange dots mark the path nodes and the cyan line connects them into a loop. The guide is shifted slightly outward for visibility. On your own vehicle, run the path along the bottom of the road wheels, around both end wheels, and across the top to close the loop.
Click to expand MCP actionsClick to collapse MCP actions
[
  {
    "tool": "invoke",
    "arguments": {
      "path": "static:ShanghaiWindy.Editor.WheelUtil/CreateWheelPrefab",
      "args": [
        "${wheel}"
      ]
    },
    "expect": {
      "contains": "GameObject"
    }
  },
  {
    "tool": "inspect_set",
    "arguments": {
      "path": "asset:${wheel}/WheelCollider/radius",
      "value": "0.43"
    },
    "expect": {
      "contains": "OK:"
    }
  },
  {
    "tool": "inspect_set",
    "arguments": {
      "path": "asset:${wheel}/WheelCollider/mass",
      "value": "320"
    },
    "expect": {
      "contains": "OK:"
    }
  },
  {
    "tool": "invoke",
    "arguments": {
      "path": "static:UnityEditor.EditorUtility/SetDirty",
      "args": [
        "@asset:${wheel}/WheelCollider"
      ]
    },
    "expect": {
      "contains": "OK:"
    }
  },
  {
    "tool": "invoke",
    "arguments": {
      "path": "static:UnityEditor.AssetDatabase/SaveAssets",
      "args": []
    },
    "expect": {
      "contains": "OK:"
    }
  },
  {
    "tool": "invoke",
    "arguments": {
      "path": "static:UnityEditor.AssetDatabase/CreateAsset",
      "args": [
        "@static:UnityEngine.ScriptableObject/CreateInstance(ShanghaiWindy.Core.VehicleTrackData)",
        "${track}"
      ]
    },
    "expect": {
      "contains": "OK:"
    }
  },
  {
    "tool": "inspect_set",
    "arguments": {
      "path": "asset:${vehicleText}/isStationary",
      "value": "false"
    },
    "expect": {
      "contains": "OK:"
    }
  },
  {
    "tool": "inspect_set",
    "arguments": {
      "path": "asset:${vehicleText}/PTCParameter/TankWheelCollider",
      "value": "@asset:${wheel}"
    },
    "expect": {
      "contains": "OK:"
    }
  },
  {
    "tool": "inspect_set",
    "arguments": {
      "path": "asset:${vehicleText}/PTCParameter/TrackData",
      "value": "@asset:${track}"
    },
    "expect": {
      "contains": "OK:"
    }
  },
  {
    "tool": "invoke",
    "arguments": {
      "path": "static:ShanghaiWindy.Core.AssetBundleManager/LuaEnv/DoString",
      "args": [
        "local U, E = CS.UnityEngine, CS.UnityEditor\nlocal link = U.GameObject.CreatePrimitive(U.PrimitiveType.Cube)\nlink.name = 'Tutorial Track Link'\nlink.transform.localScale = U.Vector3(0.36, 0.07, 0.12)\nU.Object.DestroyImmediate(link:GetComponent(typeof(U.Collider)))\nassert(E.PrefabUtility.SaveAsPrefabAsset(link, '${link}'))\nU.Object.DestroyImmediate(link)\nlocal data = E.AssetDatabase.LoadMainAssetAtPath('${track}')\ndata.trackNodes:Clear()\nfor _, point in ipairs({{0.02, 1.85}, {0.02, -1.85}, {0.48, -2.29}, {0.95, -1.85},\n    {0.95, 1.85}, {0.48, 2.29}}) do\n    local node = CS.ShanghaiWindy.Core.TrackNode()\n    node.leftNode = U.Vector3(-1.42, point[1], point[2])\n    node.rightNode = U.Vector3(1.42, point[1], point[2])\n    data.trackNodes:Add(node)\nend\nE.EditorUtility.SetDirty(data)\nE.AssetDatabase.SaveAssets()\nreturn 'Six track nodes per side'\n",
        "tank-track-nodes",
        "null"
      ]
    },
    "expect": {
      "contains": "Six track nodes per side"
    }
  },
  {
    "tool": "inspect_set",
    "arguments": {
      "path": "asset:${track}/TrackMesh",
      "value": "@asset:${link}"
    },
    "expect": {
      "contains": "OK:"
    }
  },
  {
    "tool": "inspect",
    "arguments": {
      "path": "asset:${track}/trackNodes"
    },
    "expect": {
      "contains": "Count=6"
    }
  },
  {
    "tool": "inspect",
    "arguments": {
      "path": "asset:${track}/TrackDistance"
    },
    "expect": {
      "contains": "0.12"
    }
  },
  {
    "tool": "inspect",
    "arguments": {
      "path": "asset:${vehicleText}/GetGroundType()"
    },
    "expect": {
      "contains": "TrackController"
    }
  },
  {
    "tool": "invoke",
    "arguments": {
      "path": "static:ShanghaiWindy.Core.AssetBundleManager/LuaEnv/DoString",
      "args": [
        "local verify = assert(loadfile(\"../../Tools/ManualMcp/TankTutorial/check_details.lua\"))()\nreturn verify.wheel(\"${wheel}\", \"${vehicleText}\")\n",
        "tank-wheel",
        "null"
      ]
    },
    "expect": {
      "contains": "Wheel template and suspension values verified"
    }
  }
]
9. Cook the vehicle prefab
Select VehicleData and click Pack. Cooked Output controls whether the generated prefab goes into the shared Cooked folder or beside the data asset. Check that VehicleInfo resolves to the output. Pack again after changing the visual model, colliders, damage model, wheel setup, or positions of the edit nodes. Confirm that the prefab exists before building the mod.
10. Build, install, and test the mod
- In the GM Editor, open Mod Build → Create Mod Package. Use a distinct name such as
Vehicle-Tutorial-Tank. Open ModPackageBuildPiplineData and drag this vehicle's VehicleInfo into Linked Objects. Verify the associated Linked Mod Package. - Use File → Build Settings or Ctrl+Shift+B and switch to the target platform. Verify the active platform, then build the linked resources from the pipeline. In ModPackageData, fill in the name, description, author, and version, then click Package Now. Rebuild the linked objects and package again whenever you change platforms.
- Find the resulting
.modpackunderBuild/Mod-Package/<platform>/. Check the target and follow Install mods. Use the Windows build for a Windows driving test. Check the build result for the exact file path. - In the SDK you can first select VehicleData → Drive (Repack) to open the Vehicle Playground. For an exterior-only test, select Health Based. Select
Tutorial Tankand check that it spawns on the ground. Switch to Module Based after you finish the interior. - Use the movement controls to drive forward, reverse, and turn both ways. Release them and check that the tank slows. Watch the wheel contact and the direction and fit of the tracks. Aim away from the hull heading and check traverse and elevation. In the range, fire the first shell. It should leave the muzzle, use one round, and reload in about six seconds. Finally, check the hit feedback.
- If an installed package is missing from the selection list, check Player Pick, the damage mode, and the vehicle types supported by the map. If the tank spawns but will not move, check the torque and TankWheelCollider. If the muzzle moves out of place as you turn the turret, recheck the
Gun → Dymhierarchy and firing point from section 7 before repacking.
Click to expand MCP actionsClick to collapse MCP actions
[
  {
    "tool": "invoke",
    "arguments": {
      "path": "static:ShanghaiWindy.Core.PackUtil/Pack",
      "args": [
        "@asset:${vehicleData}"
      ]
    },
    "expect": {
      "contains": "OK:"
    },
    "phase": "build"
  },
  {
    "tool": "inspect",
    "arguments": {
      "path": "asset:${cooked}/name"
    },
    "expect": {
      "contains": "(String)"
    },
    "phase": "build"
  },
  {
    "tool": "inspect",
    "arguments": {
      "path": "asset:${cooked}/VehicleComponentsReferenceManager/LeftWheels"
    },
    "expect": {
      "contains": "Count=4"
    },
    "phase": "build"
  },
  {
    "tool": "invoke",
    "arguments": {
      "path": "asset:${pipeline}/linkedObjects/Add",
      "args": [
        "@asset:${vehicleInfo}"
      ]
    },
    "expect": {
      "contains": "OK:"
    },
    "phase": "build"
  },
  {
    "tool": "invoke",
    "arguments": {
      "path": "static:UnityEditor.EditorUtility/SetDirty",
      "args": [
        "@asset:${pipeline}"
      ]
    },
    "expect": {
      "contains": "OK:"
    },
    "phase": "build"
  },
  {
    "tool": "invoke",
    "arguments": {
      "path": "static:UnityEditor.AssetDatabase/SaveAssets",
      "args": []
    },
    "expect": {
      "contains": "OK:"
    },
    "phase": "build"
  },
  {
    "tool": "modpack_plan",
    "arguments": {
      "pipeline": "${pipeline}"
    },
    "expect": {
      "equals": {
        "ok": true,
        "built": false
      }
    },
    "phase": "build"
  },
  {
    "tool": "modpack_build",
    "arguments": {
      "pipeline": "${pipeline}"
    },
    "expect": {
      "equals": {
        "ok": true,
        "archiveExists": true,
        "published": false,
        "installed": false
      }
    },
    "phase": "build",
    "capture": {
      "archivePath": {
        "path": "archivePath"
      }
    }
  },
  {
    "tool": "invoke",
    "arguments": {
      "path": "static:Frontend.Editor.ModPackageWorkshopMeta/WriteSidecar",
      "args": [
        "${archivePath}"
      ]
    },
    "expect": {
      "contains": ".modpack.json"
    },
    "phase": "build",
    "capture": {
      "sidecarPath": {
        "regex": "\\(String\\) (.+)"
      }
    }
  },
  {
    "tool": "invoke",
    "arguments": {
      "path": "static:System.IO.File/ReadAllText",
      "args": [
        "${sidecarPath}"
      ]
    },
    "expect": {
      "contains": "${packageGuid}"
    },
    "phase": "build"
  }
]
Click to expand the MCP test-drive replay
Use a local DE editor with a configured game environment and map assets. Build the Windows package with the recipe above, then pass its run.json to the test-drive script.
python Tools/ManualMcp/TankTutorial/test_drive.py "<build receipt run.json>" Temp/ManualMcp/TankFirstDrive
The script uses MCP to install the build, spawn the tank, and verify forward driving, reversing, turning, and a ballistic hit. It switches to Module Based to inspect the loaded modules and checks effect keys in the live object pool. The script exits Play and saves measurements in the output folder. Use the manual drive steps above to check ammo consumption from player input, reload timing, and the appearance of the effects.
11. Try variants after the basic tank works
| Variant | How to extend the basic tank |
|---|---|
| Wheeled vehicle | If it still uses the track controller, keep the LeftTrack and RightTrack placeholders. Configure the wheel colliders and review the wheel and track control differences. |
| Slot gun (old M3 Stuart example) | Use standard fire, enable Has Slot, and set Slot Count and Slot Duration. The old example used 5 and 3.35. Check the burst and reload timing in the playground. |
| Drum (Progetto 65 example) | Set Fire State to Drum. Configure Fire Duration and Reload Times. The old example used 2 seconds and [12.4, 10.3, 8.6, 6.8]. Verify reload at each stage. |
| Magazine (Bat 25t-style example) | Choose Advance. In Advance Fire Class, set the short reload, long reload, and rounds per magazine. The old example used 2 seconds, 33 seconds, and 4 rounds. |
| Multiple turrets (BMD-1 and T-35) | The BMD-1 example used a secondary weapon for missiles. In the T-35 example, SubTurret01 → SubGun01 → SubDym01 is under the root. The other three secondary turrets use suffixes 02, 03, and 04. Set the turret path from the model root, the gun path from its turret, and the barrel path from its gun. Check muzzle and effect offsets on each. |
| Twin barrels (ST-II) | The old hierarchy put SubTurret → SubGun → SubDym under Turret/Gun. Put the second barrel's pivot at its breech. The example used Turret/Gun/SubTurret for the turret path and SubGun and SubDym for the relative paths. Legacy multi-turret setup |
The old example values illustrate the controls. Tune them for your own mod after testing. For a new multi-turret vehicle, see the current fire-system fields in VehicleTextData. For hull steering, fixed mounts, or hydraulic suspension, see SPG, tank destroyer and Strv setup. If the model is invisible, the gun points the wrong way, or the vehicle is missing after installation, see vehicle development troubleshooting.