Tank Light Settings
中文 | English
Run this command at the repository root to replay the examples through the local Unity MCP. The command also captures screenshots in both languages.
python Docs/Manual/manual/tools/tutorials.py run tank-light-settings --capture
Click to expand MCP actionsClick to collapse MCP actions
Prepare the teaching sample. The recipe provides ${variables}.
{
  "variables": {
    "light": "${fixture}/Tutorial_ArrayLights.prefab"
  },
  "calls": [
    {
      "tool": "invoke",
      "arguments": {
        "path": "static:UnityEditor.AssetDatabase/CreateFolder",
        "args": [
          "${fixtureParent}",
          "${folder}"
        ]
      },
      "expect": {
        "contains": "(String)"
      }
    },
    {
      "tool": "invoke",
      "arguments": {
        "path": "static:UnityEditor.AssetDatabase/CopyAsset",
        "args": [
          "Packages/com.shanghaiwindy.coreresources/Light/AuthoringSamples/Array4.prefab",
          "${light}"
        ]
      },
      "expect": {
        "contains": "True"
      }
    }
  ]
}
This guide is for players who already have a working tank and want to install lights, configure beams and light types in Unity, then verify the result in game.
1. Attach lights with CustomShape
Under MainBody, create a separate child node for the left light and another for the right light. Each light root needs VehicleLightAttachmentMonoComponent, plus VehicleAttachmentMonoComponent with attachmentSlotType set to Specific and specificAttachmentMonoComponent pointing at the former. The custom editor adds the companion component while drawing the light node, so confirm the link exists before you save.
Next, configure the slot data. Assign the light mount transform in lightAttachmentSlot.attachment.lightTransform (灯光位置 / Light Transform).
For multi-lens lights you can start from our Array4 sample as a teaching reference, or create separate LensSurface children under lightTransform, each using MeshFilter and MeshRenderer with the lamp material. See the light component guide for presets, duplication and mirroring.
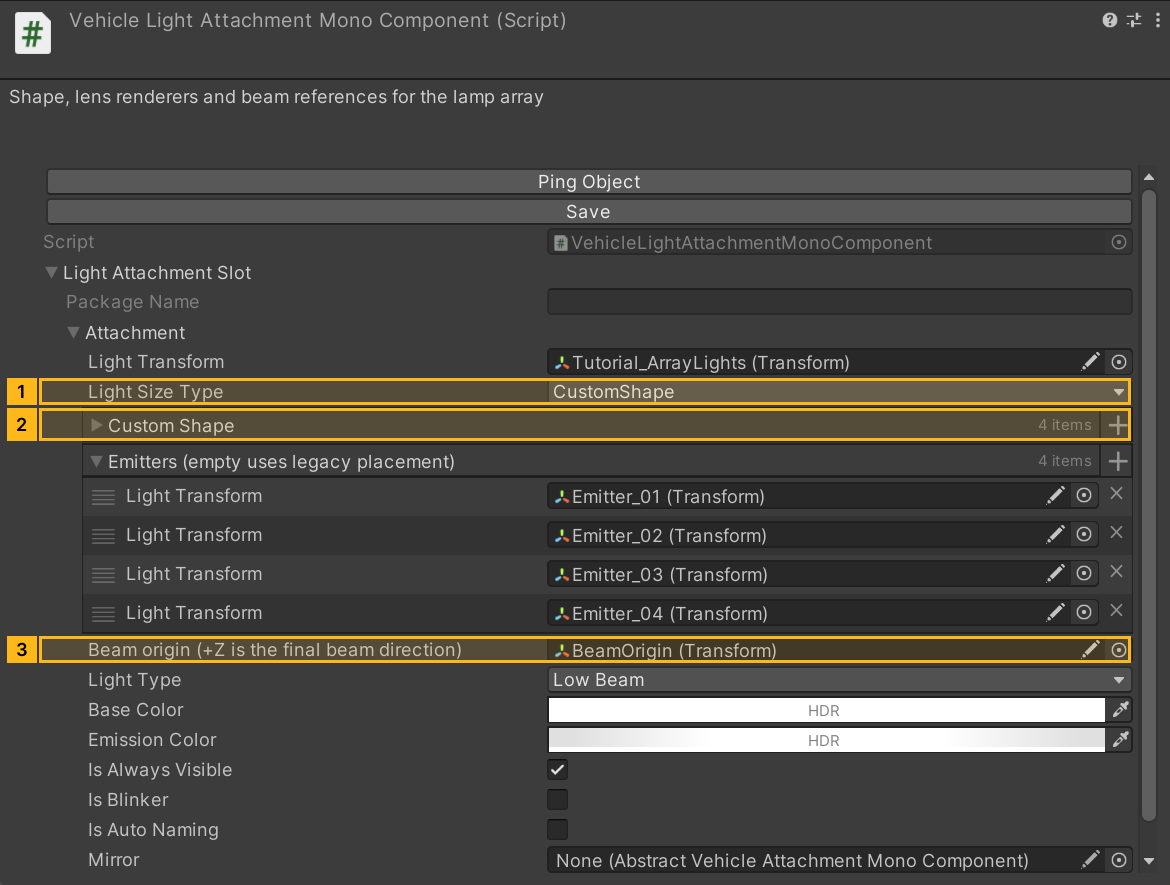
Then set lightSizeType (灯光大小类型 / Light Size Type) to CustomShape. Circle and HalfCircle use radiusSize, RectSmall, RectMiddle and RectLarge use rectSize, and CustomShape uses customShapeRenderers.
Click to expand MCP actionsClick to collapse MCP actions
[
  {
    "tool": "inspect",
    "arguments": {
      "path": "asset:${light}/GetComponent(ShanghaiWindy.Core.VehicleAttachmentMonoComponent)/attachmentSlotType"
    },
    "expect": {
      "contains": "Specific"
    }
  },
  {
    "tool": "inspect",
    "arguments": {
      "path": "asset:${light}/GetComponent(ShanghaiWindy.Core.VehicleLightAttachmentMonoComponent)/lightAttachmentSlot/attachment/lightSizeType"
    },
    "expect": {
      "contains": "CustomShape"
    }
  }
]
2. Aim the light and set the type
The Array4 sample uses four lens renderers, four emitter transforms and one beam origin. lensEmitters carries the label 发光点(留空沿用旧配置) / Emitters (empty uses legacy placement). Use up to eight unique child transforms under lightTransform, keep glareScale and glareWeight finite and non-negative with a positive total weight, and give each lens one material and one submesh when you fill emitters explicitly. Place emitters at the lamp faces and use local +Z as the forward direction.
beamOrigin carries the label 光束节点(+Z 为最终出光方向) / Beam origin (+Z is the final beam direction). It is an optional child node, so orient the arrows in Scene View to confirm the final beam direction.
Set lightType (灯光类型 / Light Type) to LowBeam, HighBeam, PositionLight, BrakeLight, ReverseLight, LeftBlinker or RightBlinker. Fill colors with Set From Preset when the interface offers it, and keep baseColor and emissionColor separate. isBlinker exposes a frequency and an on fraction, so frequency 1 with fraction 0.5 produces half a second on per second. CustomShape offers a preview for lights on and off.
Click to expand MCP actionsClick to collapse MCP actions
[
  {
    "tool": "inspect",
    "arguments": {
      "path": "asset:${light}/GetComponent(ShanghaiWindy.Core.VehicleLightAttachmentMonoComponent)/lightAttachmentSlot/attachment/beamOrigin"
    }
  },
  {
    "tool": "inspect",
    "arguments": {
      "path": "asset:${light}/GetComponent(ShanghaiWindy.Core.VehicleLightAttachmentMonoComponent)/lightAttachmentSlot/attachment/lensEmitters"
    }
  }
]
3. Test and diagnose
Save and repack the mod, then drive in a dim test scene and compare switchable beams, brake and reverse lights, and the indicators using the assigned controls. If a lens glows but the beam points the wrong way, check the local +Z direction of beamOrigin. If no light appears, check the slot, renderer, material and child references in the actual mod prefab before you adjust HDR.
This workflow has two stages: the editor recipe checks the asset wiring, and a player session verifies runtime behavior.
Click to expand MCP actionsClick to collapse MCP actions
[
  {
    "tool": "inspect",
    "arguments": {
      "path": "asset:${light}/GetComponent(ShanghaiWindy.Core.VehicleLightAttachmentMonoComponent)/lightAttachmentSlot/attachment/lightType"
    }
  }
]
Click to expand MCP actionsClick to collapse MCP actions
Runtime test pending. Use the index of VehicleLightManagementAttachment from the component listing. Toggle the beam, then observe the rendered lighting in a night scene.
[
  {
    "tool": "runtime_status",
    "arguments": {}
  },
  {
    "tool": "inspect",
    "arguments": {
      "path": "entity/${tankEntityId}"
    }
  },
  {
    "tool": "invoke",
    "arguments": {
      "path": "entity/${tankEntityId}/${lightComponentIndex}/ToggleBeam",
      "args": []
    }
  },
  {
    "tool": "inspect",
    "arguments": {
      "path": "entity/${tankEntityId}/${lightComponentIndex}/IsBeamOn"
    }
  }
]