坦克灯光设置
中文 | English
在仓库根目录运行以下命令,用本机 Unity MCP 回放本页示例。 命令也会重拍两种语言的配图。
python Docs/Manual/manual/tools/tutorials.py run tank-light-settings --capture
点击展开 MCP 操作点击收起 MCP 操作
准备教学样例。${变量} 由配方提供。
{
  "variables": {
    "light": "${fixture}/Tutorial_ArrayLights.prefab"
  },
  "calls": [
    {
      "tool": "invoke",
      "arguments": {
        "path": "static:UnityEditor.AssetDatabase/CreateFolder",
        "args": [
          "${fixtureParent}",
          "${folder}"
        ]
      },
      "expect": {
        "contains": "(String)"
      }
    },
    {
      "tool": "invoke",
      "arguments": {
        "path": "static:UnityEditor.AssetDatabase/CopyAsset",
        "args": [
          "Packages/com.shanghaiwindy.coreresources/Light/AuthoringSamples/Array4.prefab",
          "${light}"
        ]
      },
      "expect": {
        "contains": "True"
      }
    }
  ]
}
本指南面向已经做出基础坦克的玩家,说明如何在 Unity 中为坦克安装车灯、配置光束与灯光类型,并在游戏中验证效果。
1. 用 CustomShape 安装灯具
在 MainBody 下为左灯和右灯各建立一个独立的子节点,不要把两盏灯挂在同一个节点上。每盏灯的根节点需要添加 VehicleLightAttachmentMonoComponent,同时添加 VehicleAttachmentMonoComponent,把 attachmentSlotType 设为 Specific,并将 specificAttachmentMonoComponent 指向前面那个组件。自定义编辑器在绘制灯节点时会自动补上配套组件,保存前请确认该链接确实存在。
接下来配置挂点数据。在 lightAttachmentSlot.attachment.lightTransform(灯光位置 / Light Transform)中指定灯的挂点变换。
多镜头灯具可以先使用我们提供的 Array4 示例作为教学参考,也可以在 lightTransform 下自行创建多个 LensSurface 子节点,每个子节点使用 MeshFilter 与 MeshRenderer,并挂上灯罩材质。单灯的预设、复制和镜像操作见车灯组件。
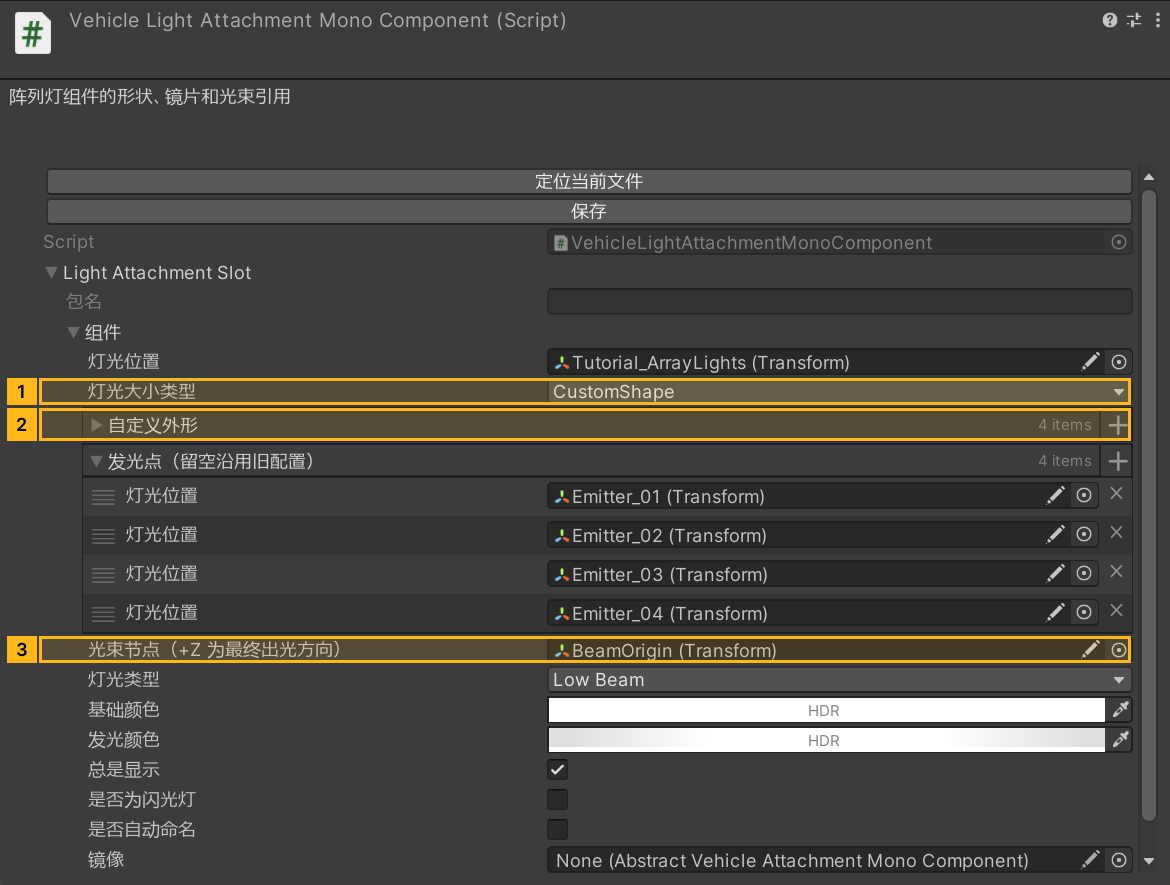
然后设置 lightSizeType(灯光大小类型 / Light Size Type)为 CustomShape。Circle 与 HalfCircle 使用 radiusSize,RectSmall、RectMiddle、RectLarge 使用 rectSize,CustomShape 使用 customShapeRenderers。
点击展开 MCP 操作点击收起 MCP 操作
[
  {
    "tool": "inspect",
    "arguments": {
      "path": "asset:${light}/GetComponent(ShanghaiWindy.Core.VehicleAttachmentMonoComponent)/attachmentSlotType"
    },
    "expect": {
      "contains": "Specific"
    }
  },
  {
    "tool": "inspect",
    "arguments": {
      "path": "asset:${light}/GetComponent(ShanghaiWindy.Core.VehicleLightAttachmentMonoComponent)/lightAttachmentSlot/attachment/lightSizeType"
    },
    "expect": {
      "contains": "CustomShape"
    }
  }
]
2. 瞄准方向与设置类型
Array4 示例使用四个镜头渲染器、四个发光点变换和一个光束起点。lensEmitters 的标签是 发光点(留空沿用旧配置) / Emitters (empty uses legacy placement)。最多使用 lightTransform 下的八个唯一子变换,glareScale 与 glareWeight 必须是有限的非负值,权重总和为正,显式填写发光点时每个镜头需要一个材质与一个子网格。请把发光点放在灯面位置,并使用本地 +Z 作为朝向。
beamOrigin 的标签是 光束节点(+Z 为最终出光方向) / Beam origin (+Z is the final beam direction),它是可选的子节点,请在 Scene View 中调整箭头方向以确认最终出光方向。
若灯具使用自带反光面,可先关闭 始终显示 校对熄灯外观,再使用 Inspector 的亮灯预览检查发光材质。
接着设置 lightType(灯光类型 / Light Type),可选 LowBeam、HighBeam、PositionLight、BrakeLight、ReverseLight、LeftBlinker、RightBlinker。颜色可借助 Set From Preset 填充(若界面提供该按钮),baseColor 与 emissionColor 请分别设置。isBlinker 会暴露频率与亮起占比,频率 1 与占比 0.5 表示每秒亮半秒。CustomShape 提供灯光开启与关闭的预览功能。
点击展开 MCP 操作点击收起 MCP 操作
[
  {
    "tool": "inspect",
    "arguments": {
      "path": "asset:${light}/GetComponent(ShanghaiWindy.Core.VehicleLightAttachmentMonoComponent)/lightAttachmentSlot/attachment/beamOrigin"
    }
  },
  {
    "tool": "inspect",
    "arguments": {
      "path": "asset:${light}/GetComponent(ShanghaiWindy.Core.VehicleLightAttachmentMonoComponent)/lightAttachmentSlot/attachment/lensEmitters"
    }
  }
]
3. 测试与排错
保存并重新打包模组,然后在较暗的测试场景中驾驶坦克,用已分配的按键逐项对比可切换远光与近光、刹车灯与倒车灯以及左右转向灯。若镜头正常发亮但光束方向错误,请检查 beamOrigin 的本地 +Z 方向。若完全没有灯光,请先确认实际模组 prefab 中的挂点、渲染器、材质与子节点引用,再考虑调整 HDR。
这套流程分为两步:编辑器中的配方用于检查资源连接,玩家实际驾驶用于确认运行时表现。
点击展开 MCP 操作点击收起 MCP 操作
[
  {
    "tool": "inspect",
    "arguments": {
      "path": "asset:${light}/GetComponent(ShanghaiWindy.Core.VehicleLightAttachmentMonoComponent)/lightAttachmentSlot/attachment/lightType"
    }
  }
]
点击展开 MCP 操作点击收起 MCP 操作
运行时未执行。根据组件列表填入 VehicleLightManagementAttachment 的索引。发出切灯命令后,到夜间场景观察实际照明。
[
  {
    "tool": "runtime_status",
    "arguments": {}
  },
  {
    "tool": "inspect",
    "arguments": {
      "path": "entity/${tankEntityId}"
    }
  },
  {
    "tool": "invoke",
    "arguments": {
      "path": "entity/${tankEntityId}/${lightComponentIndex}/ToggleBeam",
      "args": []
    }
  },
  {
    "tool": "inspect",
    "arguments": {
      "path": "entity/${tankEntityId}/${lightComponentIndex}/IsBeamOn"
    }
  }
]