Tank turret traverse, elevation and stabilizers
中文 | English
Run this command at the repository root to replay the examples through the local Unity MCP. The command also captures screenshots in both languages.
python Docs/Manual/manual/tools/tutorials.py run tank-turret-settings --capture
Click to expand MCP actionsClick to collapse MCP actions
Prepare the teaching sample. The recipe provides ${variables}.
{
  "variables": {
    "text": "${fixture}/Tutorial_TurretVehicleText.asset",
    "model": "${fixture}/Tutorial_TurretModel.prefab"
  },
  "calls": [
    {
      "tool": "invoke",
      "arguments": {
        "path": "static:UnityEditor.AssetDatabase/CreateFolder",
        "args": [
          "${fixtureParent}",
          "${folder}"
        ]
      },
      "expect": {
        "contains": "(String)"
      }
    },
    {
      "tool": "invoke",
      "arguments": {
        "path": "static:UnityEditor.AssetDatabase/CopyAsset",
        "args": [
          "Packages/com.shanghaiwindy.coreresources/Editor/DocumentationSamples/vehicle-basics/Tutorial_NativeText.asset",
          "${text}"
        ]
      },
      "expect": {
        "contains": "True"
      }
    },
    {
      "tool": "invoke",
      "arguments": {
        "path": "static:UnityEditor.AssetDatabase/CopyAsset",
        "args": [
          "Packages/com.shanghaiwindy.coreresources/Editor/DocumentationSamples/vehicle-basics/Tutorial_NativePackModel.prefab",
          "${model}"
        ]
      },
      "expect": {
        "contains": "True"
      }
    }
  ]
}
Start with the main gun model from the first-tank guide. Set up the turret and gun pivots first, then configure traverse, elevation and stabilizers.
1. Set up the main gun hierarchy
- Create
Turret → Gun → Dymbelow the visual model root. Parent the turret mesh toTurretand the recoiling barrel mesh toDym. Put the turret pivot on the turret ring and theGunpivot at the elevation axis.Dymmoves with recoil. - Check model axes, with local +Z forward and +Y up. Place
FFPoint,EffectStartand the gunner camera reference as in the main model setup. Rotate and elevate the model by hand to check that the muzzle and reference points follow their intended parts. - Inspect the generated prefab. The assembler names the runtime nodes
TurretTransform,GunTransform, andGunDym. KeepTurret/Gun/Dymin the source model for the next build. Bind secondary turrets separately using the multi-turret data.
Click to expand MCP actionsClick to collapse MCP actions
[
  {
    "tool": "inspect",
    "arguments": {
      "path": "asset:${model}/Turret/name"
    },
    "expect": {
      "contains": "Turret"
    }
  },
  {
    "tool": "inspect",
    "arguments": {
      "path": "asset:${model}/Turret/Gun/name"
    },
    "expect": {
      "contains": "Gun"
    }
  },
  {
    "tool": "inspect",
    "arguments": {
      "path": "asset:${model}/Turret/Gun/Dym/name"
    },
    "expect": {
      "contains": "Dym"
    }
  }
]
2. Set traverse, stabilization and limits
Open the Turret tab of VehicleTextData. With no Shared Turret Data (sharedTurretData) assigned, edit Turret Params (MTParameter). With a shared asset assigned, open it and edit turretParameter. Duplicate the shared asset first to tune one vehicle.
| Field | Teaching values and purpose |
|---|---|
maxTurretAngle |
180° allows 180° on either side. A value of 45° allows 45° on either side. |
isNonSymmetricTurret |
Enables separate maxTurretNegativeAngle and maxTurretPositiveAngle, for example −30° and +45°. |
UpMaxDegree, DownMaxDegree |
Use 20° and 6° on the teaching tank. For a normal setup, enter depression as a positive magnitude, so 6° permits six degrees down. |
turretDegreesPerSecond, gunDegreesPerSecond |
Set 18°/s for horizontal traverse and 12°/s for elevation. |
offset |
Horizontal offset. Keep 0° when the turret's zero pose already faces forward. |
ffPointAlignType |
Selects the aiming alignment reference, the Gun root or the recoiling Dym barrel. Keep the working setup for the first test and compare the resulting muzzle direction. |
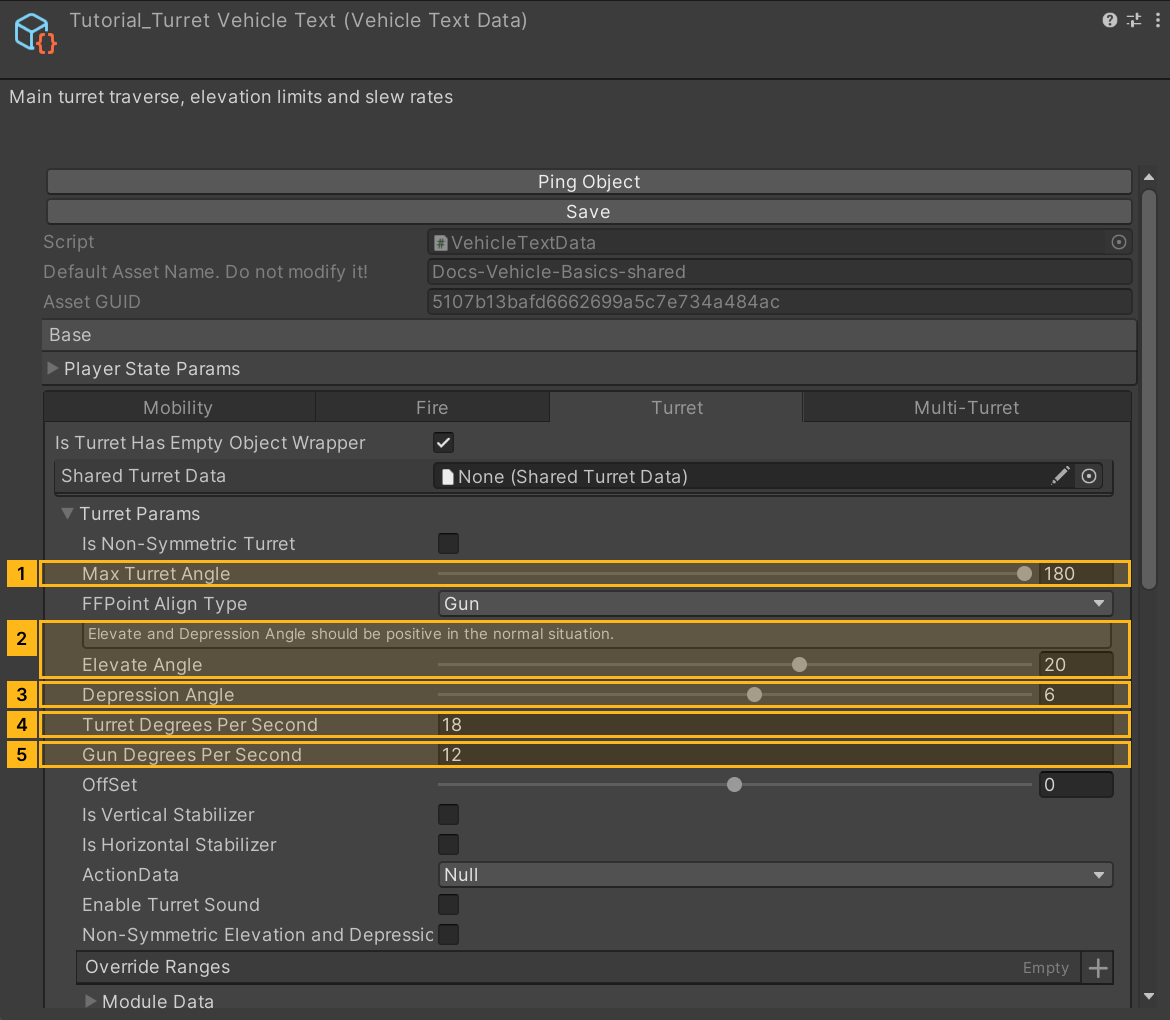
To clear the engine deck or another fixture, add an Override Range for that sector. Symmetric ranges mirror on both sides. Enable asymmetric override ranges for separate sectors, then fill in their start and end azimuths and the elevation and depression available inside each. Aim across the boundary to test how the limits change.
The vertical stabilizer has its own speed, elevation and depression limits. The horizontal stabilizer has its own speed and angle. Verify the base limits first. Enable stabilization and compare while moving. In module mode, moduleData.hasOverride can select separate traverse and elevation rates. See the fixed-mount and suspension guide for casemates, hull-assisted traverse and hydraulic suspension.
Click to expand MCP actionsClick to collapse MCP actions
[
  {
    "tool": "inspect_set",
    "arguments": {
      "path": "asset:${text}/MTParameter/maxTurretAngle",
      "value": "180"
    },
    "expect": {
      "contains": "OK:"
    }
  },
  {
    "tool": "inspect",
    "arguments": {
      "path": "asset:${text}/MTParameter/maxTurretAngle"
    },
    "expect": {
      "contains": "180"
    }
  },
  {
    "tool": "inspect_set",
    "arguments": {
      "path": "asset:${text}/MTParameter/UpMaxDegree",
      "value": "20"
    },
    "expect": {
      "contains": "OK:"
    }
  },
  {
    "tool": "inspect",
    "arguments": {
      "path": "asset:${text}/MTParameter/UpMaxDegree"
    },
    "expect": {
      "contains": "20"
    }
  },
  {
    "tool": "inspect_set",
    "arguments": {
      "path": "asset:${text}/MTParameter/DownMaxDegree",
      "value": "6"
    },
    "expect": {
      "contains": "OK:"
    }
  },
  {
    "tool": "inspect",
    "arguments": {
      "path": "asset:${text}/MTParameter/DownMaxDegree"
    },
    "expect": {
      "contains": "6"
    }
  },
  {
    "tool": "inspect_set",
    "arguments": {
      "path": "asset:${text}/MTParameter/turretDegreesPerSecond",
      "value": "18"
    },
    "expect": {
      "contains": "OK:"
    }
  },
  {
    "tool": "inspect",
    "arguments": {
      "path": "asset:${text}/MTParameter/turretDegreesPerSecond"
    },
    "expect": {
      "contains": "18"
    }
  },
  {
    "tool": "inspect_set",
    "arguments": {
      "path": "asset:${text}/MTParameter/gunDegreesPerSecond",
      "value": "12"
    },
    "expect": {
      "contains": "OK:"
    }
  },
  {
    "tool": "inspect",
    "arguments": {
      "path": "asset:${text}/MTParameter/gunDegreesPerSecond"
    },
    "expect": {
      "contains": "12"
    }
  }
]
3. Test the turret and muzzle
Save and rebuild. Stop on level ground and aim at both ends of the travel. A limited turret should stop at its configured bounds. Compare traverse and elevation rates. Use high and low targets to verify the muzzle orientation and elevation limits. Enable stabilization and repeat while turning and driving over rough ground. Fire once and watch the recoil, armor hitboxes and muzzle effect follow their parts.
- If the turret never moves, check the source hierarchy, effective limits and rates, and the shared asset.
- If the model rotates while the sight points elsewhere, check pivot axes, horizontal offset and
FFPoint. - If parts clip, check sector limits and hitbox grouping. Regenerate the prefab after changing the visual hierarchy.
Click to expand MCP actionsClick to collapse MCP actions
[
  {
    "tool": "inspect",
    "arguments": {
      "path": "asset:${text}/MTParameter/maxTurretAngle"
    },
    "expect": {
      "contains": "180"
    }
  }
]
Click to expand MCP actionsClick to collapse MCP actions
Runtime test pending. Use the entity ID to discover the index of VehicleInitSystem. Read the effective parameters and observe traverse and muzzle direction in the range.
[
  {
    "tool": "runtime_status",
    "arguments": {}
  },
  {
    "tool": "inspect",
    "arguments": {
      "path": "entity/${tankEntityId}"
    }
  },
  {
    "tool": "inspect",
    "arguments": {
      "path": "entity/${tankEntityId}/${vehicleComponentIndex}/CurMainTurretParam"
    }
  }
]